Edit Mode
Edit Control
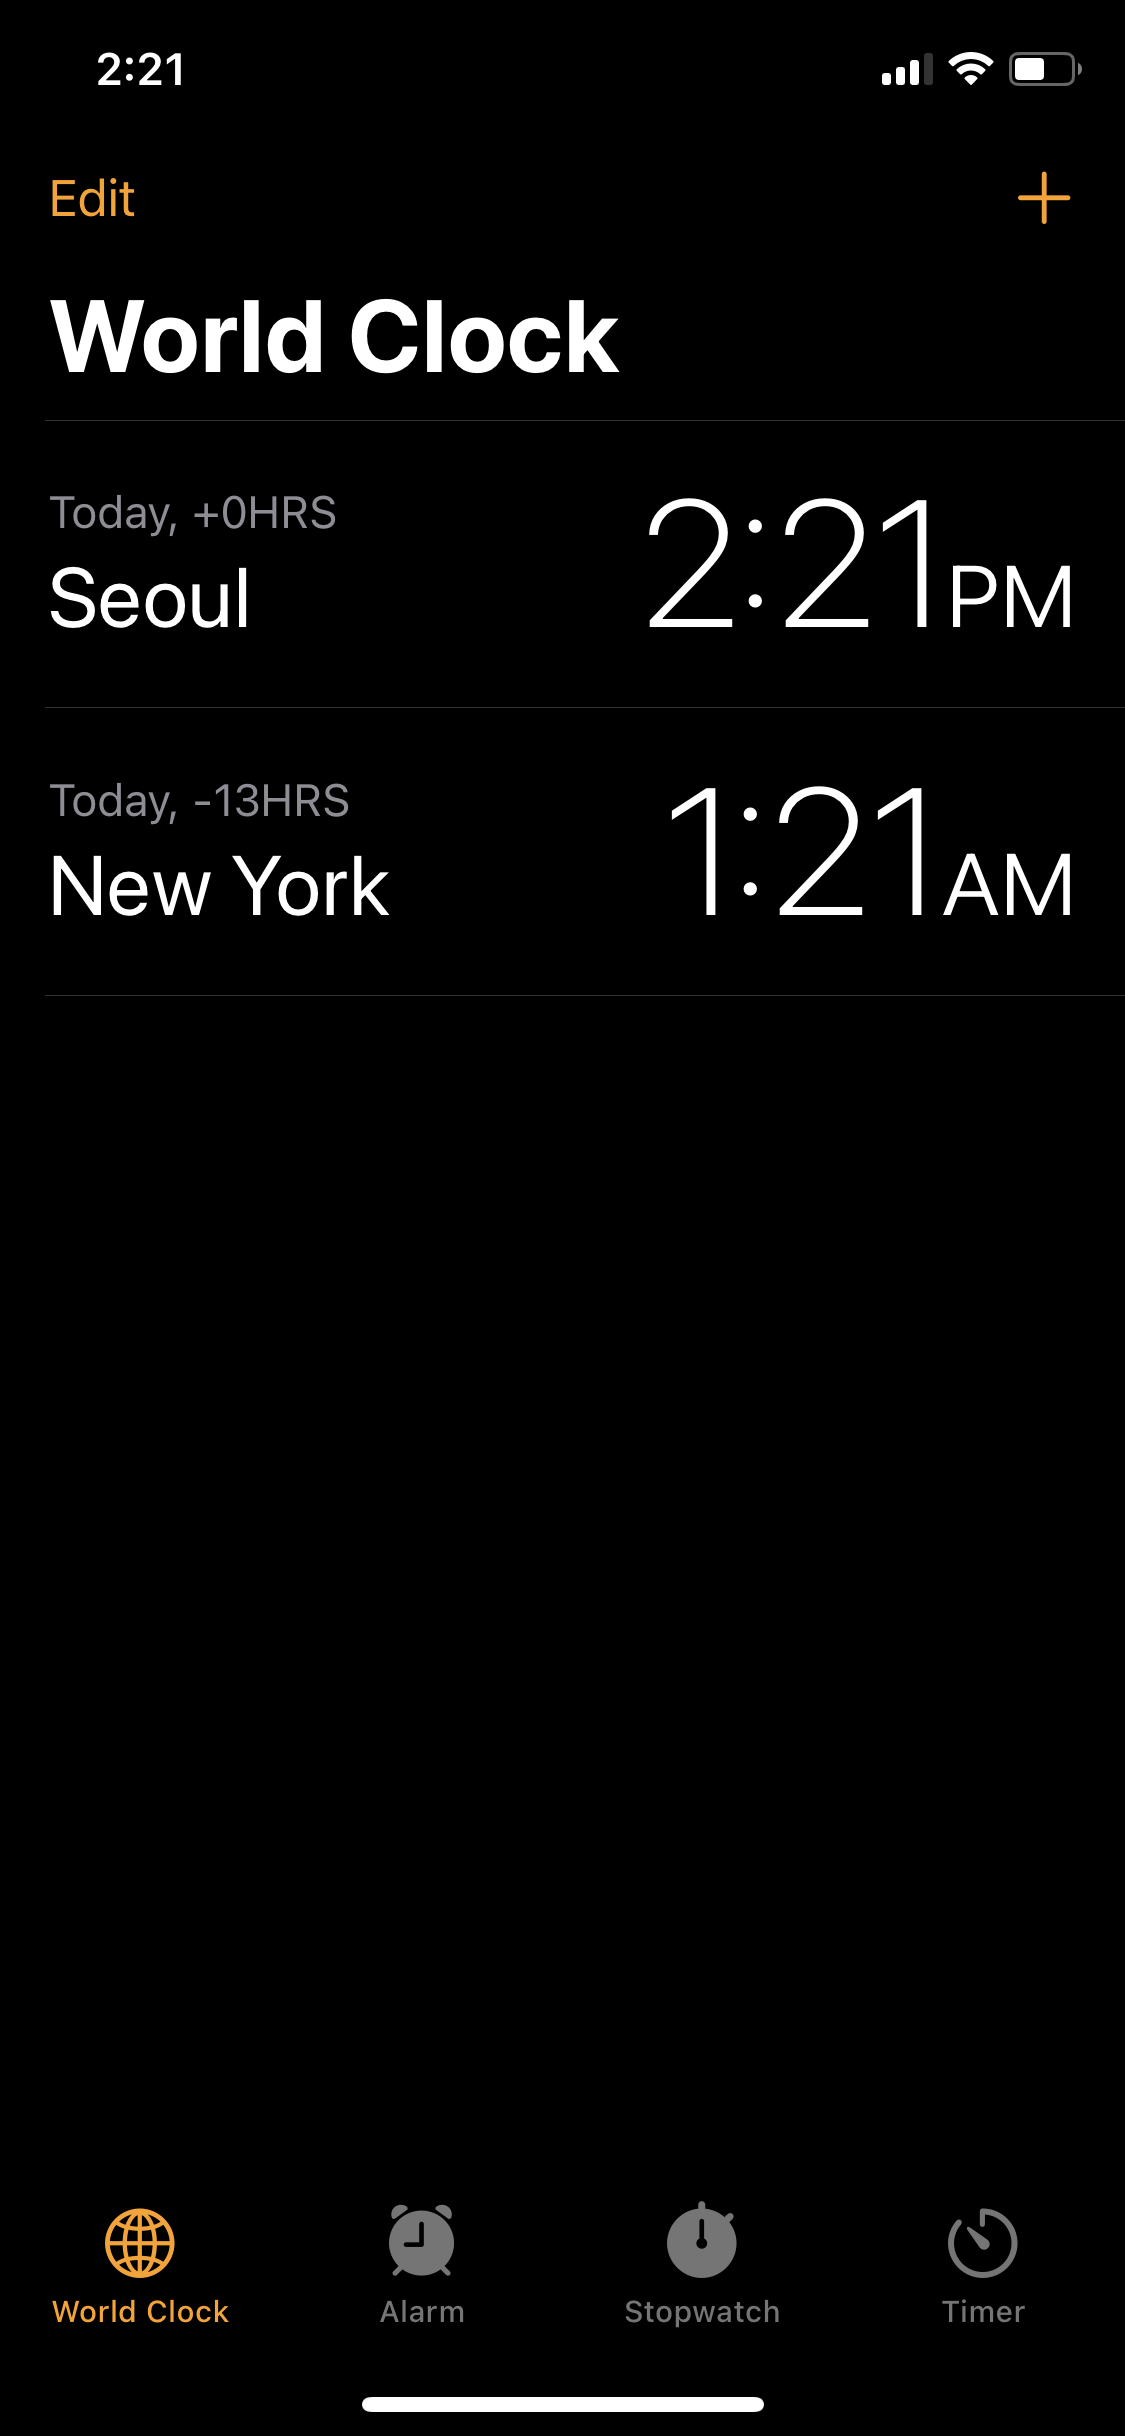
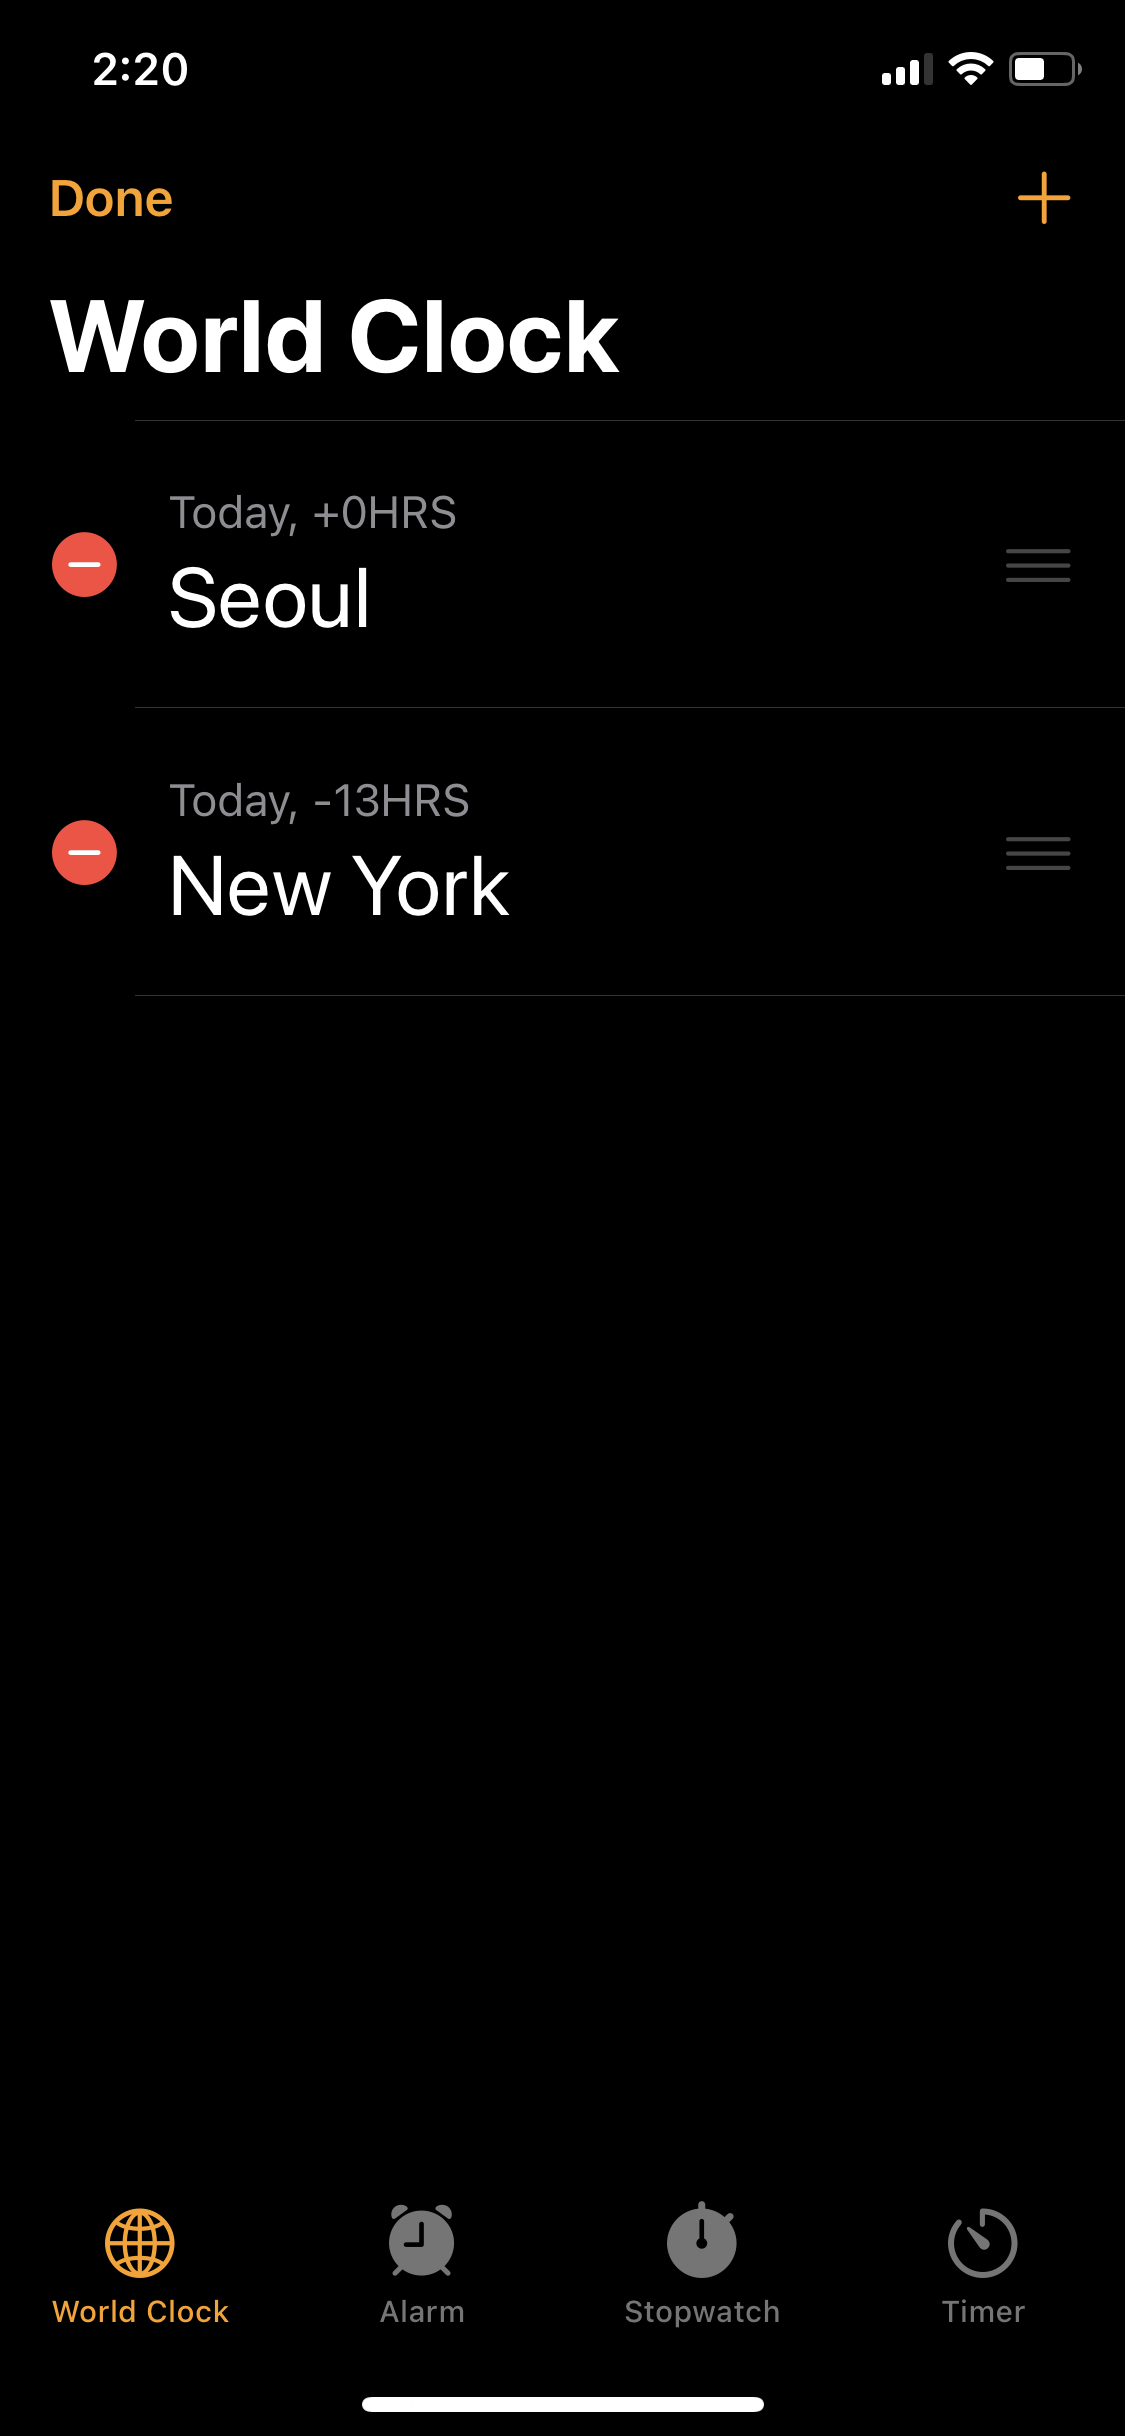
시계 앱에서 좌상단의 Edit을 터치하면 오른쪽의 편집 모드로 전환된다.
편집 모드에선 셀을 추가하거나 삭제할 수 있고, 순서를 변경할 수도 있다.
셀의 좌측엔 Edit Control이 표시되고, 지금처럼 삭제 버튼이 표시되거나 추가 버튼을 표시할 수 있다.
셀의 우측엔 Reorder Control이 표시되고, 해당 부분을 드래그 하여 원하는 순서로 변경할 수 있다.
편집 모드에서의 작업 종류는 메소드 구현에 의해 결정된다.
삭제 등의 기능을 구현하고자 한다면 연관된 delegate 메서드를 구현해야 하고,
구현하지 않는다면 해당 컨트롤이 표시되지 않는다.
Swipe to Delete
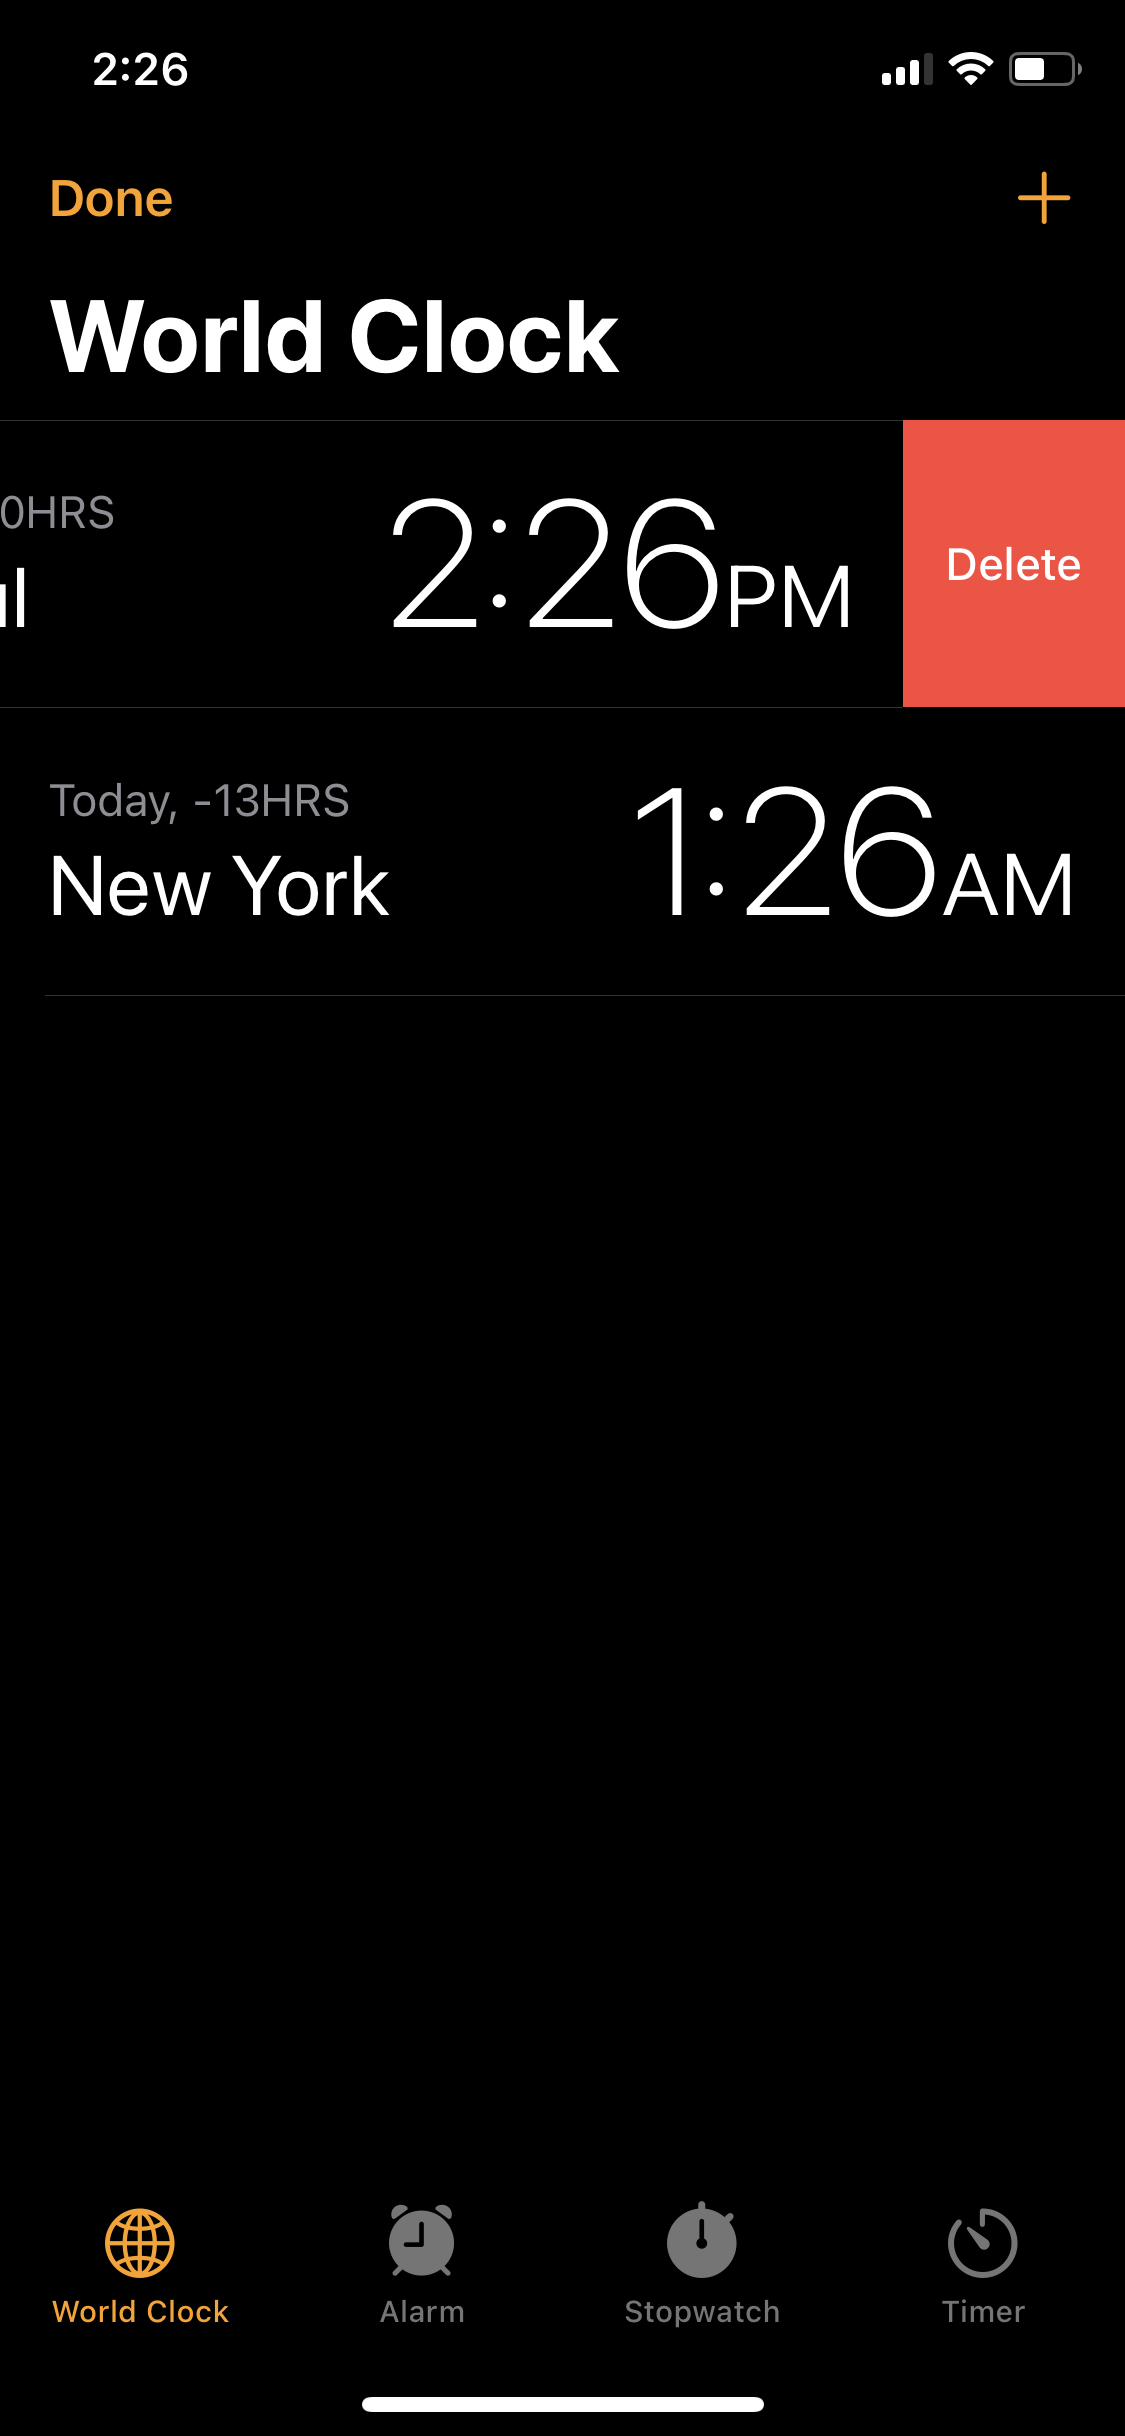
swipe 하여 표시할 수 있는 삭제 기능은 Swipe to delete라고 부른다.
보통은 좌측과 같이 삭제 버튼 하나만 표시되지만 editing action을 추가하면 우측과 같이 여러 버튼을 표시할 수 있다.
또한 iOS 11부터는 우측뿐만이 아닌 셀 양쪽에 액션을 추가할 수 있다.
tableView가 편집 모드인 상태에서 탭이나 스와이프 등의 상호작용을 통해 편집 기능을 사용하지만,
tableView가 제공하는 API를 사용하면 편집 모드 활성화 여부에 관계 없이 편집기능을 사용할 수 있다.
EditMode Control


//
// EditModeViewController.swift
// TableViewPractice
//
// Created by Martin.Q on 2021/09/30.
//
import UIKit
class EditModeViewController: UIViewController {
var editSwitch: UISwitch!
@IBOutlet weak var tableView: UITableView!
var productList = ["iMac Pro", "iMac 5K", "Macbook Pro", "iPad Pro", "iPhone X", "Mac mini", "Apple TV", "Apple Watch"]
var selectedList = [String]()
@objc func editMode(_ sender: UISwitch) {
}
@objc func emptySelectedList() {
}
override func viewDidLoad() {
super.viewDidLoad()
editSwitch = UISwitch(frame: .zero)
editSwitch.addTarget(self, action: #selector(editMode(_:)), for: .valueChanged)
let deleteBtn = UIBarButtonItem(barButtonSystemItem: .trash, target: self, action: #selector(emptySelectedList))
deleteBtn.tintColor = UIColor.red
navigationItem.rightBarButtonItems = [deleteBtn, UIBarButtonItem(customView: editSwitch)]
}
}
extension EditModeViewController: UITableViewDataSource {
func numberOfSections(in tableView: UITableView) -> Int {
return 2
}
func tableView(_ tableView: UITableView, numberOfRowsInSection section: Int) -> Int {
switch section {
case 0:
return selectedList.count
case 1:
return productList.count
default:
return 0
}
}
func tableView(_ tableView: UITableView, cellForRowAt indexPath: IndexPath) -> UITableViewCell {
let cell = tableView.dequeueReusableCell(withIdentifier: "cell", for: indexPath)
switch indexPath.section {
case 0:
cell.textLabel?.text = selectedList[indexPath.row]
case 1:
cell.textLabel?.text = productList[indexPath.row]
default:
break
}
return cell
}
func tableView(_ tableView: UITableView, titleForHeaderInSection section: Int) -> String? {
switch section {
case 0:
return "Selected List"
case 1:
return "Product List"
default:
return nil
}
}
}
extension EditModeViewController: UITableViewDelegate {
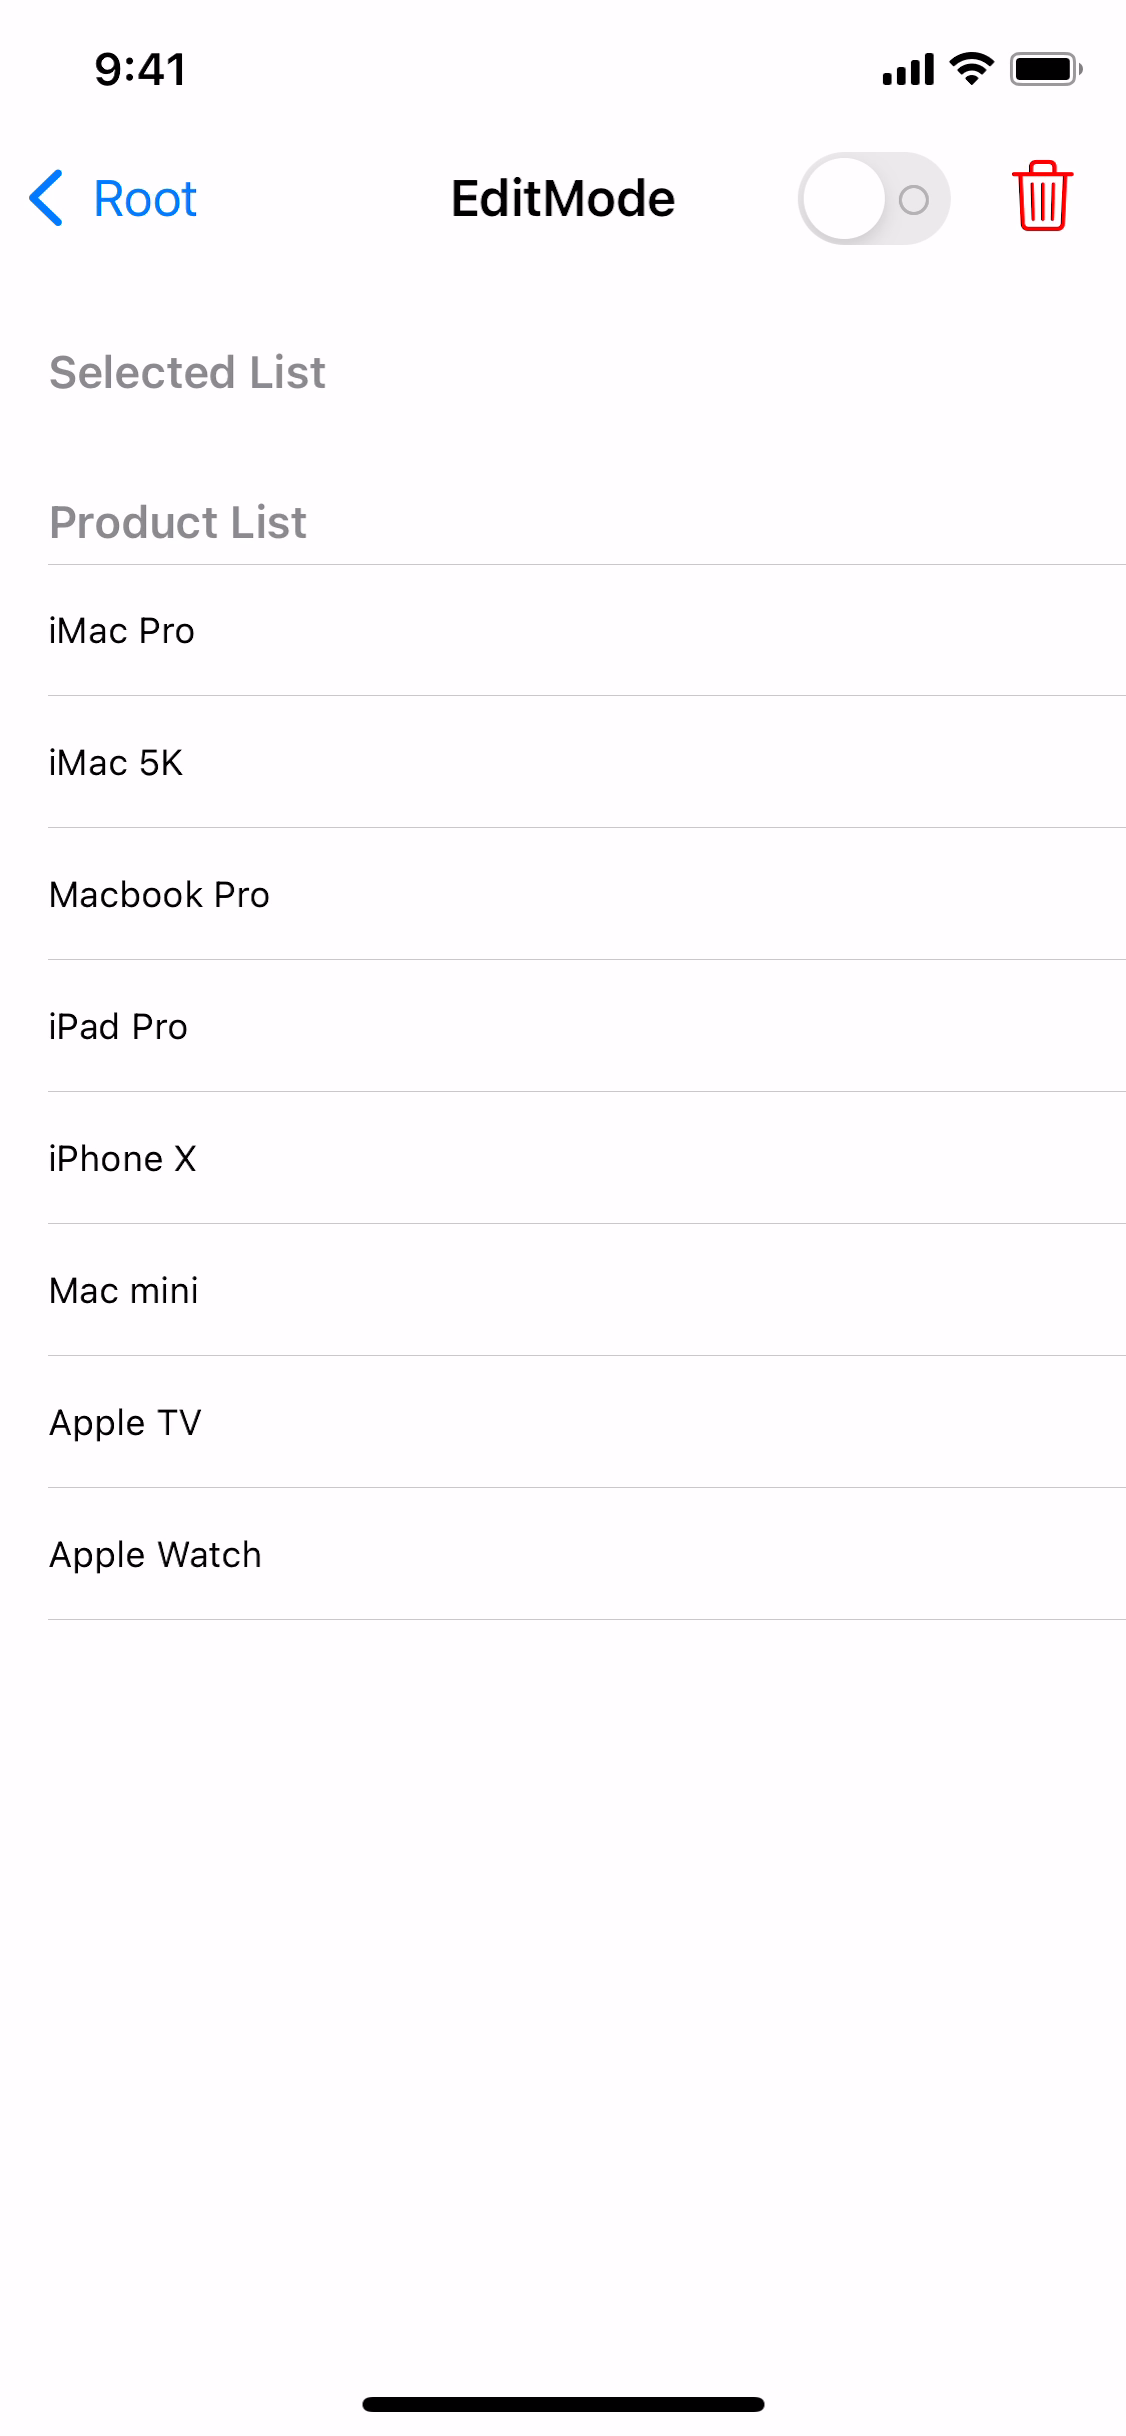
}사용할 씬과 코드는 위와 같다.
Selected List, Product List의 두 개의 section이 존재하고,
우측 상단엔 edit모드와 삭제 기능을 구현할 버튼이 추가되어있다.
override func viewDidLoad() {
	super.viewDidLoad()

	editSwitch = UISwitch(frame: .zero)
	editSwitch.addTarget(self, action: #selector(editMode(_:)), for: .valueChanged)

	let deleteBtn = UIBarButtonItem(barButtonSystemItem: .trash, target: self, action: #selector(emptySelectedList))
	deleteBtn.tintColor = UIColor.red

	navigationItem.rightBarButtonItems = [deleteBtn, UIBarButtonItem(customView: editSwitch)]

	editSwitch.isOn = tableView.isEditing

}
추가되어있는 switch의 상태에 tableView의 편집모드 상태를 동기화시키고,
@objc func editMode(_ sender: UISwitch) {
	tableView.isEditing.toggle()
}
해당 스위치에 연결된 eidtMode 메소드에서 tableView의 상태를 바꾸도록 한다.
위처럼 상태를 바로 변경해도 되지만, 애니메이션이 동작하지 않으므로 다음과 같이 작성한다.
@objc func editMode(_ sender: UISwitch) {
	tableView.setEditing(sender.isOn, animated: true)
}
스위치의 상태에 따라 편집 모드가 애니메이션과 함께 전환된다.
하지만 삭제 버튼을 터치해도 아무 반응이 없는데, 이는 삭제에 관련된 코드를 작성하지 않았기 때문이다.
tableView가 편집 모드로 전환되면 실제로 셀을 편집할 수 있는지 확인하게 된다.
func tableView(_ tableView: UITableView, canEditRowAt indexPath: IndexPath) -> Bool {
	return true
}
tableView(canEditRowAt:) 메소드를 호출하게 된다.
이 메소드가 dataSource에 구현하지 않았거나, True를 반환한다면 해당 셀을 편집할 수 있게 된다.
만약 특정 셀을 편집하지 못하도록 해야 한다면 직접 구현해야 한다.
func tableView(_ tableView: UITableView, editingStyleForRowAt indexPath: IndexPath) -> UITableViewCell.EditingStyle {

}
이후 delegate의 tableView(editingStyleForRowAt:)메소드를 호출해 편집 스타일을 결정한다.
편집 스타일은 세 가지로,
public enum EditingStyle : Int {
	case none = 0

	case delete = 1

	case insert = 2
}
셋 중에 하나를 반환해야 한다.
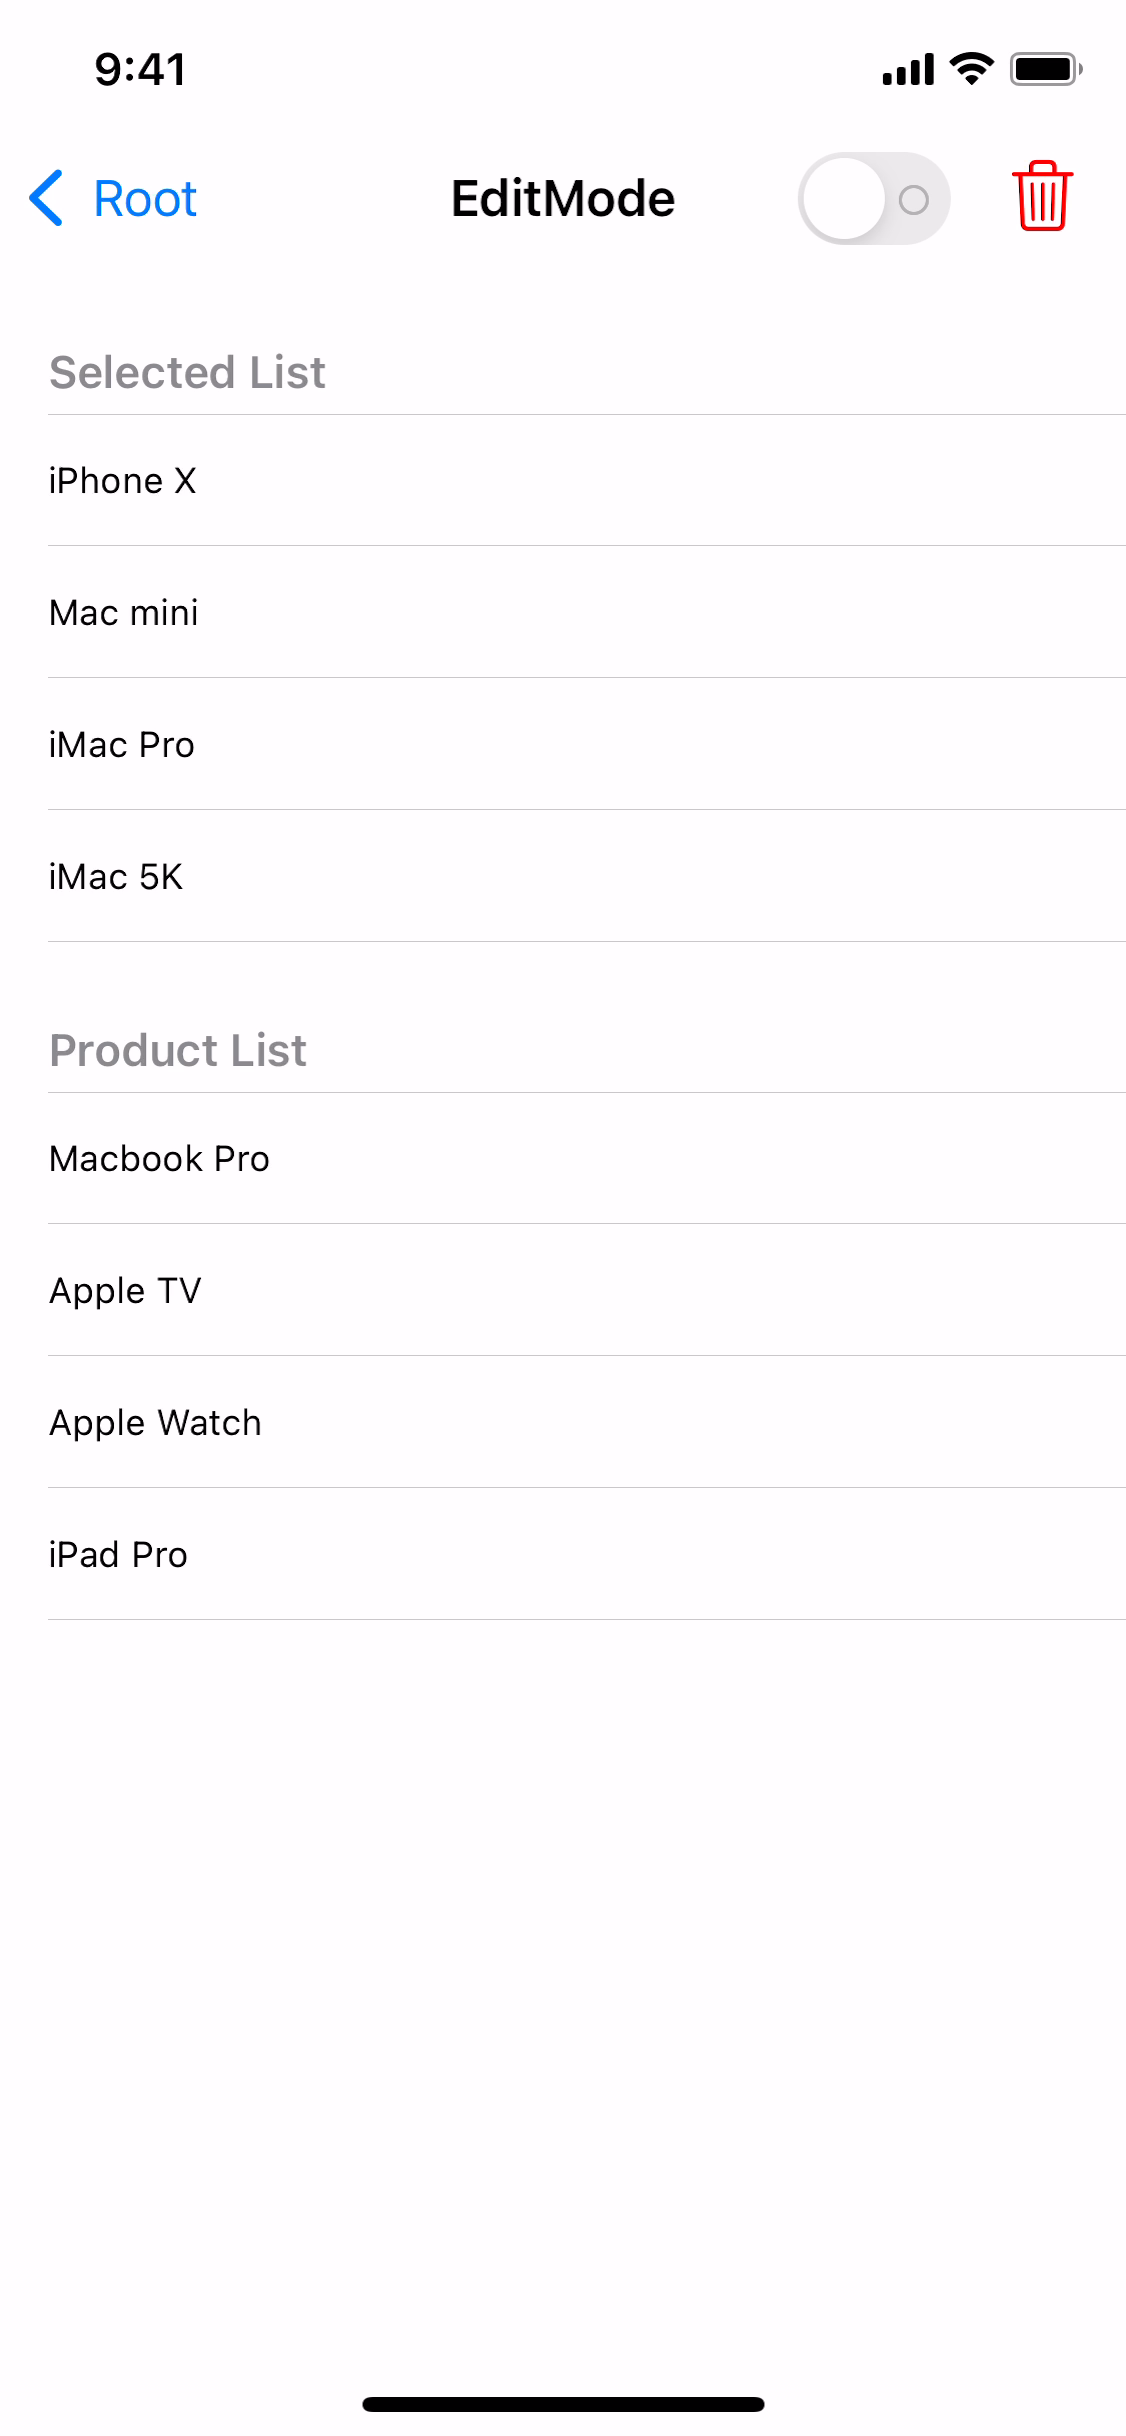
Selected List에는 제거 버튼을 표시해 삭제 후 Product List section으로 항목을 옮기고,
Product List에는 추가 버튼을 표시에 Selected List section으로 항목을 옮기도록 구현한다.
func tableView(_ tableView: UITableView, editingStyleForRowAt indexPath: IndexPath) -> UITableViewCell.EditingStyle {
	switch indexPath.section {
	case 0:
		return .delete
	case 1:
		return .insert
	default:
		return .none
	}
}
각각의 section에 맞게 분기해 적절한 스타일을 반환하도록 구현했다.
이후의 동작은 다시 dataSource에서 구현한다.
func tableView(_ tableView: UITableView, commit editingStyle: UITableViewCell.EditingStyle, forRowAt indexPath: IndexPath) {

}
사용자가 버튼을 터치하면 tableView(commit editingStyle:) 메소드가 호출된다.
파라미터에 존재하는 editingStyle을 통해 어떤 버튼인지 확인할 수 있고,
주로 버튼을 터치한 이후 데이터를 업데이트하는 용도로 사용된다.
또한 삭제와 추가는 tableView가 처리할 수 없기 때문에 모두 직접 구현해야 한다.
func tableView(_ tableView: UITableView, commit editingStyle: UITableViewCell.EditingStyle, forRowAt indexPath: IndexPath) {
	switch editingStyle {
	case .insert:
		let target = productList[indexPath.row]
		let insertIndex = IndexPath(row: selectedList.count, section: 0)

		selectedList.append(target)
		productList.remove(at: indexPath.row)

		tableView.insertRows(at: [insertIndex], with: .automatic)
		tableView.deleteRows(at: [indexPath], with: .automatic)
	case .delete:
		break
	default:
		break
	}
}
전달되는 editingStyle로 분기하여 동작을 구현한다.
insert 스타일일 경우
- productList에서 selectedList로 추가할 항목을 저장한다.
- 셀을 삽입할 IndexPath를 작성한다.
- selectedList에 항목을 추가하고, productList에서 항목을 삭제한다.
- selectedList section에 셀을 추가하고, productList section에서 셀을 삭제한다.
delete 스타일은 동일한 메커니즘으로 반대로 구현하면 된다.
Batch 메커니즘
하지만 현재 상태로는 제대로 동작하지 않는데 이유는 tableView의 셀을 추가하는 방식에 있다.
tableView에 셀을 추가할 때에는 배열에 저장되어있는 실제 숫자와 화면에 표시되는 셀의 숫자를 비교하게 된다.
지금 상태로는 selectedList와 productList를 수정한 뒤 셀을 추가하게 되고, 이때 충돌이 발생하게 된다.
func tableView(_ tableView: UITableView, commit editingStyle: UITableViewCell.EditingStyle, forRowAt indexPath: IndexPath) {
	switch editingStyle {
	case .insert:
		let target = productList[indexPath.row]
		let insertIndex = IndexPath(row: selectedList.count, section: 0)

		selectedList.append(target)
		productList.remove(at: indexPath.row)

		tableView.beginUpdates()

		tableView.insertRows(at: [insertIndex], with: .automatic)
		tableView.deleteRows(at: [indexPath], with: .automatic)

		tableList.endUpdates()
	case .delete:
		let target = selectedList[indexPath.row]
		let insertIndex = IndexPath(row: productList.count, section: 1)

		productList.append(target)
		selectedList.remove(at: indexPath.row)

		tableView.beginUpdates()

		tableView.insertRows(at: [insertIndex], with: .automatic)
		tableView.deleteRows(at: [indexPath], with: .automatic)

		tableView.endUpdate()
	default:
		break
	}
}
이러한 충돌을 방지하기 위해 셀을 추가하거나 삭제하기 직전에는 beginUpdates 메소드를 호출하고,
이후에는 endUpdates 메소드를 호출해 주는 것이 좋다.
이렇게 되면 두 메소드 사이의 코드가 batch방식으로 실행된다.
tableView가 모든 편집 내용을 동시에 적용하기 때문에 해당 문제를 회피할 수 있는 것이다.
insert, delete, reload가 포함되는 메소드를 두 개 이상 연달아 호출한다면 batch방식으로 실행해야 한다.

충돌이 사라지고 의도한 대로 동작한다.
단, selected List section은 삭제 액션이 동작하지만 product List action은 별도의 액션이 동작하지 않는다.
이는 해당 section이 insert 스타일을 가지고 있기 때문이다.
또한 슬라이드 액션이 동작할 때,
편집 모드로 진입했음에도 불구하고 switch가 반응하지 않는 것이 보인다.
해당 문제를 수정해본다.
func tableView(_ tableView: UITableView, willBeginEditingRowAt indexPath: IndexPath) {

}
func tableView(_ tableView: UITableView, didEndEditingRowAt indexPath: IndexPath?) {

}
셀에서 swipe delete가 실행되면 해당 동작이 시작되기 직전, 끝난 직후 위의 두 가지 메소드가 호출된다.
해당 메소드에서
func tableView(_ tableView: UITableView, willBeginEditingRowAt indexPath: IndexPath) {
	editSwitch.setOn(true, animated: true)
}
func tableView(_ tableView: UITableView, didEndEditingRowAt indexPath: IndexPath?) {
	editSwitch.setOn(false, animated: true)
}
스위치의 동작을 동기화해 주면

switch의 동기화 문제는 해결된다.
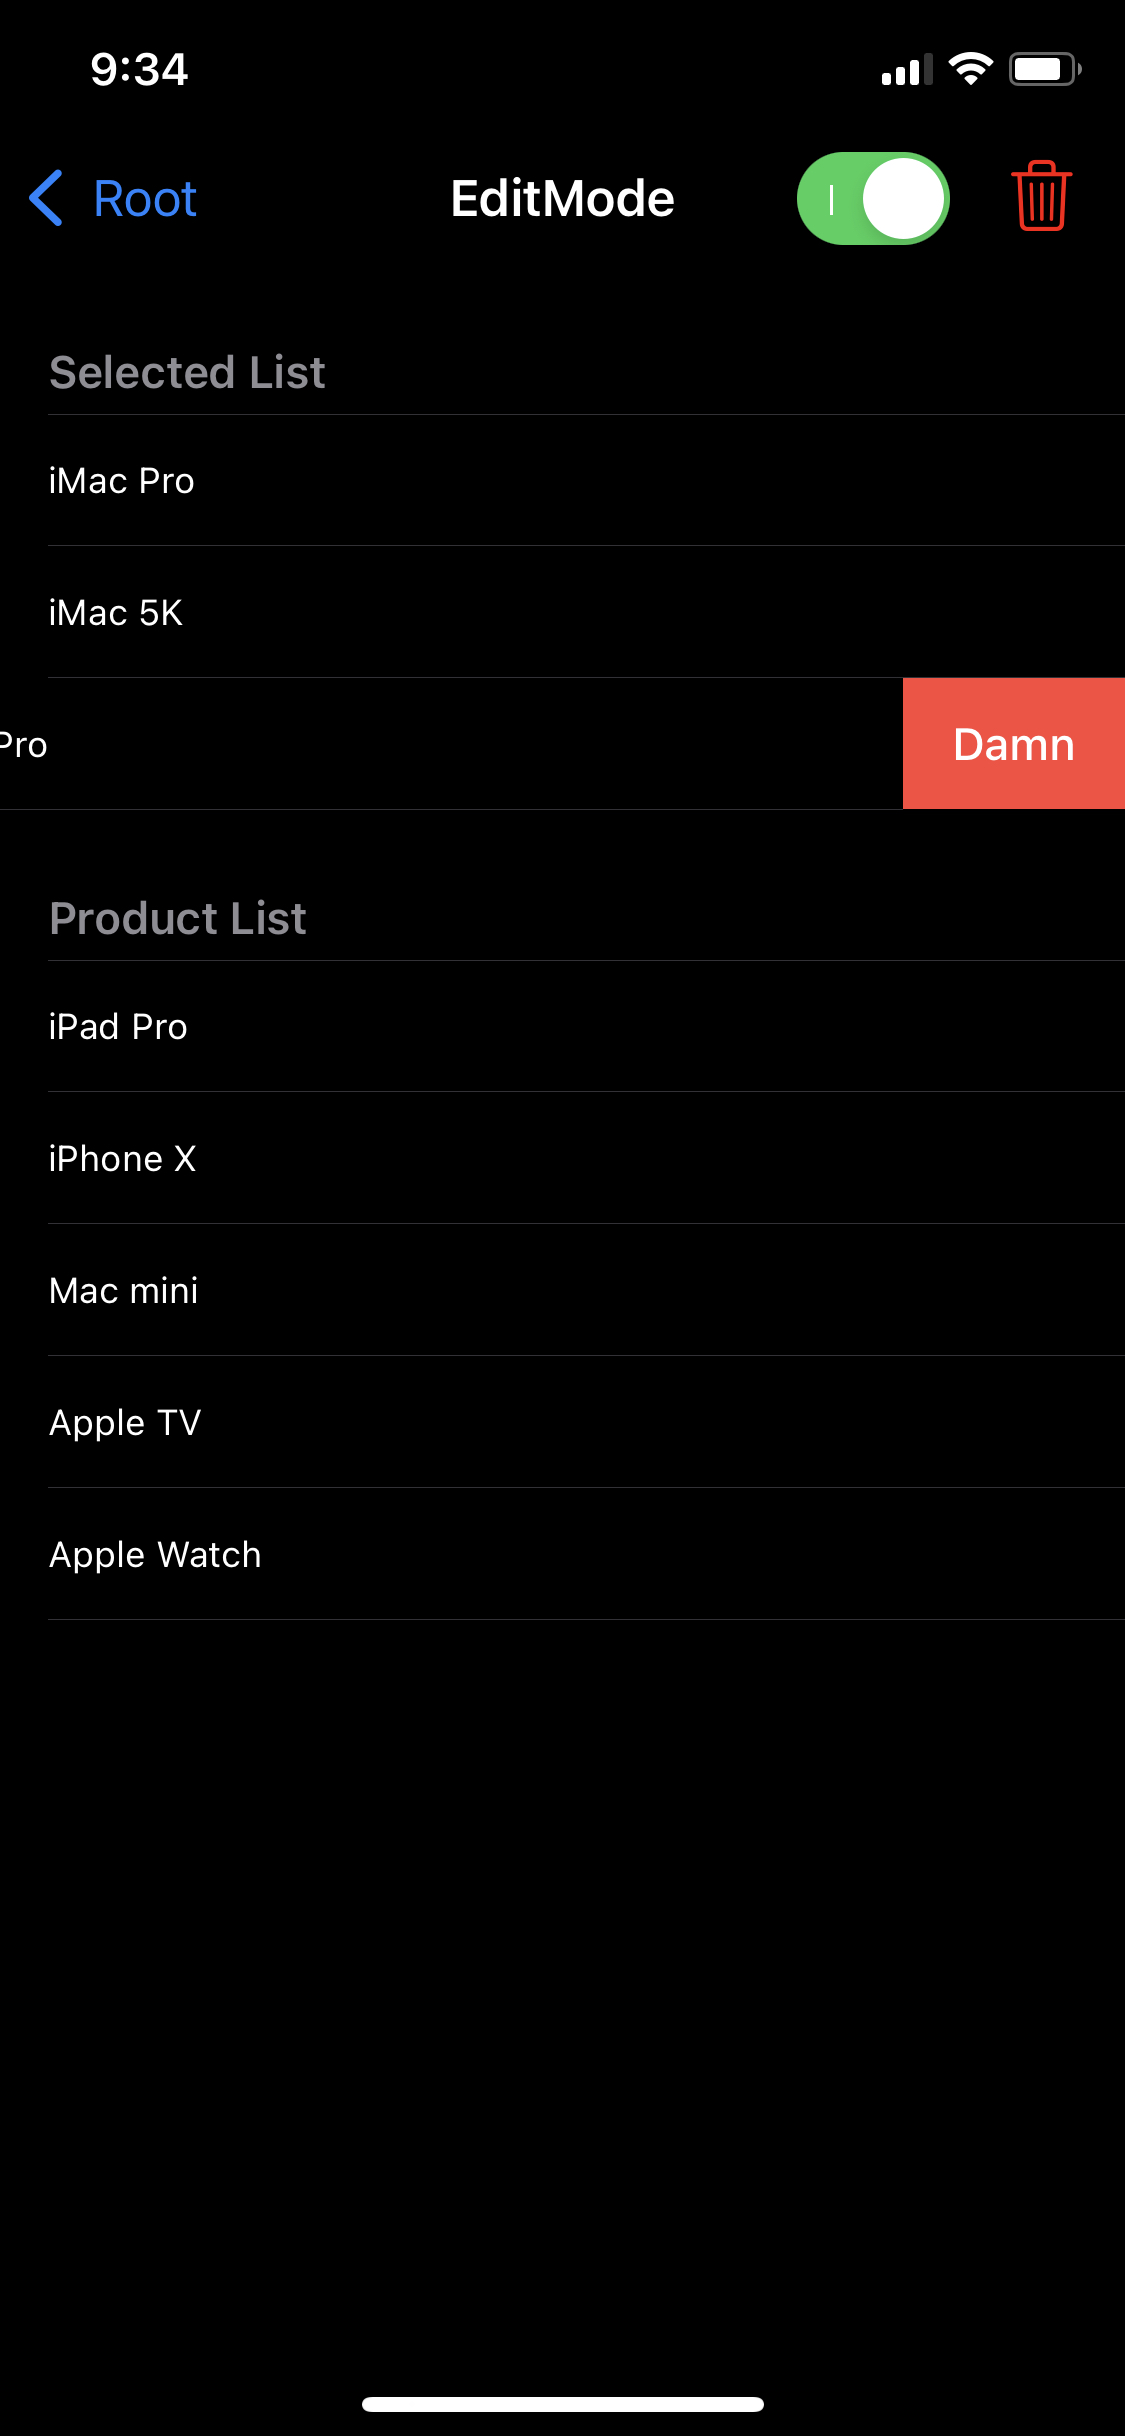
현재 삭제 스와이프 액션의 title은 delete로 표시되어있다.
기본값이 delete이고, 기기의 언어 설정에 따라 번역되어 표시된다.
이번엔 해당 title을 변경한다.
func tableView(_ tableView: UITableView, titleForDeleteConfirmationButtonForRowAt indexPath: IndexPath) -> String? {
	return "Damn"
}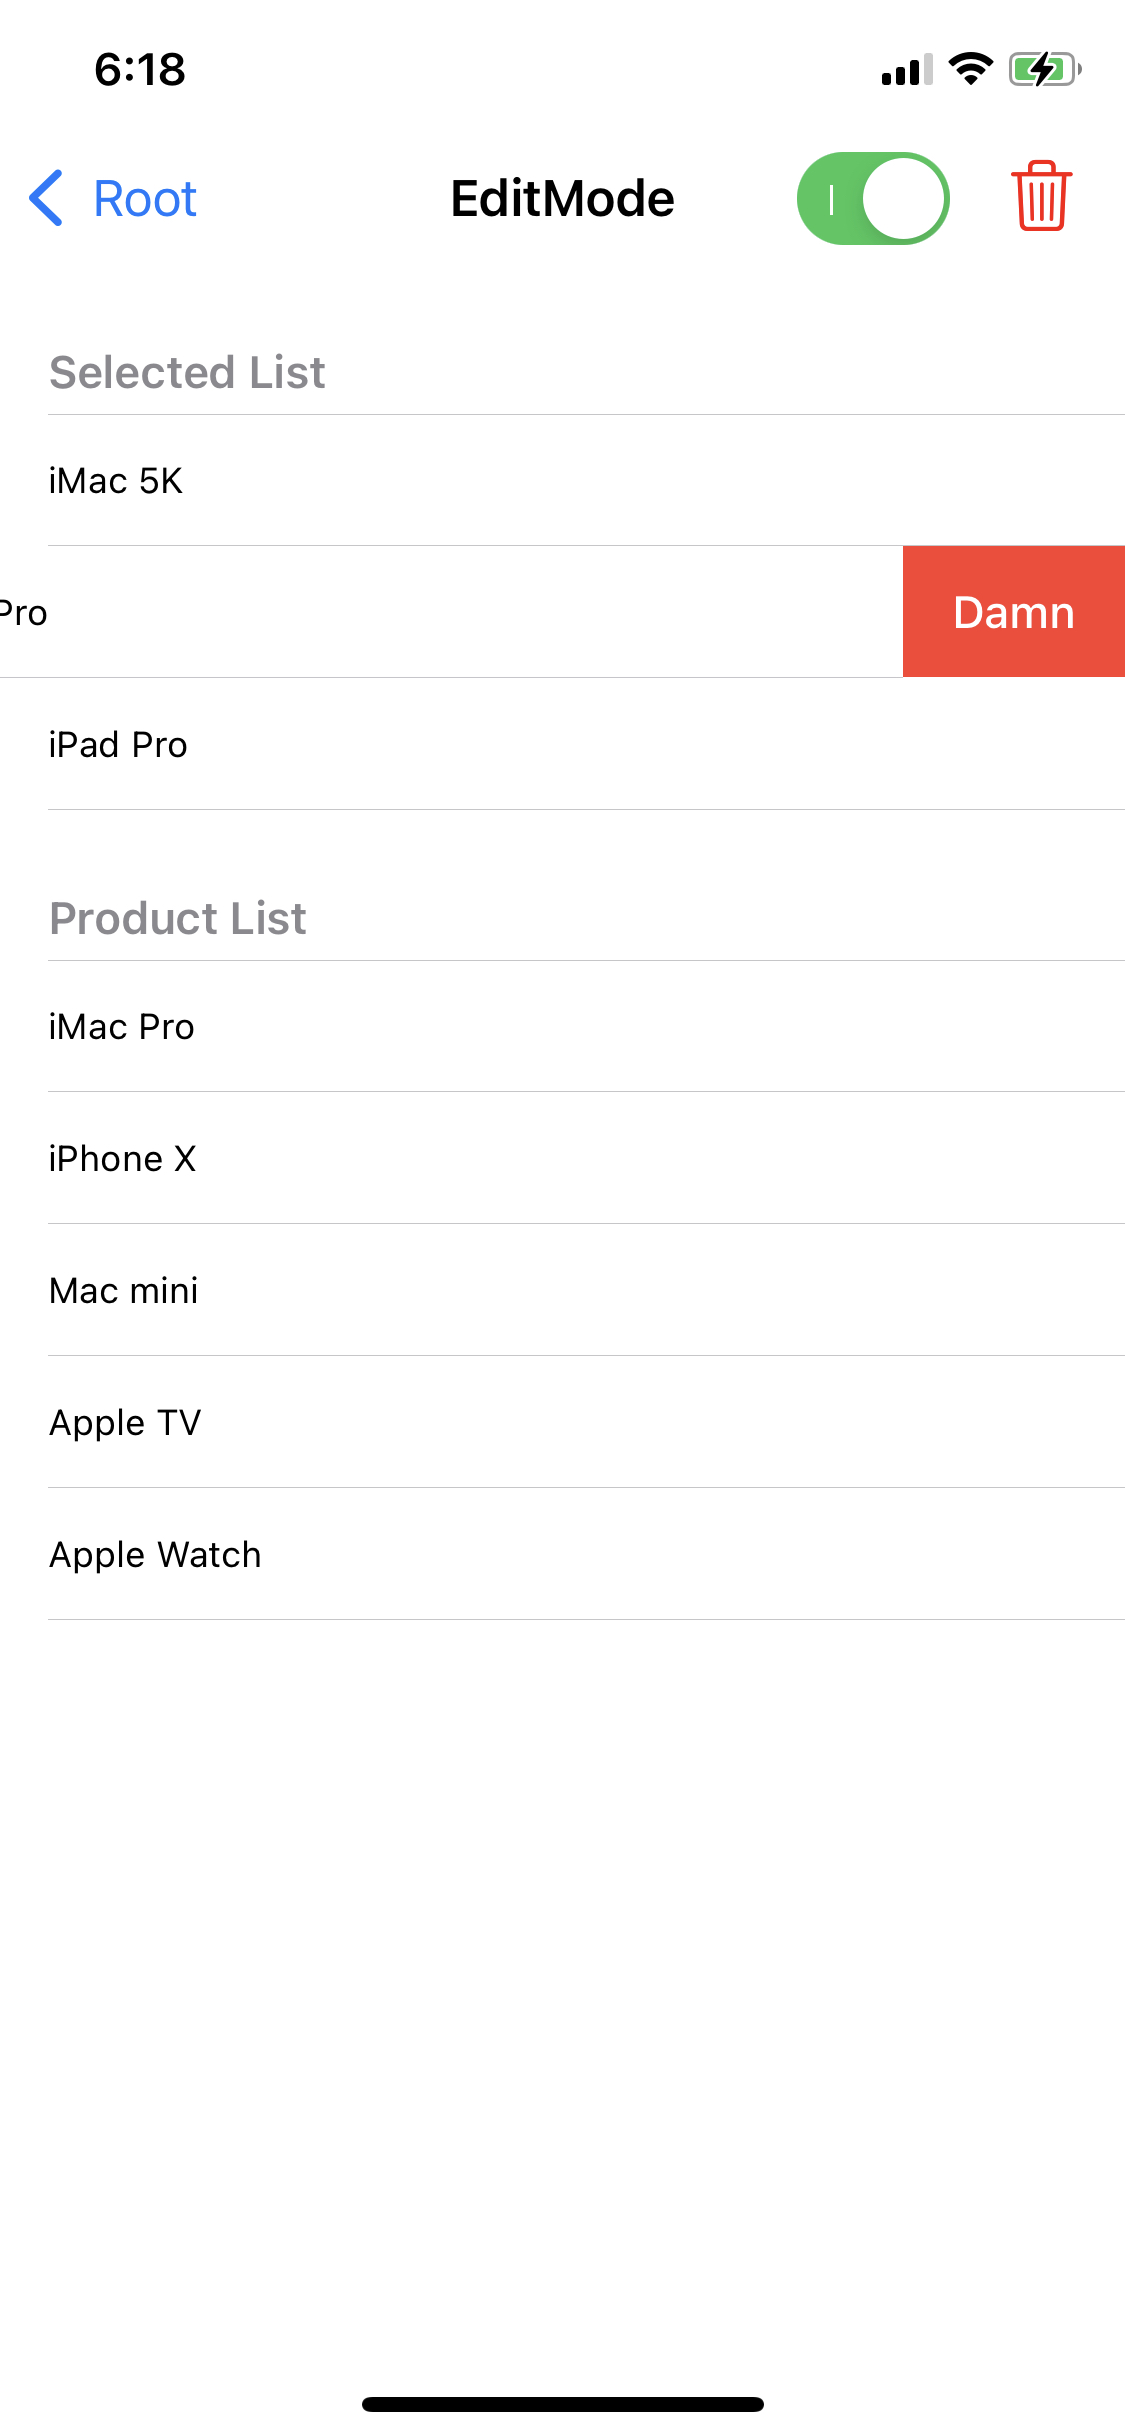
tableView(titleForDeleteConfirmationButtonForRowAt:)메소드는 delegate에서 구현된다.
변경할 문자열을 반환하면 간단하게 결과를 확인할 수 있다.
하지만 당연하게도 자동으로 번역되지는 않기 때문에 다국어를 지원한다면 번역된 문자열을 반환해야 한다.
이번엔 우측 상단의 삭제 버튼을 누르면 selected list section의 모든 셀이 지워지도록 구현한다.
@objc func emptySelectedList() {

}
해당 기능은 버튼에 연결된 emptySelectedList 메소드에서 구현한다.
@objc func emptySelectedList() {
	productList.append(contentsOf: selectedList)
	selectedList.removeAll()

	tableView.reloadSections(IndexSet(integersIn: 0...1), with: .automatic)
}
코드 구성은 간단하다.
- selectedList의 모든 항목을 producList에 추가한다.
- selectedList를 초기화한다.
- reloadSections메소드를 사용해 해당하는 section을 새로고침 한다.

의도한 대로 동작한다.
Batch Block
@objc func emptySelectedList() {
	productList.append(contentsOf: selectedList)
	selectedList.removeAll()

	tableView.reloadSections(IndexSet(integersIn: 0...1), with: .automatic)
}
지금 구현한 코드는 reload를 한 번만 실행하기 때문에 batch 방식으로 구현할 필요가 없다.
@objc func emptySelectedList() {
	productList.append(contentsOf: selectedList)
	selectedList.removeAll()

	tableView.beginUpdates()

	tableView.reloadSections(IndexSet(integersIn: 0...1), with: .automatic)

	tableView.endUpdates()
}
만약 reload, insert, delete를 두 번 이상 연달아 사용한다면 위처럼
beginUpdates와 endUpdates메소드를 사용해 batch 방식으로 구현해야 한다.
batch 방식 자체도 상당히 편리한 방식이지만 코드가 복잡해지는 경우
endUpdates를 선언하는 걸 잊어 충돌이 발생하는 때가 종종 생겼다.
따라서 iOS11 이후부터는 블록 API를 지원한다.
tableView.beginUpdates()

tableView.insertRows(at: [insertIndex], with: .automatic)
tableView.deleteRows(at: [indexPath], with: .automatic)

tableList.endUpdates()
tableView.performBatchUpdates { [weak self] in
self?.tableView.insertRows(at: [insertIndex], with: .automatic)
self?.tableView.deleteRows(at: [indexPath], with: .automatic)
} completion: { (finished) in
}기존의 코드와 완전히 동일한 동작을 수행하지만 작성이 간편하다는 장점이 있다.
batch코드 이후에 실행할 코드까지 작성할 수 있다는 장점이 있다.
따라서 iOS11 이상이 대상이라면 블록 API를 사용하는 것이 좋다.
주의사항
현재 코드의 작동 순서를 보면
- 배열 업데이트
- 셀 수정
의 순서로 구현했다.
case .insert:
let target = productList[indexPath.row]
let insertIndex = IndexPath(row: selectedList.count, section: 0)
//update cell
tableView.performBatchUpdates { [weak self] in
	self?.tableView.insertRows(at: [insertIndex], with: .automatic)
	self?.tableView.deleteRows(at: [indexPath], with: .automatic)
} completion: { (finished) in

}
//update list
selectedList.append(target)
productList.remove(at: indexPath.row)이 둘의 순서를 이렇게 바꾸게 되면
이렇게 충돌이 발생하고 앱이 종료된다.
tableView를 업데이트할 때는 반드시 데이터의 업데이트가 시작적인 업데이트보다 먼저 이뤄줘야 함을 명심하자.
Row Action
셀을 오른쪽에서 왼쪽으로 쓸어 넘기면 삭제 버튼이 나타난다.
이 상태는 Swipe to Delete 모드이다.
해당 버튼 대신 row action을 표시할 수 있고, 두 개 이상의 버튼을 동시에 표시할 수 있고,
각각 원하는 기능을 할당할 수 있다.
//
// RowActionViewController.swift
// TableViewPractice
//
// Created by Martin.Q on 2021/09/30.
//
import UIKit
import MessageUI
class RowActionViewController: UIViewController {
@IBOutlet weak var tableView: UITableView!
var list = ["iMac Pro", "iMac 5K", "Macbook Pro", "iPad Pro", "iPhone X", "Mac mini", "Apple TV", "Apple Watch"]
func sendMail(with data: String) {
guard MFMailComposeViewController.canSendMail() else {
return
}
let composer = MFMailComposeViewController()
composer.mailComposeDelegate = self
composer.setSubject("Test Mail")
composer.setMessageBody(data, isHTML: false)
present(composer, animated: true, completion: nil)
}
func sendMessage(with data: String) {
guard MFMessageComposeViewController.canSendText() else {
return
}
let composer = MFMessageComposeViewController()
composer.messageComposeDelegate = self
composer.body = data
present(composer, animated: true, completion: nil)
}
func delete(at indexPath: IndexPath) {
list.remove(at: indexPath.row)
tableView.deleteRows(at: [indexPath], with: .automatic)
}
override func viewDidLoad() {
super.viewDidLoad()
}
}
extension RowActionViewController: UITableViewDataSource {
func tableView(_ tableView: UITableView, numberOfRowsInSection section: Int) -> Int {
return list.count
}
func tableView(_ tableView: UITableView, cellForRowAt indexPath: IndexPath) -> UITableViewCell {
let cell = tableView.dequeueReusableCell(withIdentifier: "cell", for: indexPath)
cell.textLabel?.text = list[indexPath.row]
return cell
}
func tableView(_ tableView: UITableView, canEditRowAt indexPath: IndexPath) -> Bool {
return indexPath.row != 0
}
}
extension RowActionViewController: UITableViewDelegate {
}
extension RowActionViewController: MFMailComposeViewControllerDelegate{
func mailComposeController(_ controller: MFMailComposeViewController, didFinishWith result: MFMailComposeResult, error: Error?) {
controller.dismiss(animated: true, completion: nil)
}
}
extension RowActionViewController: MFMessageComposeViewControllerDelegate {
func messageComposeViewController(_ controller: MFMessageComposeViewController, didFinishWith result: MessageComposeResult) {
controller.dismiss(animated: true, completion: nil)
}
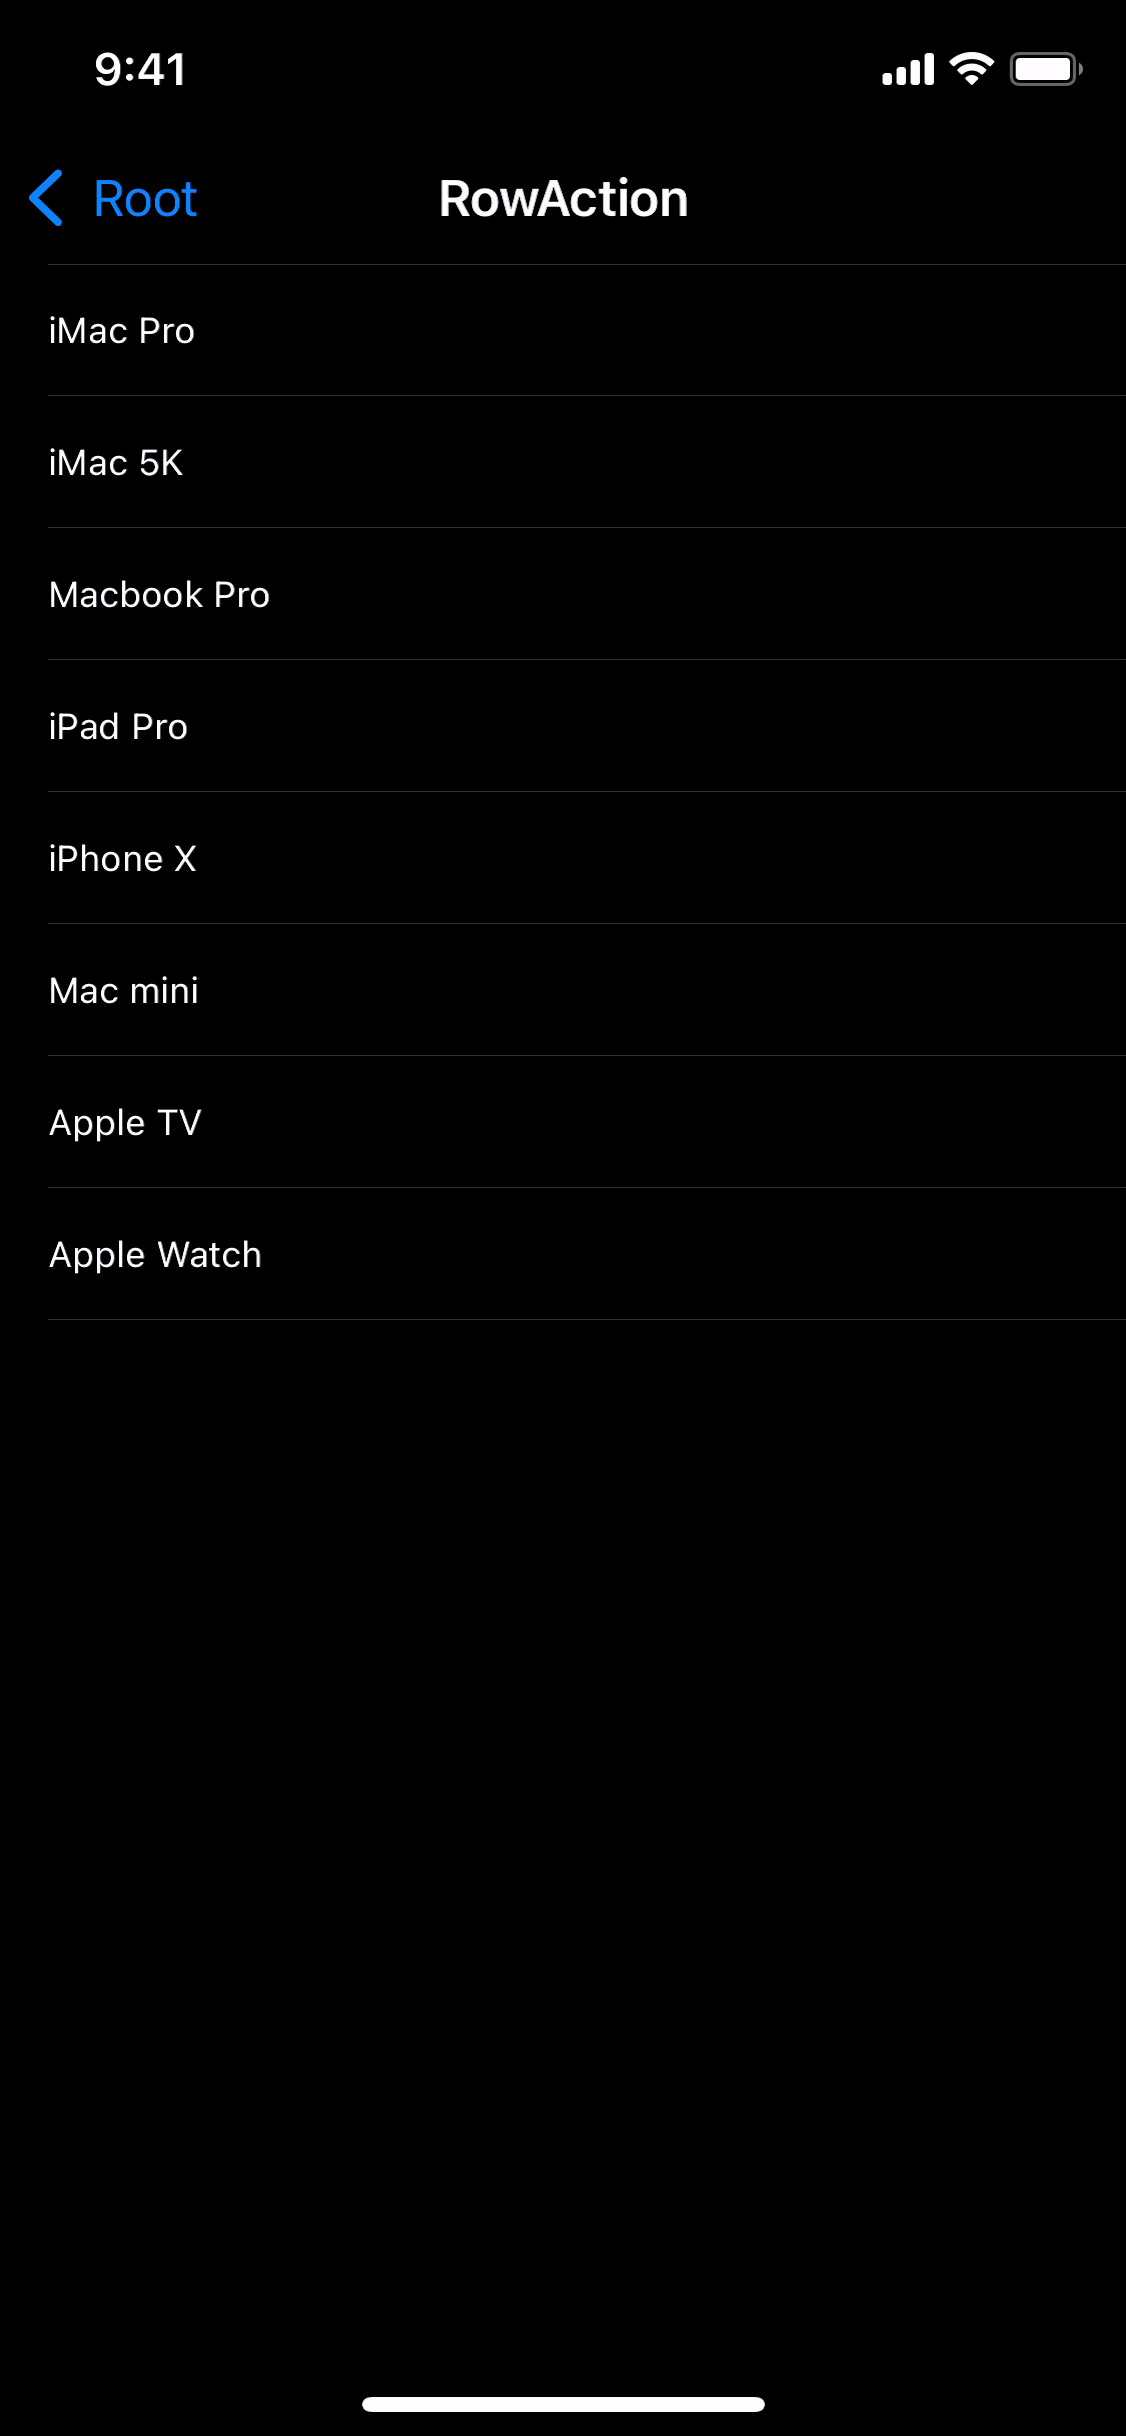
}사용할 씬과 코드는 위와 같다.
메시지와 메일을 보내는 기능 구현을 위해 MessageUI를 import 하고,
각각의 delegate를 확장했다.
extension RowActionViewController: UITableViewDelegate {
	func tableView(_ tableView: UITableView, editActionsForRowAt indexPath: IndexPath) -> [UITableViewRowAction]? {

	}
}
셀을 왼쪽으로 쓸어 넘기면 tableView(editActionsForRowAt:)메소드가 호출된다.
해당 메소드에서 rowaction 배열을 반환하면 삭제 버튼 대신 표시되게 된다.
rowAction은 메소드의 반환형처럼 UITableViewRowAction에 선언되어있다.
extension RowActionViewController: UITableViewDelegate {
	func tableView(_ tableView: UITableView, editActionsForRowAt indexPath: IndexPath) -> [UITableViewRowAction]? {
		let mailAction = UITableViewRowAction(style: .default, title: "Mail") { [weak self] (action, indexPath) in
			if let data = self?.list[indexPath.row] {
				self?.sendMail(with: data)
			}
		}
	}
}
UITableViewRowAction(style:title:handler:) 속성을 사용해 rowAction을 생성한다.
- style
Action의 스타일을 결정한다. - title
Action의 제목을 설정한다. - handler
Action의 동작을 작성한다.
메일을 전송하는 코드는 미리 작성해둔 sendMail 메소드를 사용한다.
extension RowActionViewController: UITableViewDelegate {
	func tableView(_ tableView: UITableView, editActionsForRowAt indexPath: IndexPath) -> [UITableViewRowAction]? {
		let mailAction = UITableViewRowAction(style: .default, title: "Mail") { [weak self] (action, indexPath) in
			if let data = self?.list[indexPath.row] {
				self?.sendMail(with: data)
			}
		}

		let messageAction = UITableViewRowAction(style: .normal, title: "Message") { [weak self] (action, indexPath) in
			if let data = self?.list[indexPath.row] {
				self?.sendMessage(with: data)
			}
		}
	}
}
동일한 방식으로 messageAction도 구현한 뒤
extension RowActionViewController: UITableViewDelegate {
	func tableView(_ tableView: UITableView, editActionsForRowAt indexPath: IndexPath) -> [UITableViewRowAction]? {
		let mailAction = UITableViewRowAction(style: .default, title: "Mail") { [weak self] (action, indexPath) in
			if let data = self?.list[indexPath.row] {
				self?.sendMail(with: data)
			}
		}

		let messageAction = UITableViewRowAction(style: .normal, title: "Message") { [weak self] (action, indexPath) in
			if let data = self?.list[indexPath.row] {
				self?.sendMessage(with: data)
			}
		}
		let deleteAction = UITableViewRowAction(style: .destructive, title: "Delete") { [weak self] (action, indexPath) in
			self?.delete(at: indexPath)
		}
	}
}
rowAction은 기본으로 제공되던 Delete Action을 대체해서 표시되기 때문에 삭제 기능이 필요하다면 직접 구현해 표시해야 한다.
따라서 deleteAction을 작성하고, 미리 구현한 delete 메소드를 호출하도록 구현한다.
extension RowActionViewController: UITableViewDelegate {
	func tableView(_ tableView: UITableView, editActionsForRowAt indexPath: IndexPath) -> [UITableViewRowAction]? {
		let mailAction = UITableViewRowAction(style: .default, title: "Mail") { [weak self] (action, indexPath) in
			if let data = self?.list[indexPath.row] {
				self?.sendMail(with: data)
			}
		}

		let messageAction = UITableViewRowAction(style: .normal, title: "Message") { [weak self] (action, indexPath) in
			if let data = self?.list[indexPath.row] {
				self?.sendMessage(with: data)
			}
		}
		let deleteAction = UITableViewRowAction(style: .destructive, title: "Delete") { [weak self] (action, indexPath) in
			self?.delete(at: indexPath)
		}

		return [mailAction, messageAction, deleteAction]
	}
}
완성된 rowAction들을 배열에 담아 반환한다.
이때 배열에 담기는 순서는 표시되는 순서에 영향을 주게 된다.
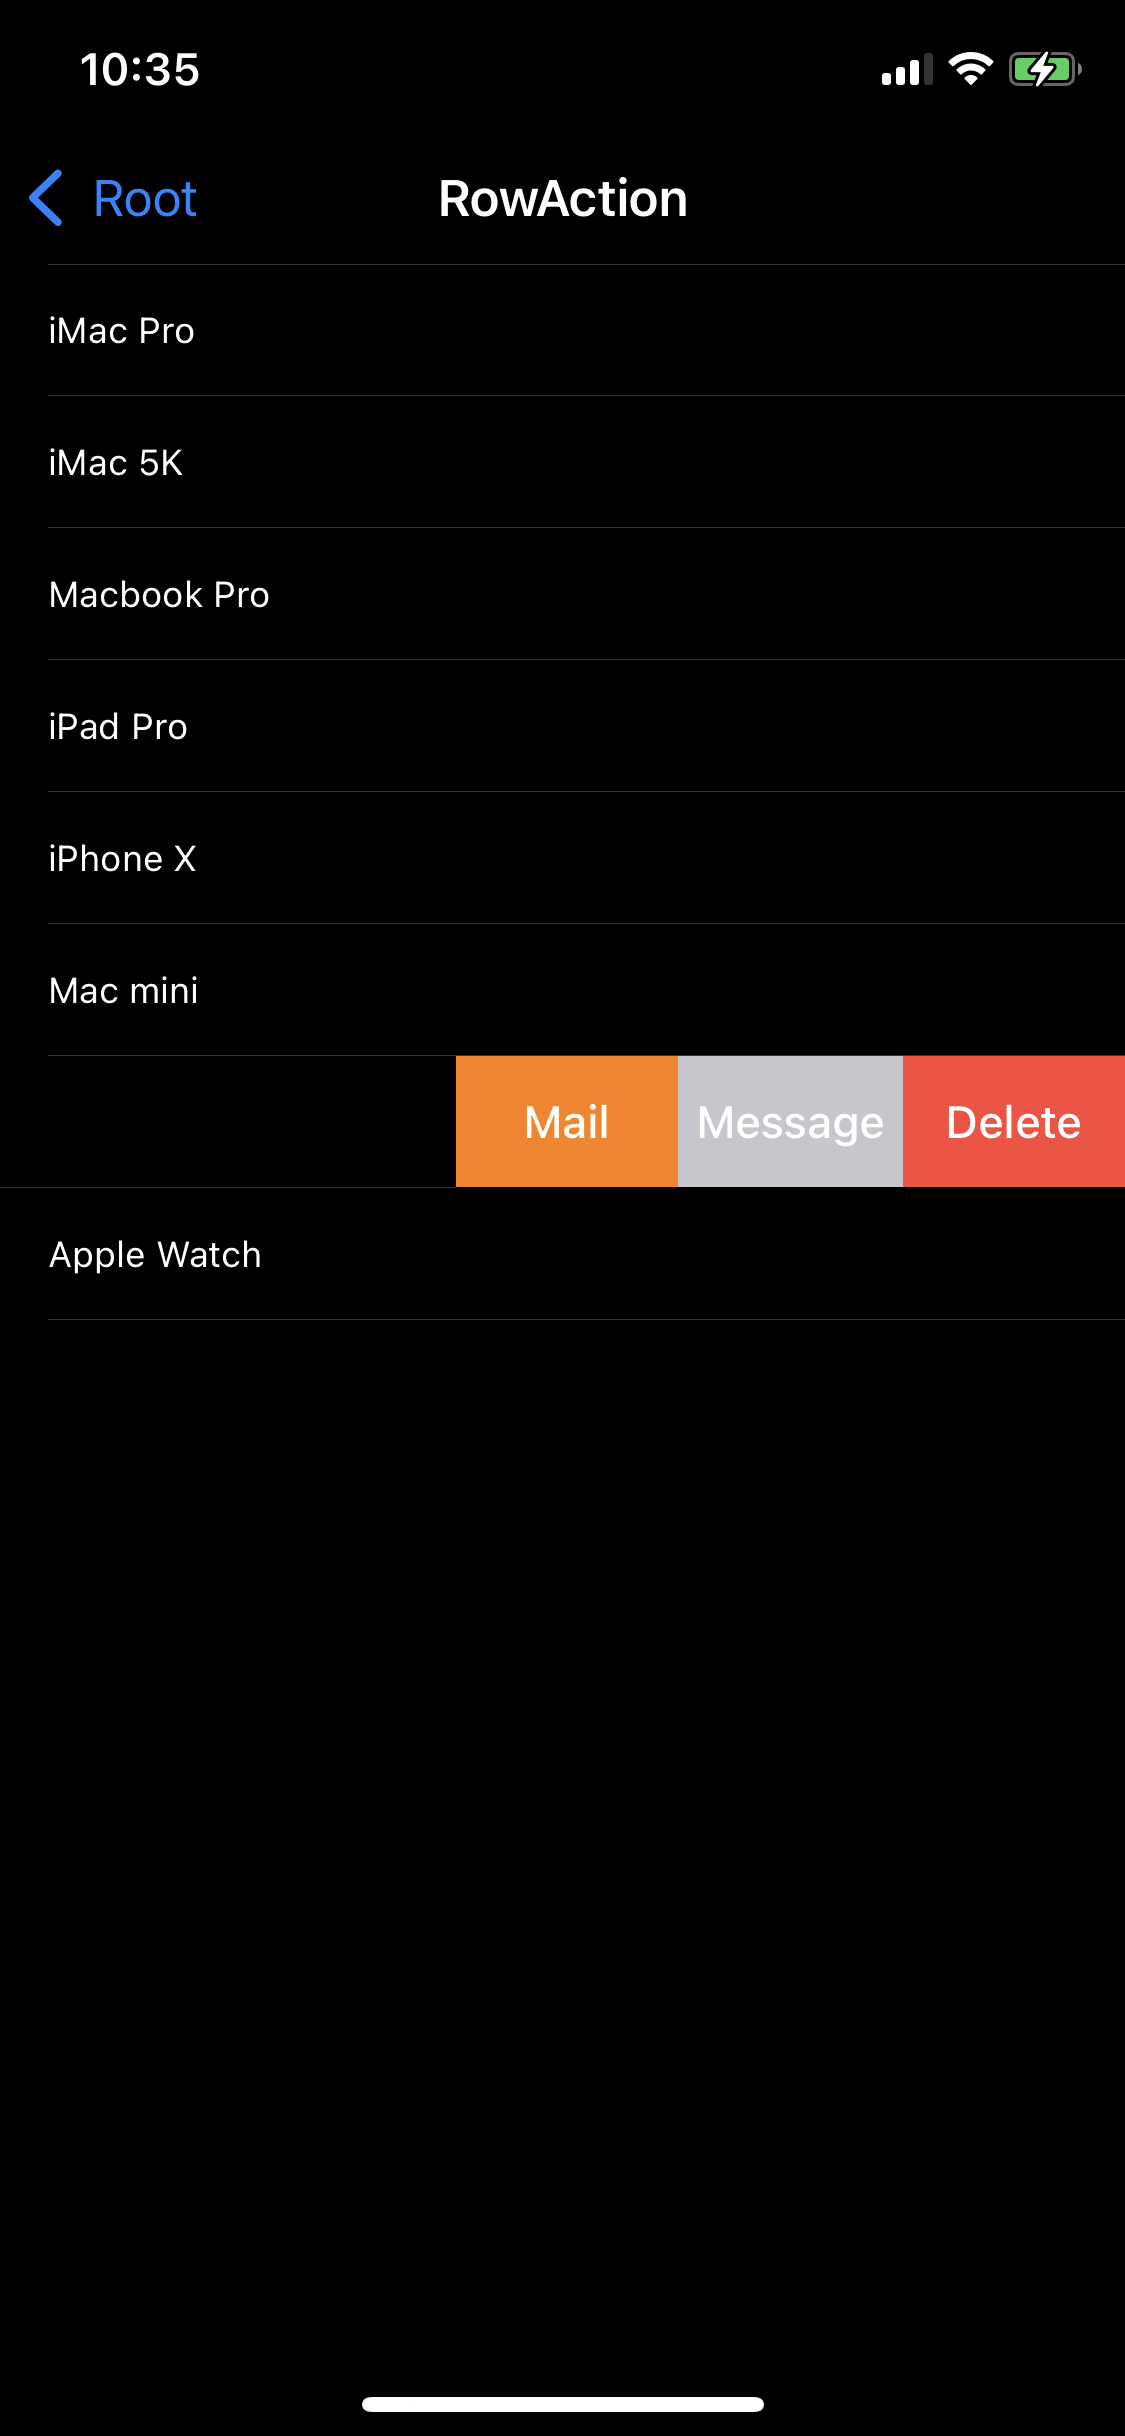
deleteAction과 messageAction이 정상적으로 동작하는 것을 확인할 수 있다.
또한 배열의 반대 순서로 Action이 정렬되었으며,
normal 스타일과 destructive 스타일은 동일한 빨간색으로 표시되는 것을 확인할 수 있다.
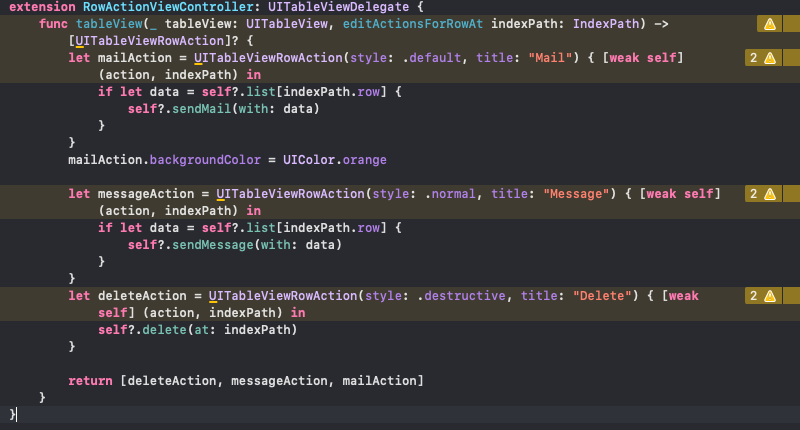
extension RowActionViewController: UITableViewDelegate {
	func tableView(_ tableView: UITableView, editActionsForRowAt indexPath: IndexPath) -> [UITableViewRowAction]? {
		let mailAction = UITableViewRowAction(style: .default, title: "Mail") { [weak self] (action, indexPath) in
			if let data = self?.list[indexPath.row] {
				self?.sendMail(with: data)
			}
		}
		mailAction.backgroundColor = UIColor.orange

		let messageAction = UITableViewRowAction(style: .normal, title: "Message") { [weak self] (action, indexPath) in
			if let data = self?.list[indexPath.row] {
				self?.sendMessage(with: data)
			}
		}
		let deleteAction = UITableViewRowAction(style: .destructive, title: "Delete") { [weak self] (action, indexPath) in
			self?.delete(at: indexPath)
		}

		return [deleteAction, messageAction, mailAction]
	}
}
배열의 순서를 바꿔 조금 더 직관적인 순서로 나열될 수 있도록 변경하고,
mailAction.backgroundColor = UIColor.orangerowAction의 backgroundColor를 변경해 디자인을 해 보면
색이 바뀌고 적절한 순서로 나열된 것을 확인할 수 있다.
참고
지금까지 작성한 코드는 컴파일러에서 경고를 표시하고 있다.
'UITableViewRowAction' was deprecated in iOS 13.0: Use UIContextualAction and related APIs instead.
해당 경고는 위와 같이 iOS13 이상의 버전에서 UITableViewRowAction이 더 이상 사용되지 않는다는 경고이고,
대신에 UIContextualAction을 사용하라고 안내하고 있다.
따라서 rowAction은 배포 타겟이 iOS13 미만인 경우 호환성을 위해 알아두는 것이 좋다.
Swipe Action
SwipeAction은 iOS11부터 RowAction을 대체하는 기능이다.

셀의 왼쪽이나 오른쪽으로 쓸어 넘겨 액션을 표시할 수 있다.
RowAction과 달리 이미지를 함께 표시할 수 있으며, Full Swipe Action을 처리할 수 있다는 장점이 있다.
//
// SwipeActionViewController.swift
// TableViewPractice
//
// Created by Martin.Q on 2021/10/01.
//
import UIKit
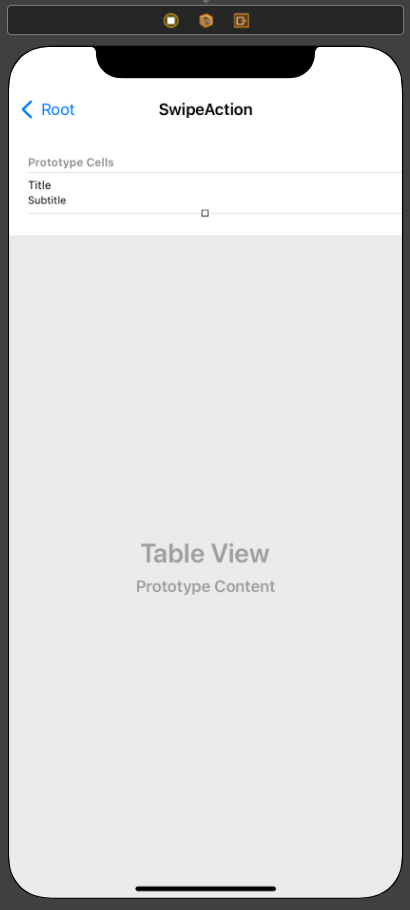
class SwipeActionViewController: UIViewController {
@IBOutlet weak var tableView: UITableView!
var list = [("또다시 넌 왜 내게서 멀어지는데 난 왜 멈추지 못해. 넌 왜 내게서 멀어지는데 난 왜 멈추지 못해", "Mad Soul Child"), ("Are ew beautiful? All of us? Cause we got something natural. It's a part of us. Darling, when they put you down like that Yeah, we can reply right back. You are beautiful. Yeah, I know, I know you are.", "Anne Marie"), ("You make me glow. But I cover up. Won't let it show. So I'm putting my defenses up. 'Cause I don't wanna fall in love.", "Demi Lovato"), ("저 하늘에 달빛이 나의 눈물에 가릴 때, 하나만 하다만 나의 사랑도 끝나고. 다 잊으려 지우려 내 맘속에 널 태워도 불꽃처럼 나를 감싸는 지독한 내 못난 사랑아", "Cho A"), ("네가 내게 온 그날 후로 부쩍 친절한 이 도시가 날 반겨주는 걸. It's like 좋은 일이 생길 것 같아, 참 걷고 시은 날이야. 다 손을 흔들며 Parade", "Younha")]
override func viewDidLoad() {
super.viewDidLoad()
}
}
extension SwipeActionViewController: UITableViewDataSource {
func tableView(_ tableView: UITableView, numberOfRowsInSection section: Int) -> Int {
return list.count
}
func tableView(_ tableView: UITableView, cellForRowAt indexPath: IndexPath) -> UITableViewCell {
let cell = tableView.dequeueReusableCell(withIdentifier: "cell", for: indexPath)
cell.textLabel?.text = list[indexPath.row].0
cell.detailTextLabel?.text = list[indexPath.row].1
return cell
}
}
@available(iOS 11.0, *)
extension SwipeActionViewController: UITableViewDelegate {
}사용할 씬과 코드는 위와 같다.
@available(iOS 11.0, *)
extension SwipeActionViewController: UITableViewDelegate {
	func tableView(_ tableView: UITableView, leadingSwipeActionsConfigurationForRowAt indexPath: IndexPath) -> UISwipeActionsConfiguration? {

	}
}
Swipe Action은 delegate에서 구현하며, iOS11 이상에서만 동작할 수 있도록 예외처리를 진행한다.
셀을 오른쪽으로 쓸어 넘겼을 때 표시되는 SwipeAction은
tableView(leadingSwipeActionsConfigurationForRowAt:)메소드가 호출되며 여기서 액션을 작성한다.
UIContextualAction(style: UIContextualAction.Style, title: String?, handler: UIContextualActionHandeler)액션은 UIContexttualAction으로 생성하며, 파라미터로
- style
normal과 destructive 두 가지를 제공한다. - title
문자열의 형태로 title을 설정한다. - handler
액션을 실행했을 때 실행할 코드를 closure로 전달한다.
(UIContextualAction, UIView, @escaping (Bool) -> Void) in codehandler는 위와 같이 세 가지의 파라미터를 받는데,
- UIContextualAction
액션이 전달된다. - UIView
연관된 view가 전달된다. - @escaping (Bool) -> Void
마지막에 호출해야 하는 closure를 전달한다.
func tableView(_ tableView: UITableView, leadingSwipeActionsConfigurationForRowAt indexPath: IndexPath) -> UISwipeActionsConfiguration? {
	let unreadAction = UIContextualAction(style: .normal, title: "Unread") { action, view, completion in
		completion(true)
	}
}
코드는 위와 같다.
원하는 기능을 클로저에 구현한 다음에는 반드시 세 번째 파라미터에 해당하는 completion을 호출해야 한다.
completion에 true를 반환하면 정상적으로 실행했다는 의미이고, 비정상이라면 false를 반환한다.
@available(iOS 11.0, *)
extension SwipeActionViewController: UITableViewDelegate {
	func tableView(_ tableView: UITableView, leadingSwipeActionsConfigurationForRowAt indexPath: IndexPath) -> UISwipeActionsConfiguration? {
		let unreadAction = UIContextualAction(style: .normal, title: "Unread") { action, view, completion in

			completion(true)
		}
		let configuration = UISwipeActionsConfiguration(actions: [unreadAction])
		return configuration
	}
}
UISwipeActionConfiguration인스턴스를 생성하고 이를 반환한다.
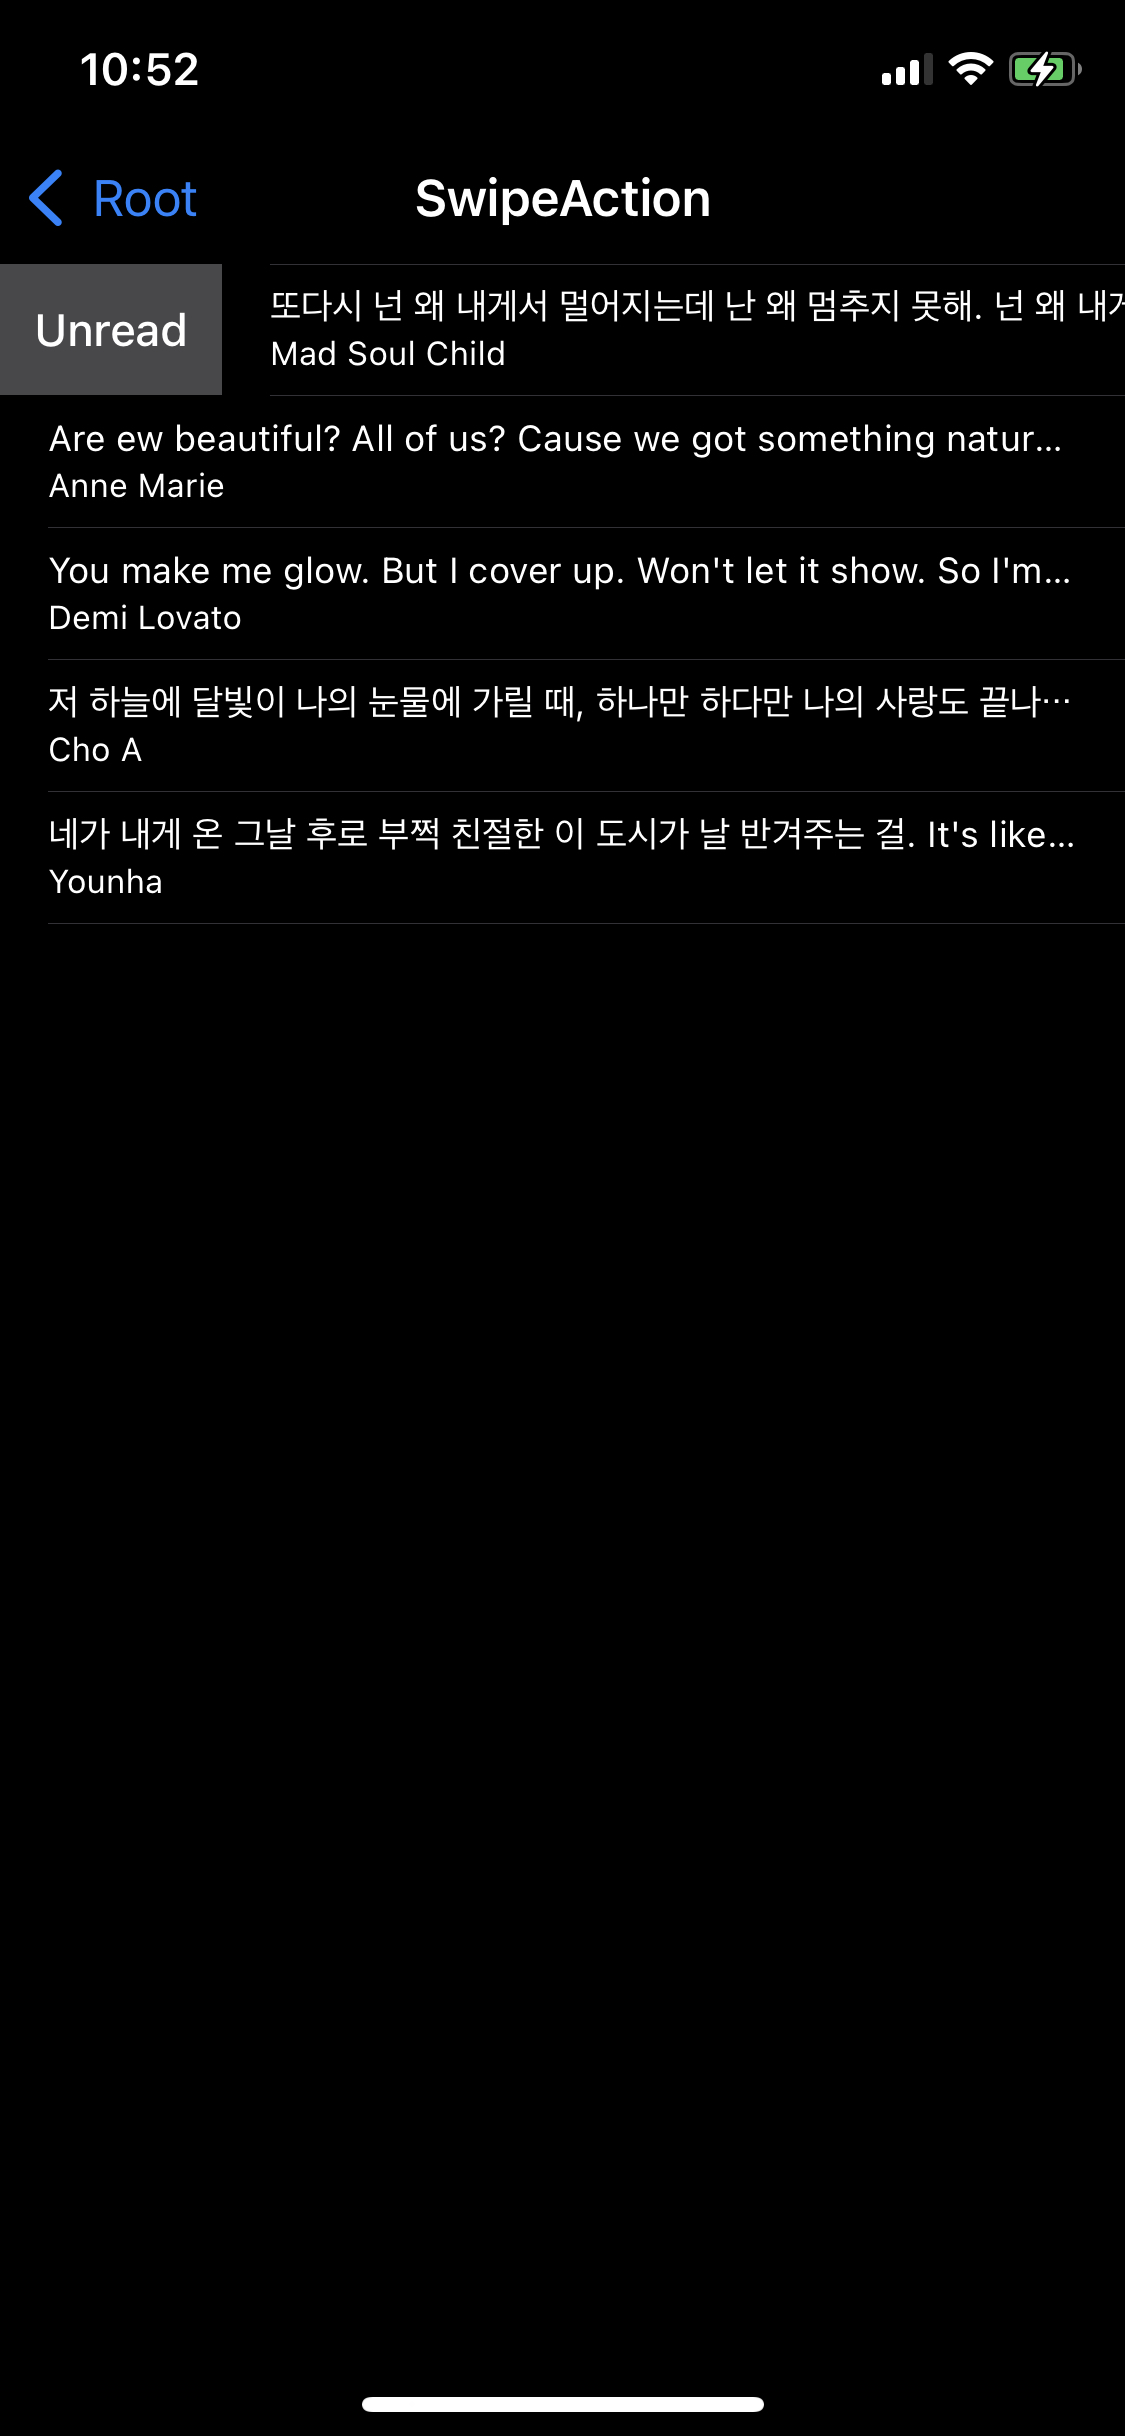
이렇게 왼쪽에 SwipeAction이 추가됐다.
RowAction과 마찬가지로 배경색을 변경할 수 있고, 폰트 색은 흰색으로 고정되기 때문에 밝은 색을 사용하는 것은 지양해야 한다.
@available(iOS 11.0, *)
extension SwipeActionViewController: UITableViewDelegate {
	func tableView(_ tableView: UITableView, leadingSwipeActionsConfigurationForRowAt indexPath: IndexPath) -> UISwipeActionsConfiguration? {
		let unreadAction = UIContextualAction(style: .normal, title: "Unread") { action, view, completion in
			completion(true)
		}

		unreadAction.backgroundColor = .orange
		unreadAction.image = UIImage(systemName: "heart")

		let configuration = UISwipeActionsConfiguration(actions: [unreadAction])
		return configuration
	}
}

이렇게 맥션의 backgroundColor와 image 속성을 통해 배경색을 변경하고 이미지를 설정할 수 있다.
또한, 셀이 충분한 높이를 가지고 있다면 이미지와 title을 동시에 표시할 수 있다.
func tableView(_ tableView: UITableView, trailingSwipeActionsConfigurationForRowAt indexPath: IndexPath) -> UISwipeActionsConfiguration? {
	let deleteAction = UIContextualAction(style: .destructive, title: "Delete") { action, view, completion in
		completion(true)
	}
	deleteAction.image = UIImage(systemName: "trash")

	let flagAction = UIContextualAction(style: .normal, title: "Flag") { action, view, completion in
		completion(true)
	}
	flagAction.backgroundColor = .green
	flagAction.image = UIImage(systemName: "flag")

	let configuration = UISwipeActionsConfiguration(actions: [deleteAction, flagAction])
	return configuration
}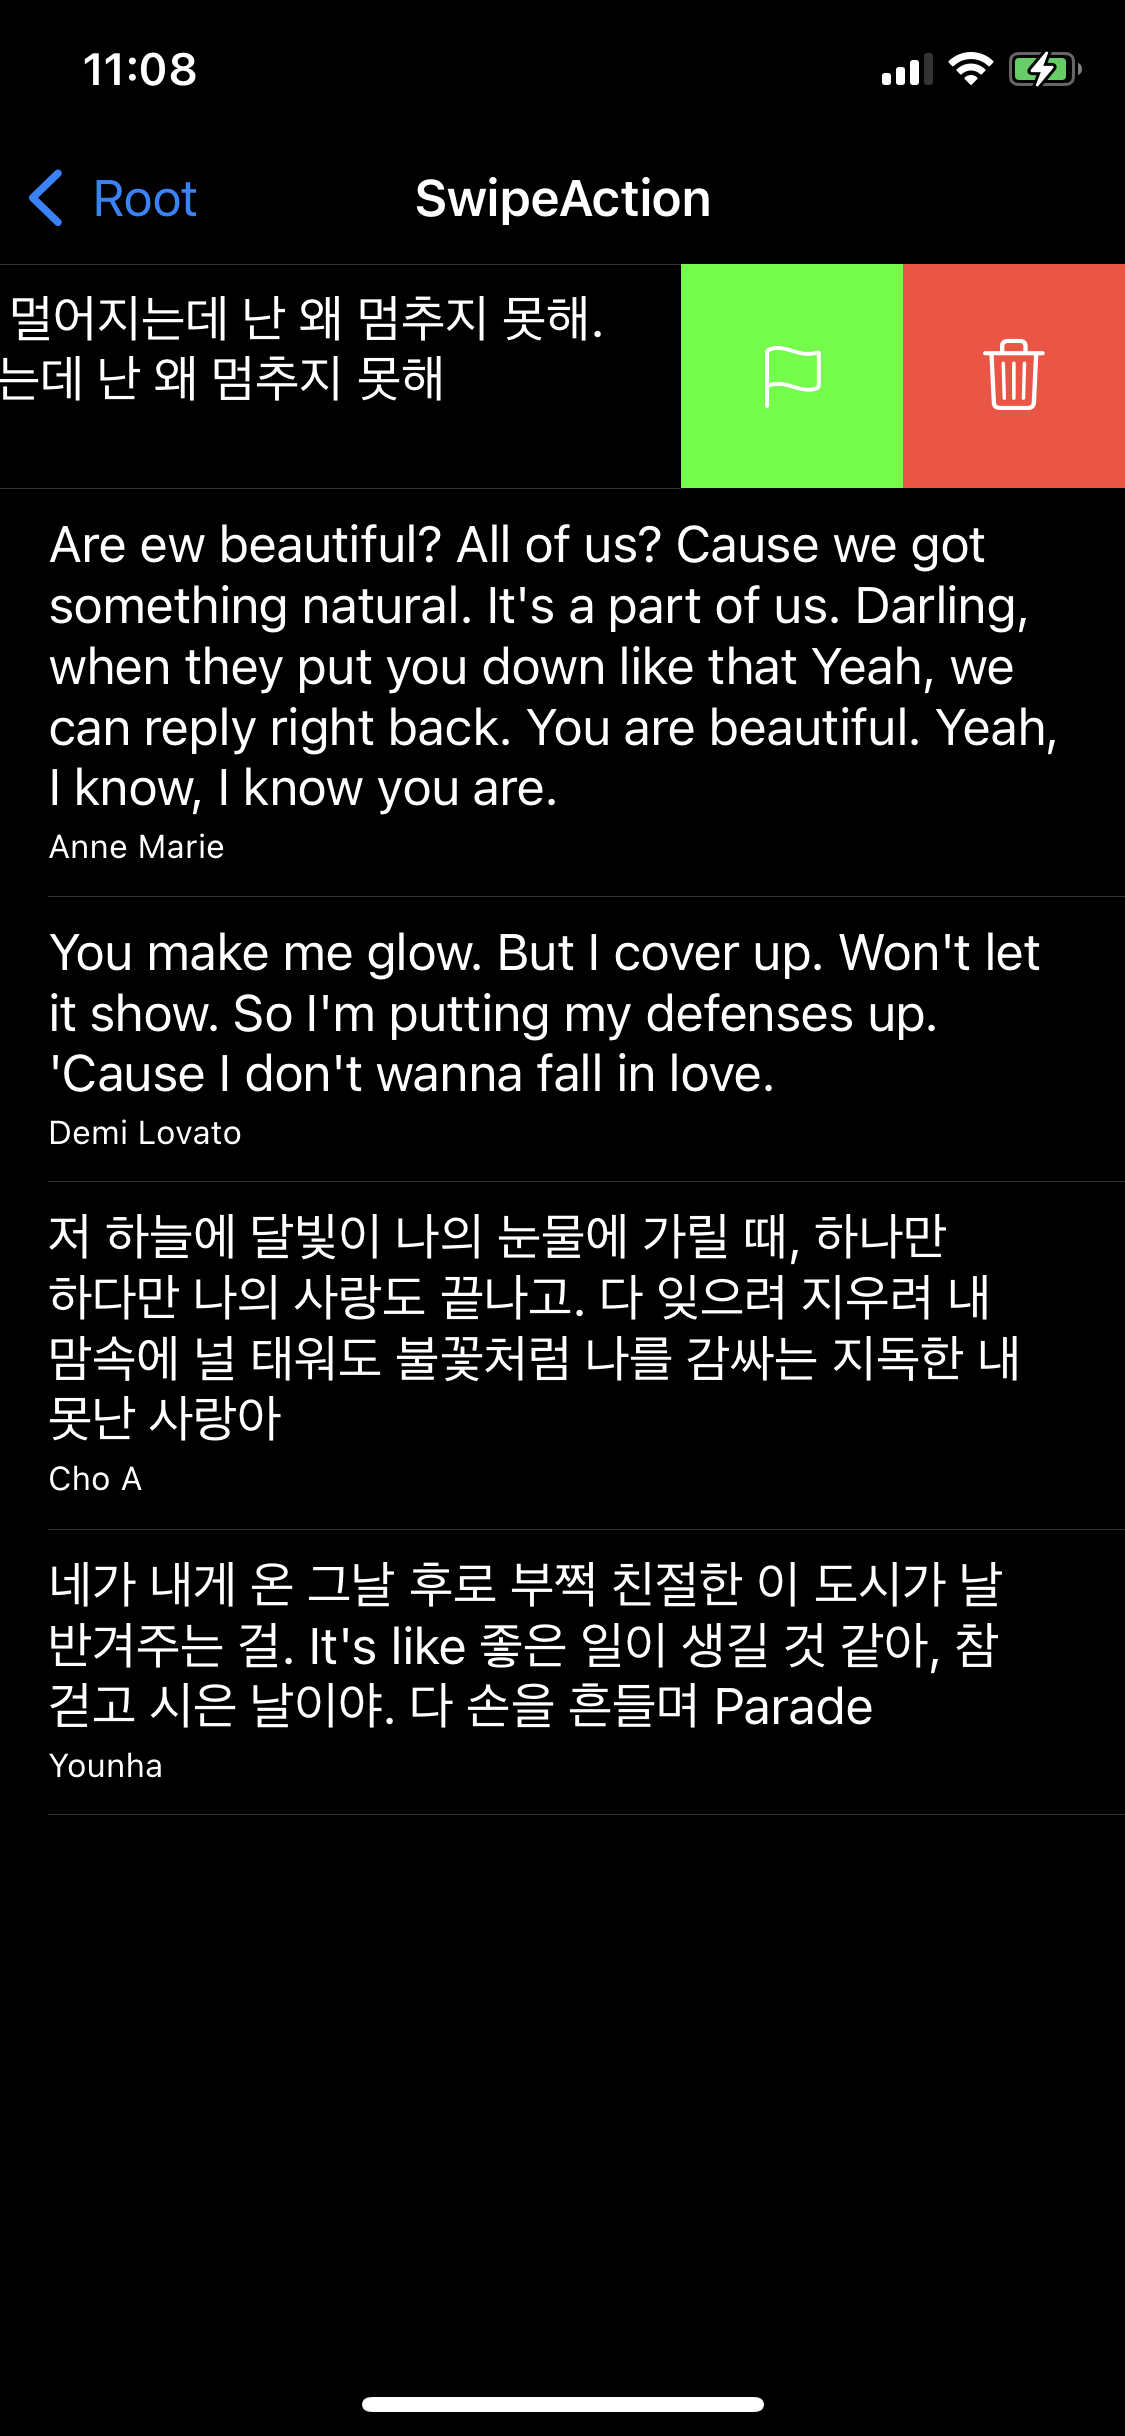
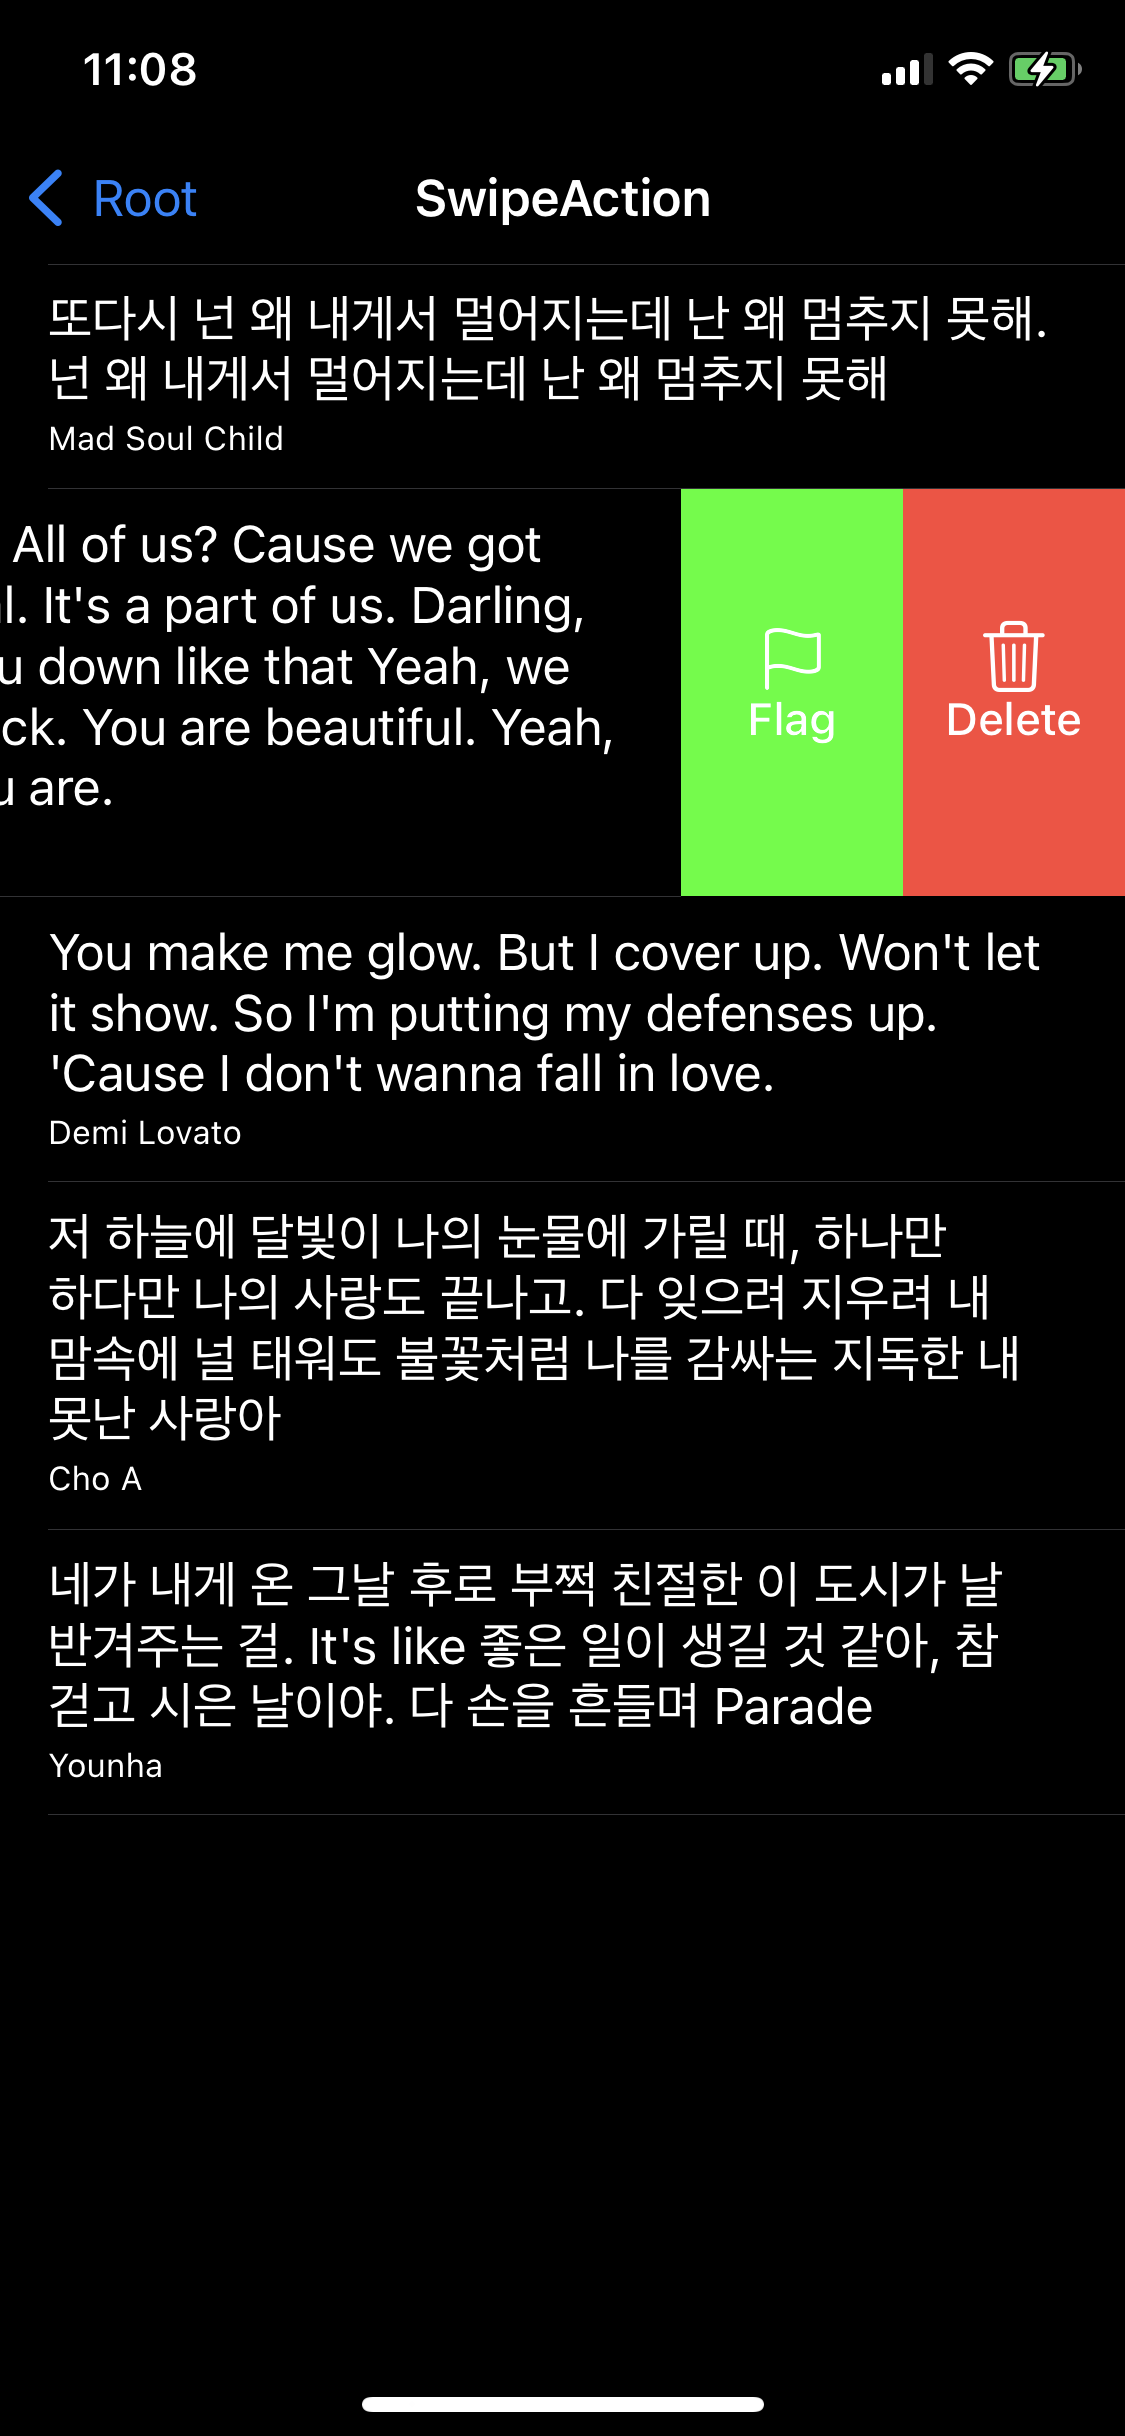
같은 방식으로 table(trailingSwipeActionConfigurationForRowAt:) 메소드를 추가하여
오른쪽에도 SwipeAction을 추가할 수 있다.
RowAction과 마찬가지로 반환하는 배열의 역순으로 표시된다.
configuration.performsFirstActionWithFullSwipe = true
또한 반환 전 performsFirstActionWithFullSwipe 속성을 true로 설정해
가장 오른쪽에 있는 액션을 기본으로 동작하도록 설정할 수 있다.


