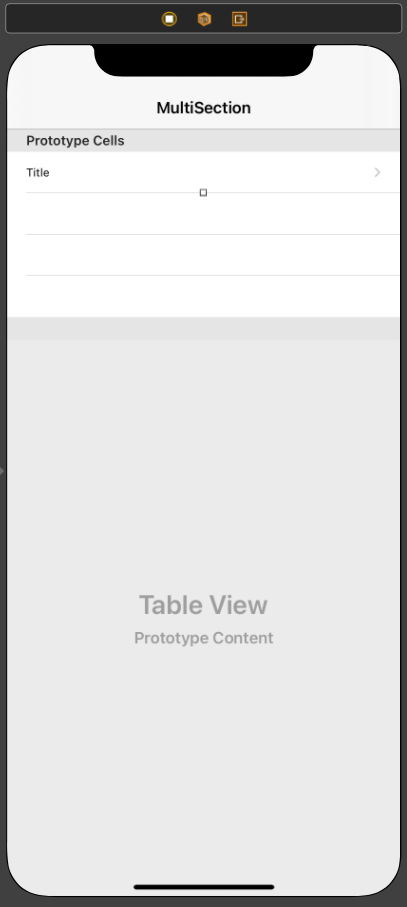
Table View
TableView는 목록을 표시할 때 사용한다.

TableView에는 Cell이 존재하고, 위의 화면엔 표시한 것을 포함해 9개의 Cell이 존재한다.
Cell의 너비는 TableView의 너비와 같고, 따라서 수평으로 두 개의 Cell을 나란히 배치할 수 없다.
또한 스크롤 방향은 상하로 고정이다. 별도로 가로 스크롤을 설정할 수는 있지만,
해당 기능을 더 간편하게 구현할 수 있는 CollectionView를 더 많이 사용한다.
Cell들이 모여있는 그룹을 Sction이라고 한다.
TableView는 하나 이상의 Section을 가질 수 있고, 각각의 Section에는 Cell이 포함되지 않을 수 있다.
TableView는 Sextion과 Cell을 2차원 배열로 관리한다.
따라서 Cell의 위치는 Section의 인덱스와 Cell의 인덱스를 함께 전달해야 하고, 이때 사용하는 형식은 IndexPath이다.
Cell의 접근할 때는 반드시 올바른 인덱스에 접근해야 한다.
TableView는 세 가지 스타일을 가지고 있다.
- Grouped Style

Grouped Style은 Section의 여백들 사이에 원하는 Text나 View를 출력하는 것이 가능하다.
단, 해당 Text나 View가 Plain Style의 여백처럼 상단에 고정되진 않는다.
- Plain Style

여러 Section으로 구분되어있지만 여백은 존재하지 않는다.

Plain Style은 Header와 Footer를 사용할 수 있고, Header로 Section을 구분한다.
이들은 설정에 따라 모두 표시하거나 어느 하나만 표시할 수 있고, Delegate Pattern을 통해 Section마다 설정할 수도 있다.
Header와 Footer는 Label이고, 기본적으로 표시할 문자열만 지정할 수 있으나,
Delegate 메서드에서 원하는 View를 반환하는 방식으로 Custom 하기도 한다.
Plain Style의 Header는 화면 상단에 고정되다가 밀려 올라간다.
이렇게 FloatingMode와 StickyMode가 혼합된 형식을 취한다.
- Inset Grouped
grouped style과 동일하지만 cell에 여백이 있는 형태의 Grouped style이다.

Cell에 데이터를 표시할 때는 기본 스타일을 사용하거나 직접 원하는 스타일을 만들어 사용할 수 있다.
이미지와 텍스트 두 개를 표시하거나 이미지와 텍스트 하나를 표시하는 스타일 등 여러 스타일을 제공한다.
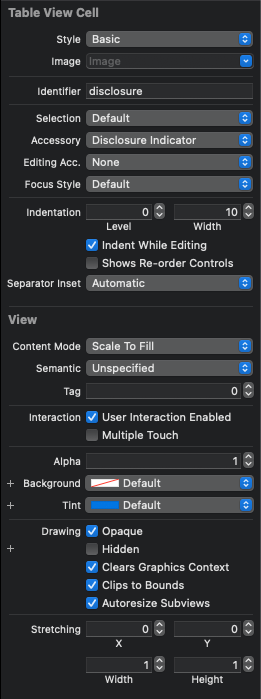
Cell의 오른쪽에 표시되는 꺽쇠는 Accessory View이다.
Cell을 선택했을 때 어떤 작업을 진행할 것인지를 알리는 용도로 사용한다.
Cell과 Cell 사이에는 실선이 존재하는데, 이것은 Separator라고 부른다.
TableView가 제공하는 속성으로 색을 변경하거나 좌우의 여백을 지정하고, 표시 여부를 선택하는 것이 가능하다.
TableView 구현

//
//  TableViewViewController.swift
//  TableViewTest
//
//  Created by Martin.Q on 2021/09/02.
//

import UIKit

class TableViewViewController: UIViewController {

	let list = ["iphone","ipad","apple watch","imac pro", "imac", "macbook pro", "apple tv"]

	override func viewDidLoad() {
		super.viewDidLoad()
	}


}
사용할 씬과 코드는 위와 같다.
코드에 선언되어있는 배열을 TableView로 표시한다.

씬에는 TableView와 Table View Cell을 추가한다.
TableView는 씬 전체를 채울 수 있도록 모든 방향에 0의 제약을 추가한다.
추가한 Cell은 PrototypeCell로 Cell을 만들기 위한 Template의 기능을 한다.

Cell은 위와 같은 속성을 가지고 있다.
Style
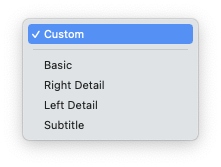
- Custom
직접 스타일을 만들 때 사용한다.
- Basic
한 가지의 텍스트를 표시할 때 사용한다.

- Right Detail
두 개의 텍스트를 셀 양쪽에 표시할 때 사용한다.
이때 왼쪽의 텍스트는 왼쪽 정렬로, 오른쪽의 텍스트는 오른쪽 정렬로 표시한다.

- Left Detail
Right Detail과 유사하지만 텍스트의 정렬 방식이 다르다.

- Subtitle
두 개의 텍스트를 수직으로 배치한다.

Selection
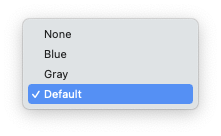
Cell을 선택했을 때 강조하는 방식을 설정한다.
- Default
회색 배경을 표시한다. - Blue, Gray
iOS7 이상부터는 두 옵션은 Default와 동일한 동작을 한다. - None
강조하지 않는다.
Identifier
TableView는 문자열로 prototype cell을 구분하는데, 이 문자열이 Identifier이다.
데이터 연결하기
Delegate pattern으로 데이터를 요청한다.
따라서 해당 요청을 처리할 Delegate 객체가 필요하다.
데이터를 공급하는 객체를 DateSource라고 부르며,
해당 객체에서 구현해야 하는 메서드는 UITableViewDataSource 프로토콜에 선언되어있다.

TableView의 ConnectionPannel에서 dataSource를 해당 씬에 연결한다.
extension TableViewViewController: UITableViewDataSource {
	func tableView(_ tableView: UITableView, numberOfRowsInSection section: Int) -> Int {

	}

	func tableView(_ tableView: UITableView, cellForRowAt indexPath: IndexPath) -> UITableViewCell {

	}


}
이후에 연결된 코드에서 extension으로 UITableViewDataSource 프로토콜을 채용하고 필수 메서드를 구현한다.
func tableView(_ tableView: UITableView, numberOfRowsInSection section: Int) -> Int {
	return list.count
}
첫 번째 메서드는 TableView에 표시할 Cell의 수를 반환한다.
따라서 우리가 출력할 배열의 원소의 수를 반환한다.
func tableView(_ tableView: UITableView, cellForRowAt indexPath: IndexPath) -> UITableViewCell {
	print("generate")
	let cell = tableView.dequeueReusableCell(withIdentifier: "cell", for: indexPath)
	cell.textLabel?.text = list[indexPath.row]
	return cell
}
두 번째 메서드는 셀을 디자인하고 이를 반환한다.
Cell을 생성할 때는 생성자를 사용하는 것이 아닌 TableView에 요청하게 되는데,
TableView는 메모리의 효율과 성능 극대화를 위해 재사용 메커니즘을 사용한다.
TableView는 내부적으로 재사용 큐를 관리하고,
Cell이 요청할 때마다 저장되어 있는 큐에 존재하는 Cell을 반환한다.
만약 큐에 Cell이 존재하지 않는다면 PrototypeCell을 기반으로 새로 만들어 반환한다.
Cell을 생성할 때는 tableView의 dequeueReusableCell(withIdentifier:for:) 메서드를 사용하고
파라미터로 앞서 지정한 PrototypeCell의 identifier와 메서드에서 전달받은 indexPath를 그대로 사용한다.
Cell의 위치는 Section 인덱스와 Row 인덱스를 조합해 사용하고, 이들은 각각 Section과 Row 속성에 존재한다.
이후 Cell을 디자인해야 하고, 현재 사용 중인 Basic style에서는 하나의 텍스트만 표시하면 된다.
그리고 텍스트는 배열에 저장된 값이다.
따라서 배열에 indexPath의 row 속성을 전달해 해당하는 원소를 가져와 cell에 표시한 뒤 이를 반환한다.
결과

이렇게 TableView가 완성되었다.
첫 번째 메서드는 TableView가 초기화되거나 ReloadData 메서드를 호출해 전체 데이터를 갱신하는 경우 호출된다.
단, 반드시 한 번만 호출되진 않는다.
두 번째 메서드는 생성되는 Cell의 수만큼 호출된다.

또한 스크롤해서 Cell이 화면에서 사라지는 만큼 Cell이 다시 화면에 표시될 때 반복적으로 호출되는데,
TableView가 재사용 메커니즘을 사용하기 때문이다.
func tableView(_ tableView: UITableView, numberOfRowsInSection section: Int) -> Int {
	print("count")
	return 100
}
다시 돌아와 100개의 Cell을 생성하도록 코드를 수정한다.
func tableView(_ tableView: UITableView, cellForRowAt indexPath: IndexPath) -> UITableViewCell {
	print("generate", indexPath)
	let cell = tableView.dequeueReusableCell(withIdentifier: "cell", for: indexPath)

	cell.textLabel?.text = "\(indexPath.section) / \(indexPath.row)"
	return cell
}
또한 셀에도 배열의 내용이 아닌 indexPath의 값이 표시되도록 변경하고,
콘솔에도 indexPath를 함께 출력하도록 수정한다.
결과
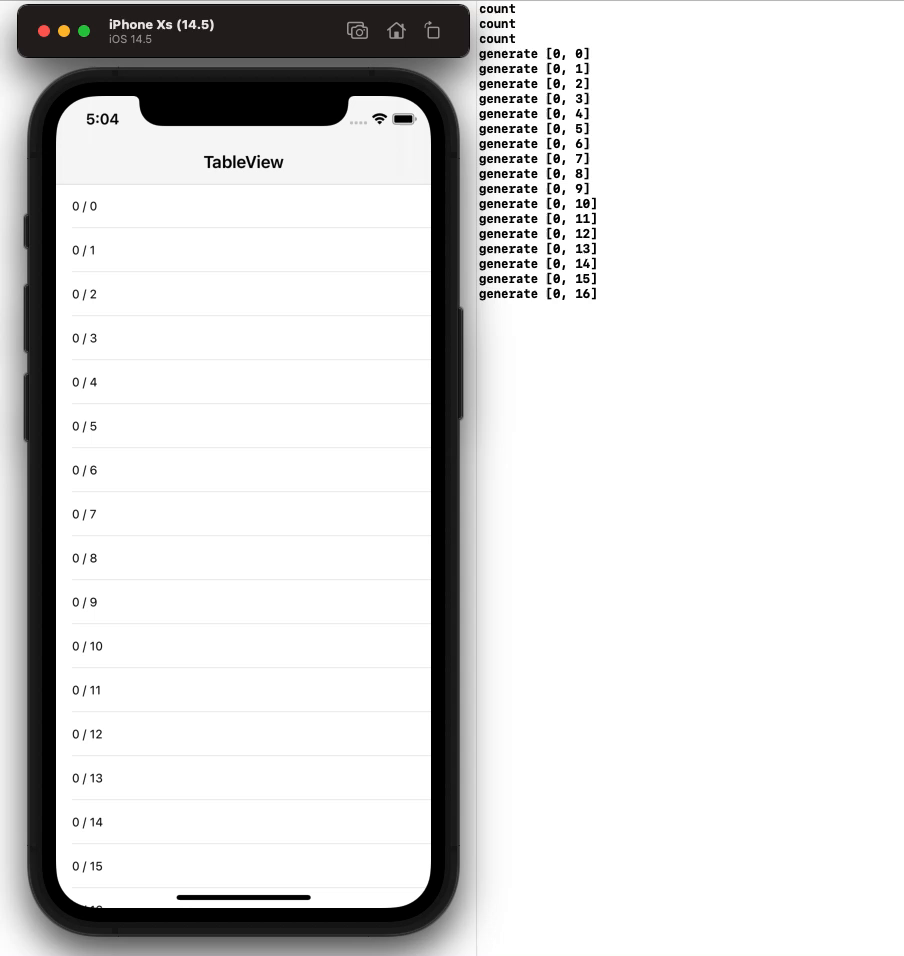
100개의 Cell을 표시하도록 했기 때문에 100개의 Cell을 만들어야 하지만 화면에 표시되는 Cell만 만드는 것이 확인된다.
만약 전부를 생성한다면 Cell이 많아질수록 효율이 너무 떨어지게 된다.
지금처럼 화면에 보이는 만큼만 만들면서도 딜레이는 느껴지지 않는 이유는 재사용 메커니즘을 적극적으로 사용하기 때문이고,
100개가 아닌 10만 개가 되어도 앱의 성능을 보장할 수 있다.
TableView는 dequeueReusableCell 메서드가 호출될 때 재사용 큐를 확인한다.
반환할 Cell이 존재한다면 반환하고, 존재하지 않는다면 PrototypeCell을 기반으로 새로 생성해 반환한다.
TableView가 처음 표시될 때는 재사용 큐에 Cell이 존재하지 않기 때문에 화면에 표시되는 만큼의 새 Cell을 생성해 반환한다.

따라서 첫 화면에 표시되는 16개의 Cell이 생성되고, Buffer를 위해 2~3개의 Cell이 추가로 생성된다.
만약 스크롤해 맨 위의 0 / 0 Cell이 화면에서 사라지면 Cell은 삭제되는 것이 아닌 재사용 큐에 저장되게 되고,
새로운 Cell인 0 / 17 Cell이 새롭게 생성되는데 이 0 / 17 Cell이 바로 직전에 저장된 재사용 Cell이다.
재사용 큐에 저장되는 Cell에는 별다른 작업을 하지 않고 그대로 저장하지만,
사용할 때는 적절한 처리 과정을 거쳐 사용되게 된다.
따라서 메모리와 시스템 성능에 영향받지 않고 이론상 무한한 Cell을 표시하는 것이 가능하다.
하지만 이론과 현실은 다르기 때문에 성능에 영향을 줄 수 있으며,
두 번째 메서드의 경우 가능한 한 가볍게 구현하는 것이 중요하다.
가볍게의 기준은 16ms 안에 Cell 반환이 가능해야 한다.
정리
- StoryBoard에 TableView와 TableViewCell을 추가하고 구성한다.
- PrototypeCell에 Identifier를 추가한다.
- TableView의 DataSource를 지정하고, 필요에 따라 Delegate까지 지정한다.
- DataSource로 지정된 Class에서 UITableViewDataSource 프로토콜을 채용하고, 필수 메서드를 구현한다.
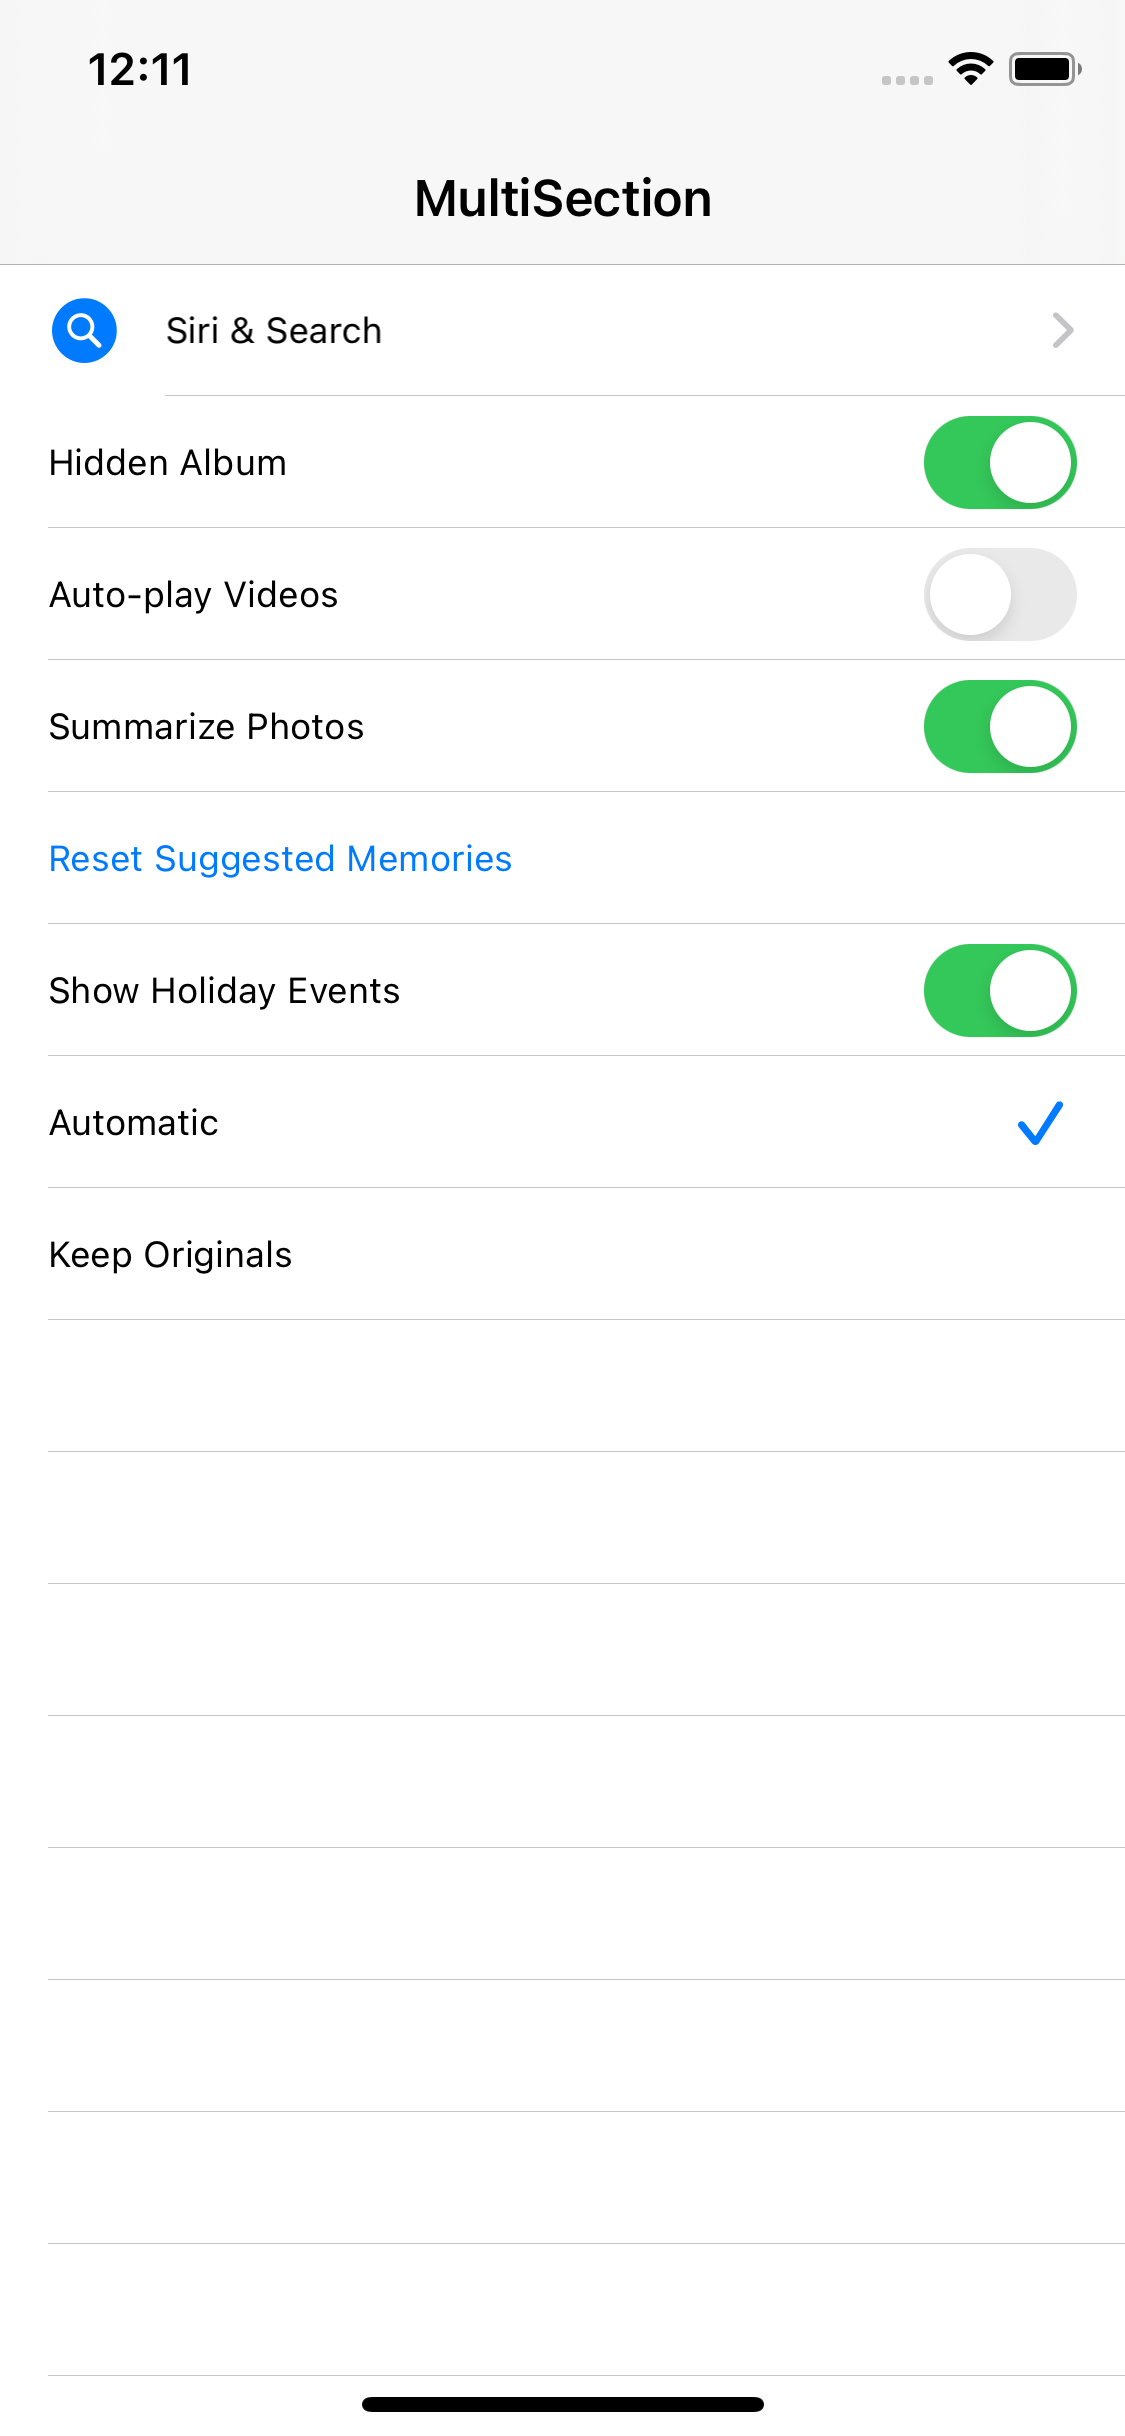
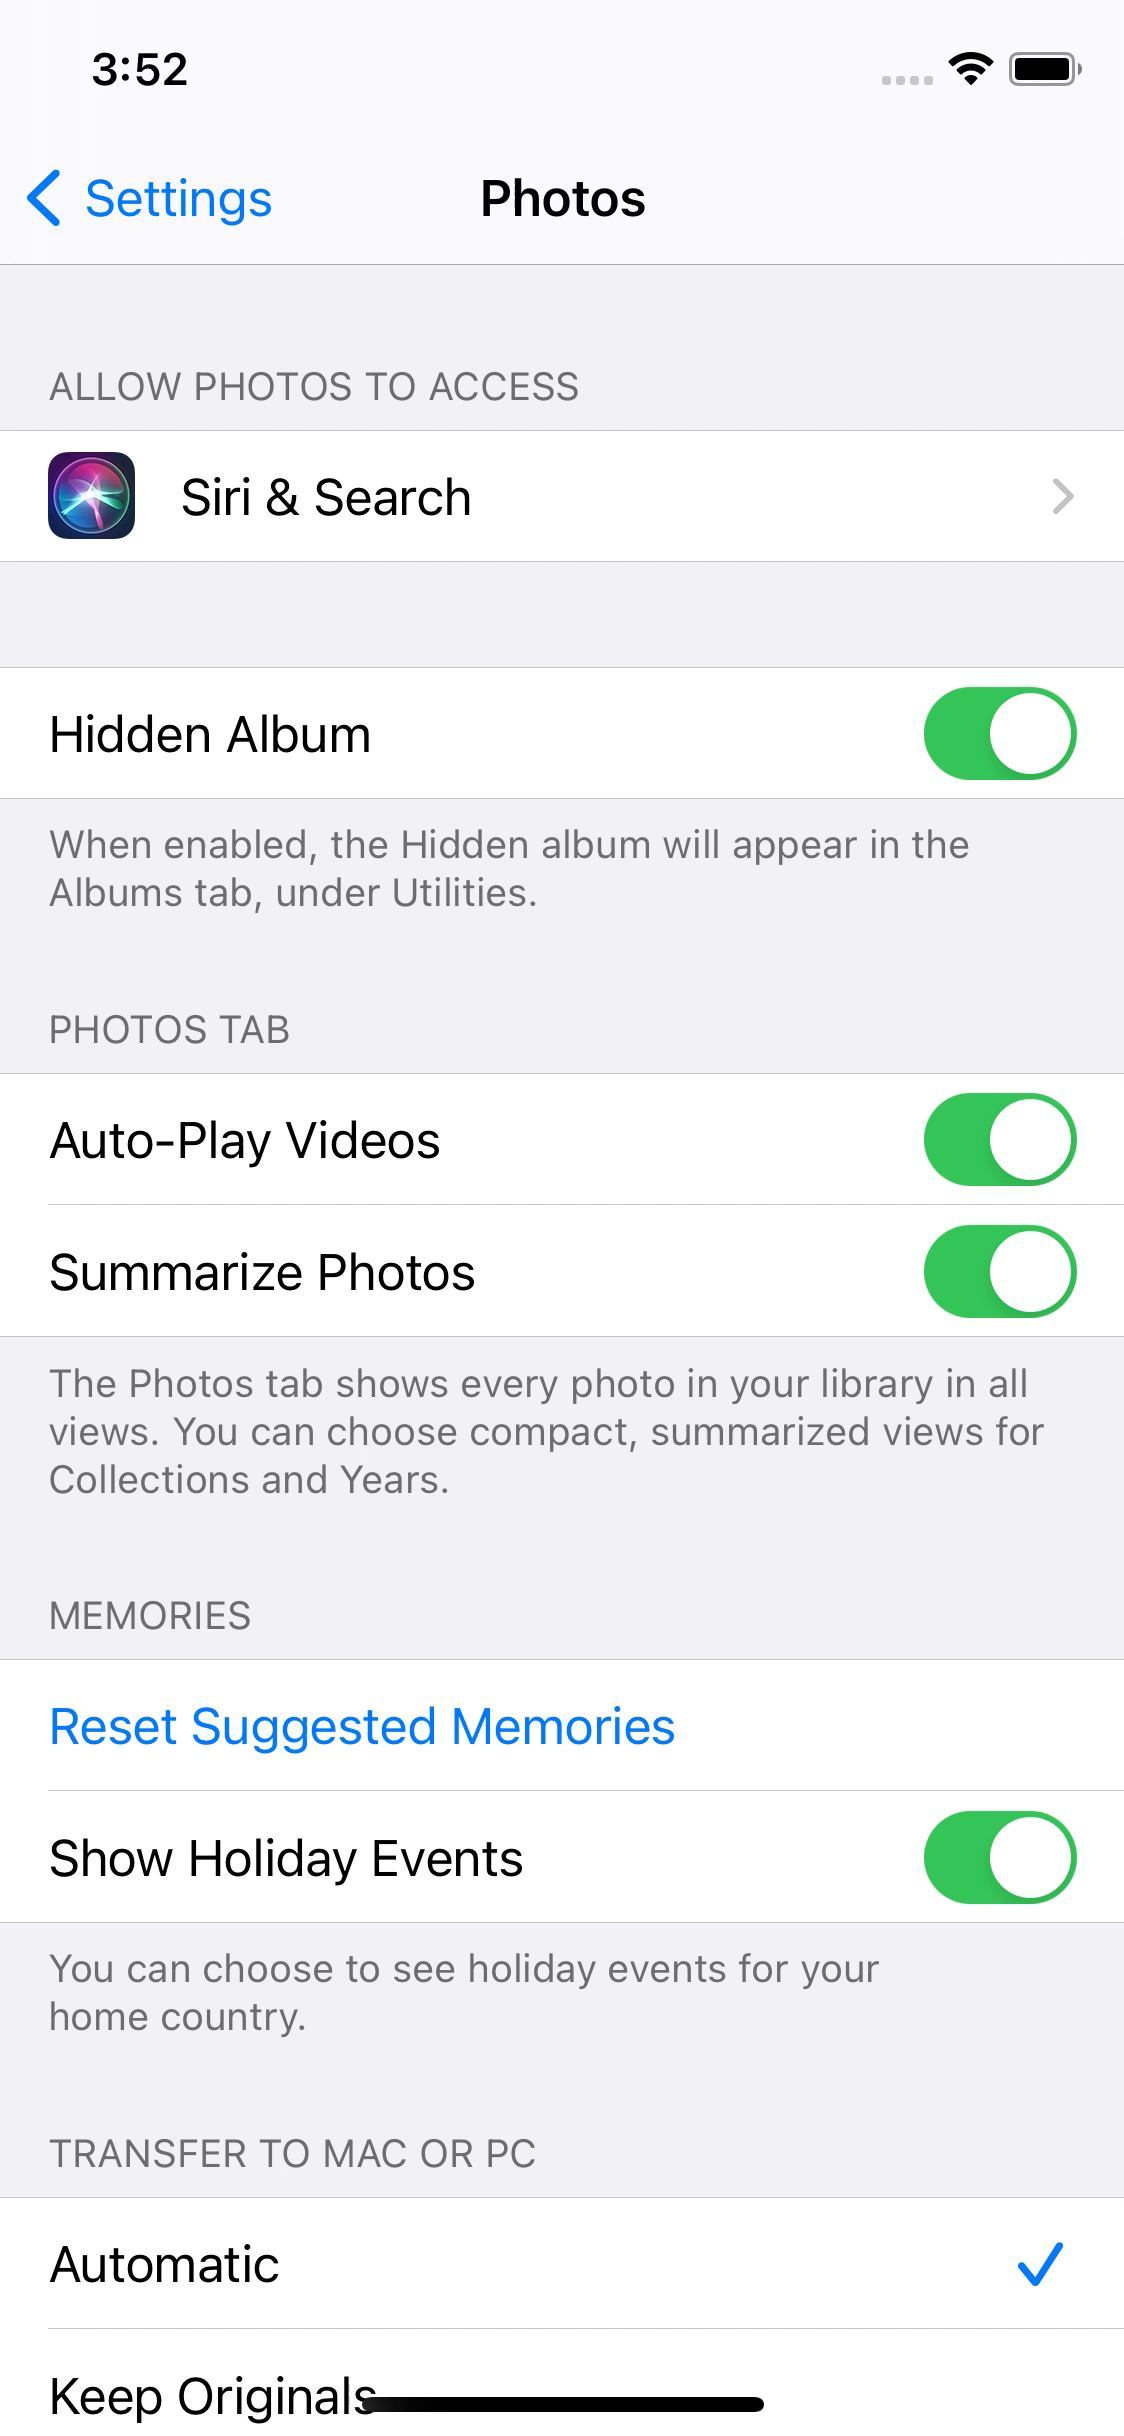
Multi Section
이번엔 위와 동일한 UI를 MultiSection을 통해 구현해 본다.
//
// PhotoSetting.swift
// TableViewTest
//
// Created by Martin.Q on 2021/09/02.
//
import UIKit
enum CellType: String {
case action
case disclosure
case `switch`
case chaeckmark
}
class PhotoSettingItem {
init(type: CellType, title: String, on: Bool = false, imageName: String? = nil) {
self.type = type
self.title = title
self.on = on
self.imageName = imageName
}
let type: CellType
let title: String
var on: Bool
var imageName: String?
}
class PhotoSettingSection {
init(items: [PhotoSettingItem], header: String? = nil, footer: String? = nil) {
self.items = items
self.header = header
self.footer = footer
}
let items: [PhotoSettingItem]
var header: String?
var footer: String?
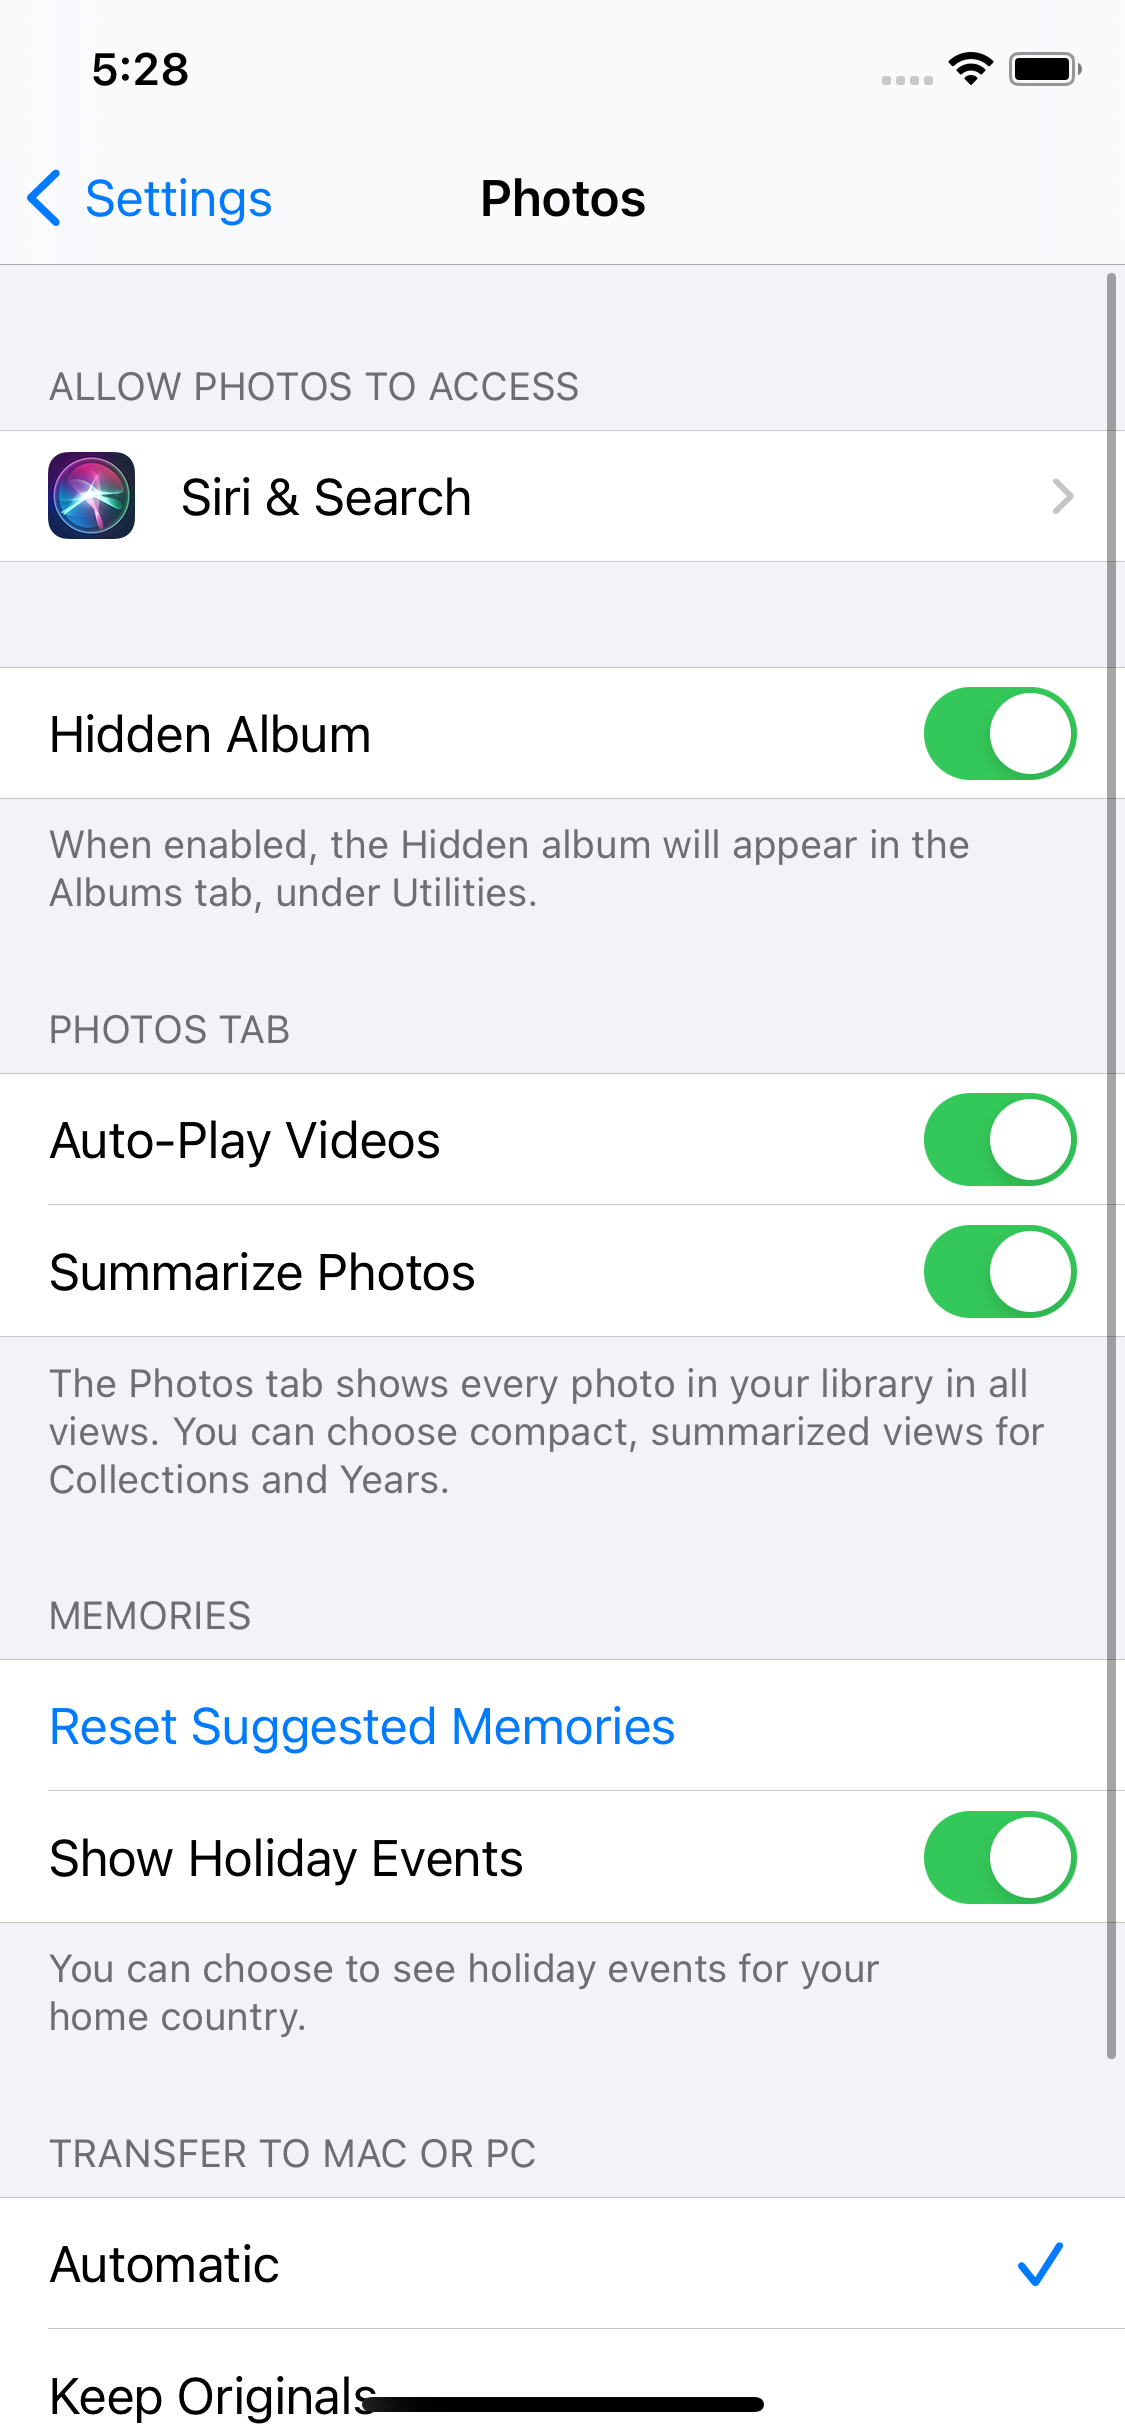
static func generateData() -> [PhotoSettingSection] {
return [
PhotoSettingSection(items: [
PhotoSettingItem(type: .disclosure, title: "Siri & Search", imageName: "magnifyingglass.circle.fill")
],
header: "Allow Photos to Access"),
PhotoSettingSection(items: [
PhotoSettingItem(type: .switch, title: "Hidden Album", on: true)
],
footer: "When enabled, the Hidden album will appear in the Albums tab, under Utilities."),
PhotoSettingSection(items: [
PhotoSettingItem(type: .switch, title: "Auto-play Videos", on: false),
PhotoSettingItem(type: .switch, title: "Summarize Photos", on: true)
],
header: "Photos Tab",
footer: "The Photos tab shows every photo in your library in all views. You can choose compact, summarized views for Collections and Years."),
PhotoSettingSection(items: [
PhotoSettingItem(type: .action, title: "Reset Suggested Memories"),
PhotoSettingItem(type: .switch, title: "Show Holiday Events", on: true)
],
header: "Memories",
footer: "You can choose to see holiday events for your home country."),
PhotoSettingSection(items: [
PhotoSettingItem(type: .chaeckmark, title: "Automatic", on: true),
PhotoSettingItem(type: .chaeckmark, title: "Keep Originals", on: false)
],
header: "Transfer to mac or PC",
footer: "Automatically transfer photos and videos in a compitable format, or always transfer the original file without checking for compatibillity.")
]
}
}Cell에 표시할 내용들은 위와 같이 작성됐다
class PhotoSettingItem {
	init(type: CellType, title: String, on: Bool = false, imageName: String? = nil) {
		self.type = type
		self.title = title
		self.on = on
		self.imageName = imageName
	}

	let type: CellType
	let title: String
	var on: Bool
	var imageName: String?
}
Cell에 표시할 데이터는 PhotoSettingItem 구조체로 저장한다.
type에는 cell의 타입을, title에는 표시할 텍스트를, on은 활성화 여부를, imageName은 함께 표시할 이미지를 저장한다.
class PhotoSettingSection {
	init(items: [PhotoSettingItem], header: String? = nil, footer: String? = nil) {
		self.items = items
		self.header = header
		self.footer = footer
	}

	let items: [PhotoSettingItem]
	var header: String?
	var footer: String?
	//...
}
Section 구성에는 PhotoSeettingSection 구조체를 사용한다.
items에는 section에 표시할 아이템 구조체를, header와 footer에는 section에 표시할 텍스트를 저장한다.
마지막 generateData는 표시할 샘플 데이터를 반환한다.
씬에는 4개의 Cell이 필요하고,
첫 번째 Cell은 Basic 스타일, Identifier는 disclosure, Accessory는 Disclodure Indicator로 설정했다.
이후 오른쪽에 스위치를 추가하기 위해서는 CustomCell를 사용하거나 CustomAccessoryView를 사용해야 한다.
이번엔 후자를 사용해 구현한다.
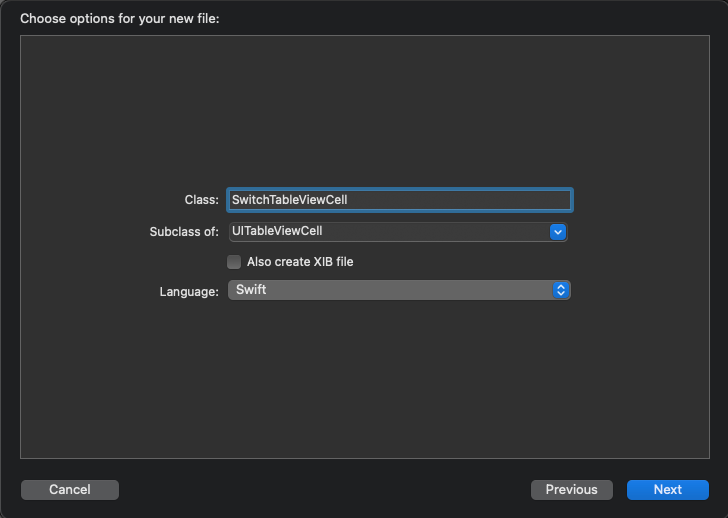
cocoaTouch 프레임 워크를 선택하고 UITableViewCell을 상속받도록 생성한다.
//
//  SwitchTableViewCell.swift
//  TableViewTest
//
//  Created by Martin.Q on 2021/09/02.
//

import UIKit

class SwitchTableViewCell: UITableViewCell {

	override func awakeFromNib() {
		super.awakeFromNib()
	}

	override func setSelected(_ selected: Bool, animated: Bool) {
		super.setSelected(selected, animated: animated)
	}

}
생성 후 자동으로 작성되어 있는 awakeFromNib 메서드 안에서 cell을 초기화하게 된다.
override func awakeFromNib() {
	super.awakeFromNib()
	let accSwitch = UISwitch(frame: .zero)
	accessoryView = accSwitch
}
switch를 하나 생성하고 accessoryView에 추가하면 cell의 오른쪽에 나타나게 된다.
이후 두 번째 cell의 customClass로 지정한다.


attributeInspector에서 두 번째, 세 번째, 네 번째 Cell의 스타일을 Basic으로, Identifier를 각자 설정해 준다.
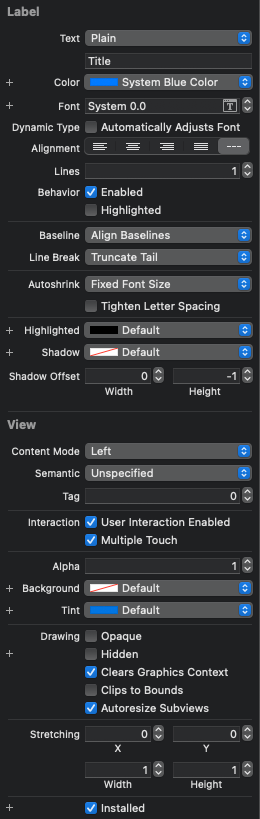
또한 마지막 Cell의 Label 색상을 System Blue로 변경한다.
이후 TableView의 dataSource를 해당 씬에 연결한다.
//
//  TableViewViewController.swift
//  TableViewTest
//
//  Created by Martin.Q on 2021/09/02.
//

import UIKit

class TableViewViewController: UIViewController {

	let list = PhotoSettingSection.generateData()

	func toggleHideAlbum(_ sender: UISwitch) {
		print(#function)
		list[1].items[0].on.toggle()
	}

	func toggleAutoPlayVideos(_ sender: UISwitch) {
		print(#function)
		list[2].items[0].on.toggle()
	}

	func toggleSummarizePhotos(_ sender: UISwitch) {
		print(#function)
		list[2].items[1].on.toggle()
	}

	func toggleShowHolidauEvents(_ sender: UISwitch) {
		print(#function)
		list[3].items[1].on.toggle()
	}

	func showActionSheet() {
		let sheet = UIAlertController(title: nil, message: "Resetting will allow previously blocked people, places, dates, or holidays to once again be included in new memories", preferredStyle: .actionSheet)

		let resetAction = UIAlertAction(title: "Reset", style: .destructive, handler: nil)
		let cancelAction = UIAlertAction(title: "Cancel", style: .cancel, handler: nil)

		sheet.addAction(resetAction)
		sheet.addAction(cancelAction)

		if let pc = sheet.popoverPresentationController {
			if let tbl = view.subviews.first(where: { $0 is UITableView}) as? UITableView {
				if let cell = tbl.cellForRow(at: IndexPath(row: 0, section: 3)) {
					pc.sourceView = cell
					pc.sourceRect = tbl.frame
				}
			}
		}

		present(sheet, animated: true, completion: nil)
	}

	override func viewDidLoad() {
		super.viewDidLoad()
	}
}
씬에 연결된 코드에는 각각의 switch를 toggle 했을 때 호출할 메서드와 출력할 actionsheet를 구성했다.
해당 클래스의 밖에 UITableViewDataSource를 채용하도록 extension을 구성한다.
extension TableViewViewController: UITableViewDataSource {
	func numberOfSections(in tableView: UITableView) -> Int {
		return list.count
	}
	func tableView(_ tableView: UITableView, numberOfRowsInSection section: Int) -> Int {
		return list[section].items.count
	}

	func tableView(_ tableView: UITableView, cellForRowAt indexPath: IndexPath) -> UITableViewCell {
		let target = list[indexPath.section].items[indexPath.row]

		let cell = tableView.dequeueReusableCell(withIdentifier: target.type.rawValue, for: indexPath)

		cell.textLabel?.text = target.title
		switch target.type{
			case .disclosure:
				cell.imageView?.image = UIImage(systemName: target.imageName ?? "")
			case .switch:
				if let switchView = cell.accessoryView as? UISwitch {
					switchView.isOn = target.on
				}
			case .action:
				break
			case .checkmark:
				cell.accessoryType = target.on ? .checkmark : .none
		}
		return cell
	}


}
TableView에서 표시할 Section의 수는 numberOfSections 메서드를 사용해 결정한다.
표시할 최종적인 Section의 수는 generateData 메서드에서 만들어지는 구조체의 수이고,
이 반환 값들은 list에 저장되므로 list의 원소의 수를 반환한다.
표시할 Cell의 수는 list에 저장된 section 내의 items 속성이므로
인덱스로 section을 전달하고 해당 섹션의 items의 수를 반환한다.
section이 아닌 복수의 section을 가지고 있기 때문에,
section 내의 items에 Cell이 저장되며, 해당 cell을 dequeueReusableCell에 전달해 Cell을 생성한다.
생성된 cell에는 이전에 설정한 identifier와 CellType 열거형을 사용해 분기해 디자인을 진행한다.
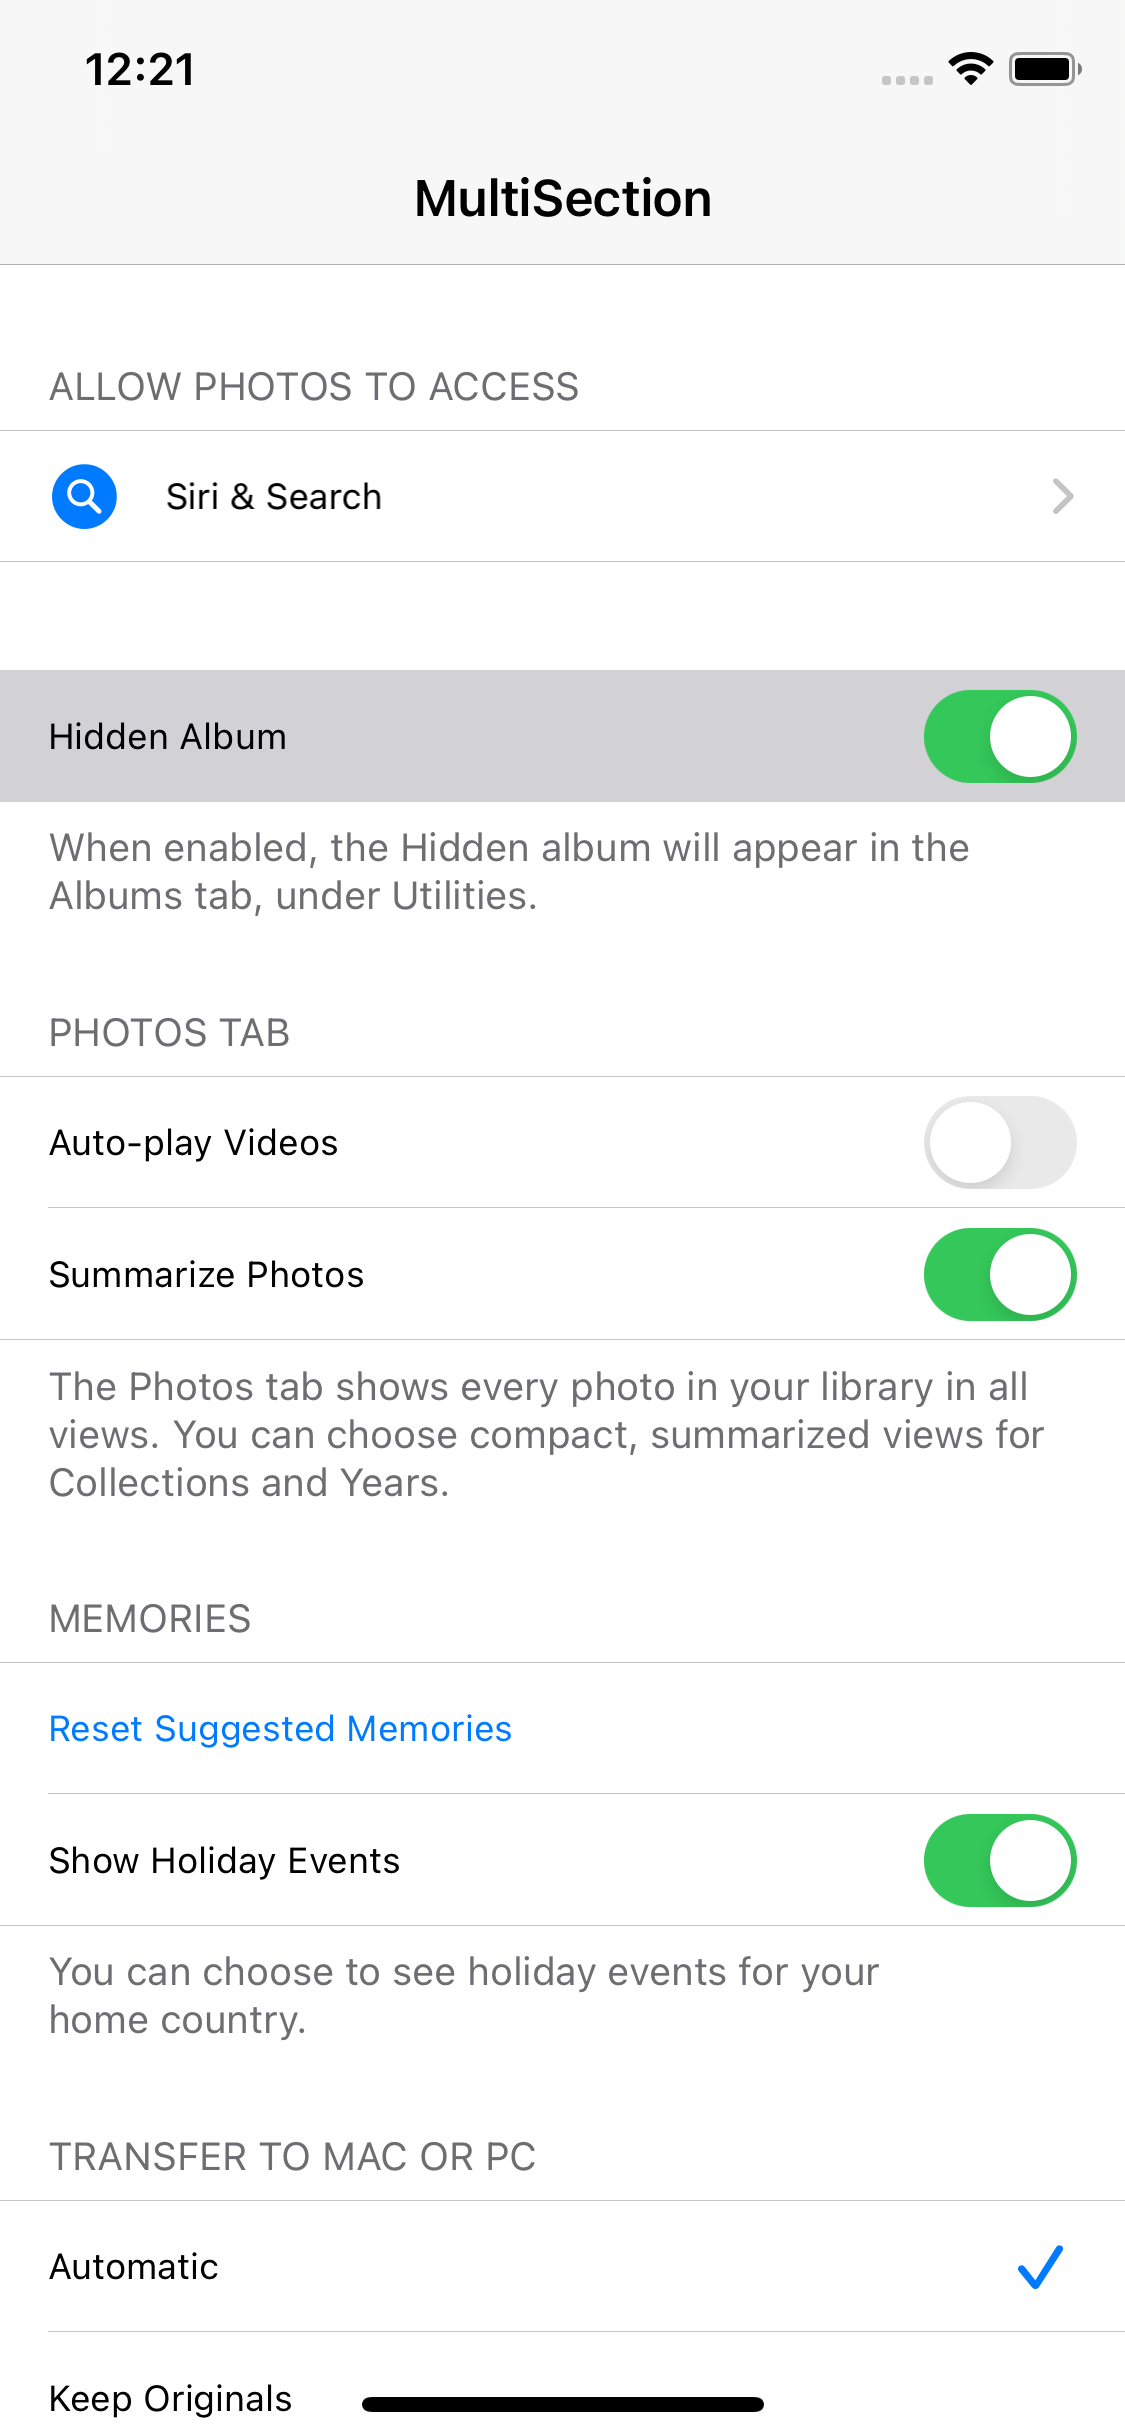
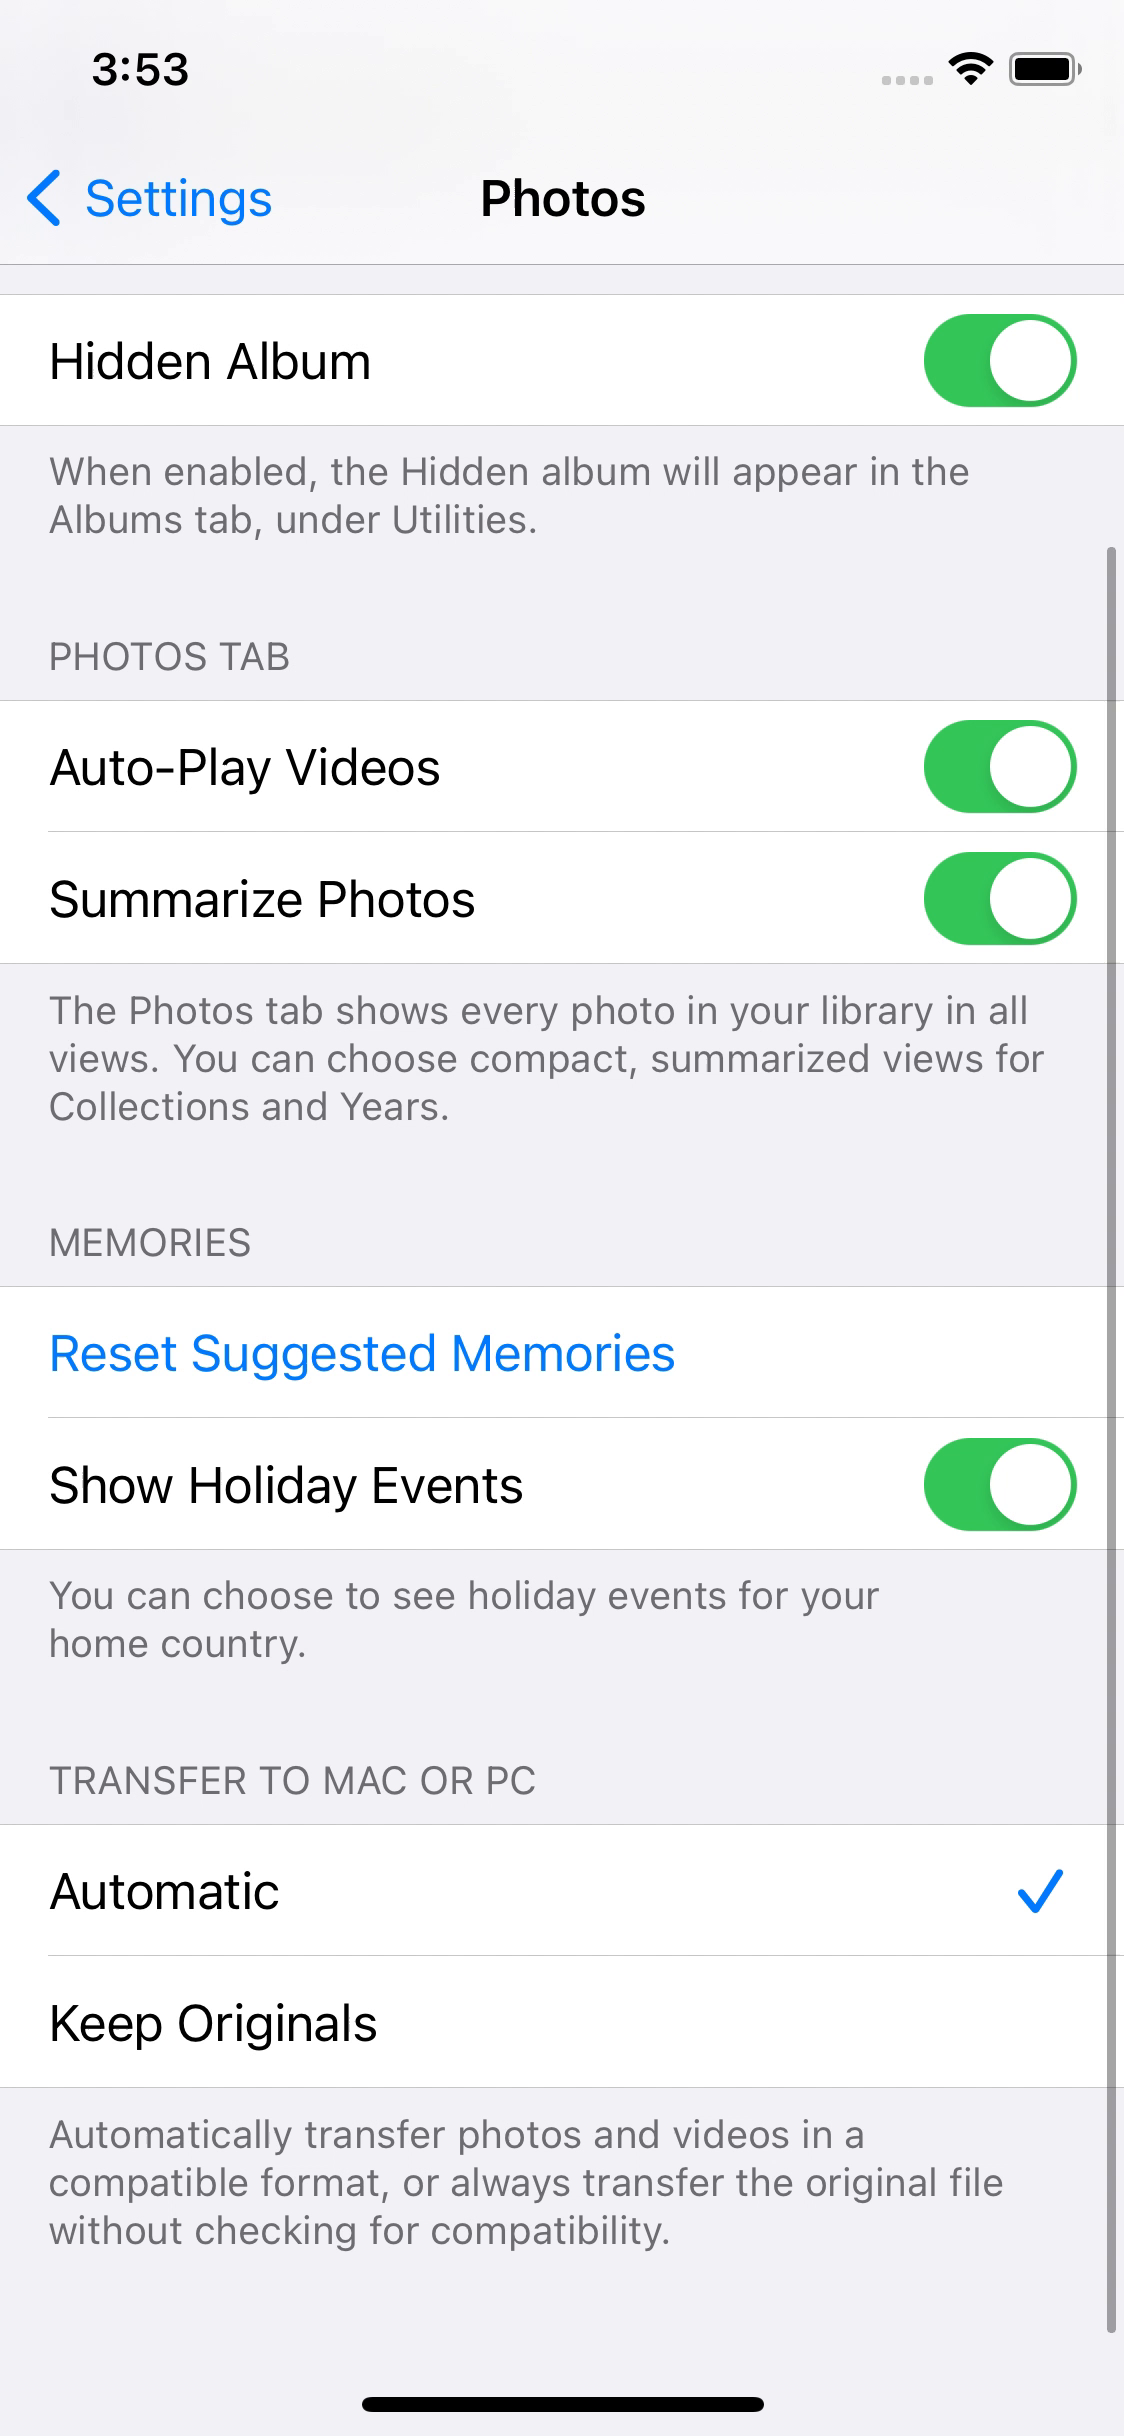
결과

대상으로 삼았던 화면과 직접 만든 화면이다.
구성요소는 대부분 비슷하지만 Section별로의 구별이 되지 않아 시각적으로 매우 다르다.
또한 header와 footer도 표시되지 않아 어떤 Section인지도 확인할 수 없다.
TableView는 plain이 기본 스타일이고, section이 시각적으로 구분되지 않는다.


따라서 이번엔 TableView의 Style을 Grouped로 변경하고 확인하면 조금 더 원본과 닮아진 것을 볼 수 있다.
extension TableViewViewController: UITableViewDataSource {
	func numberOfSections(in tableView: UITableView) -> Int {
		return list.count
	}
	func tableView(_ tableView: UITableView, numberOfRowsInSection section: Int) -> Int {
		return list[section].items.count
	}

	func tableView(_ tableView: UITableView, cellForRowAt indexPath: IndexPath) -> UITableViewCell {
		let target = list[indexPath.section].items[indexPath.row]

		let cell = tableView.dequeueReusableCell(withIdentifier: target.type.rawValue, for: indexPath)

		cell.textLabel?.text = target.title
		switch target.type{
			case .disclosure:
				cell.imageView?.image = UIImage(systemName: target.imageName ?? "")
			case .switch:
				if let switchView = cell.accessoryView as? UISwitch {
					switchView.isOn = target.on
				}
			case .action:
				break
			case .checkmark:
				cell.accessoryType = target.on ? .checkmark : .none
		}
		return cell
	}
	func tableView(_ tableView: UITableView, titleForHeaderInSection section: Int) -> String? {
		return list[section].header
	}
	func tableView(_ tableView: UITableView, titleForFooterInSection section: Int) -> String? {
		return list[section].footer
	}
}
이렇게 tableView(titleForHeaderInSection:) 메서드와 tableView(titleForFooterInSection:) 메서드를 사용해
header와 footer를 표시해 주면
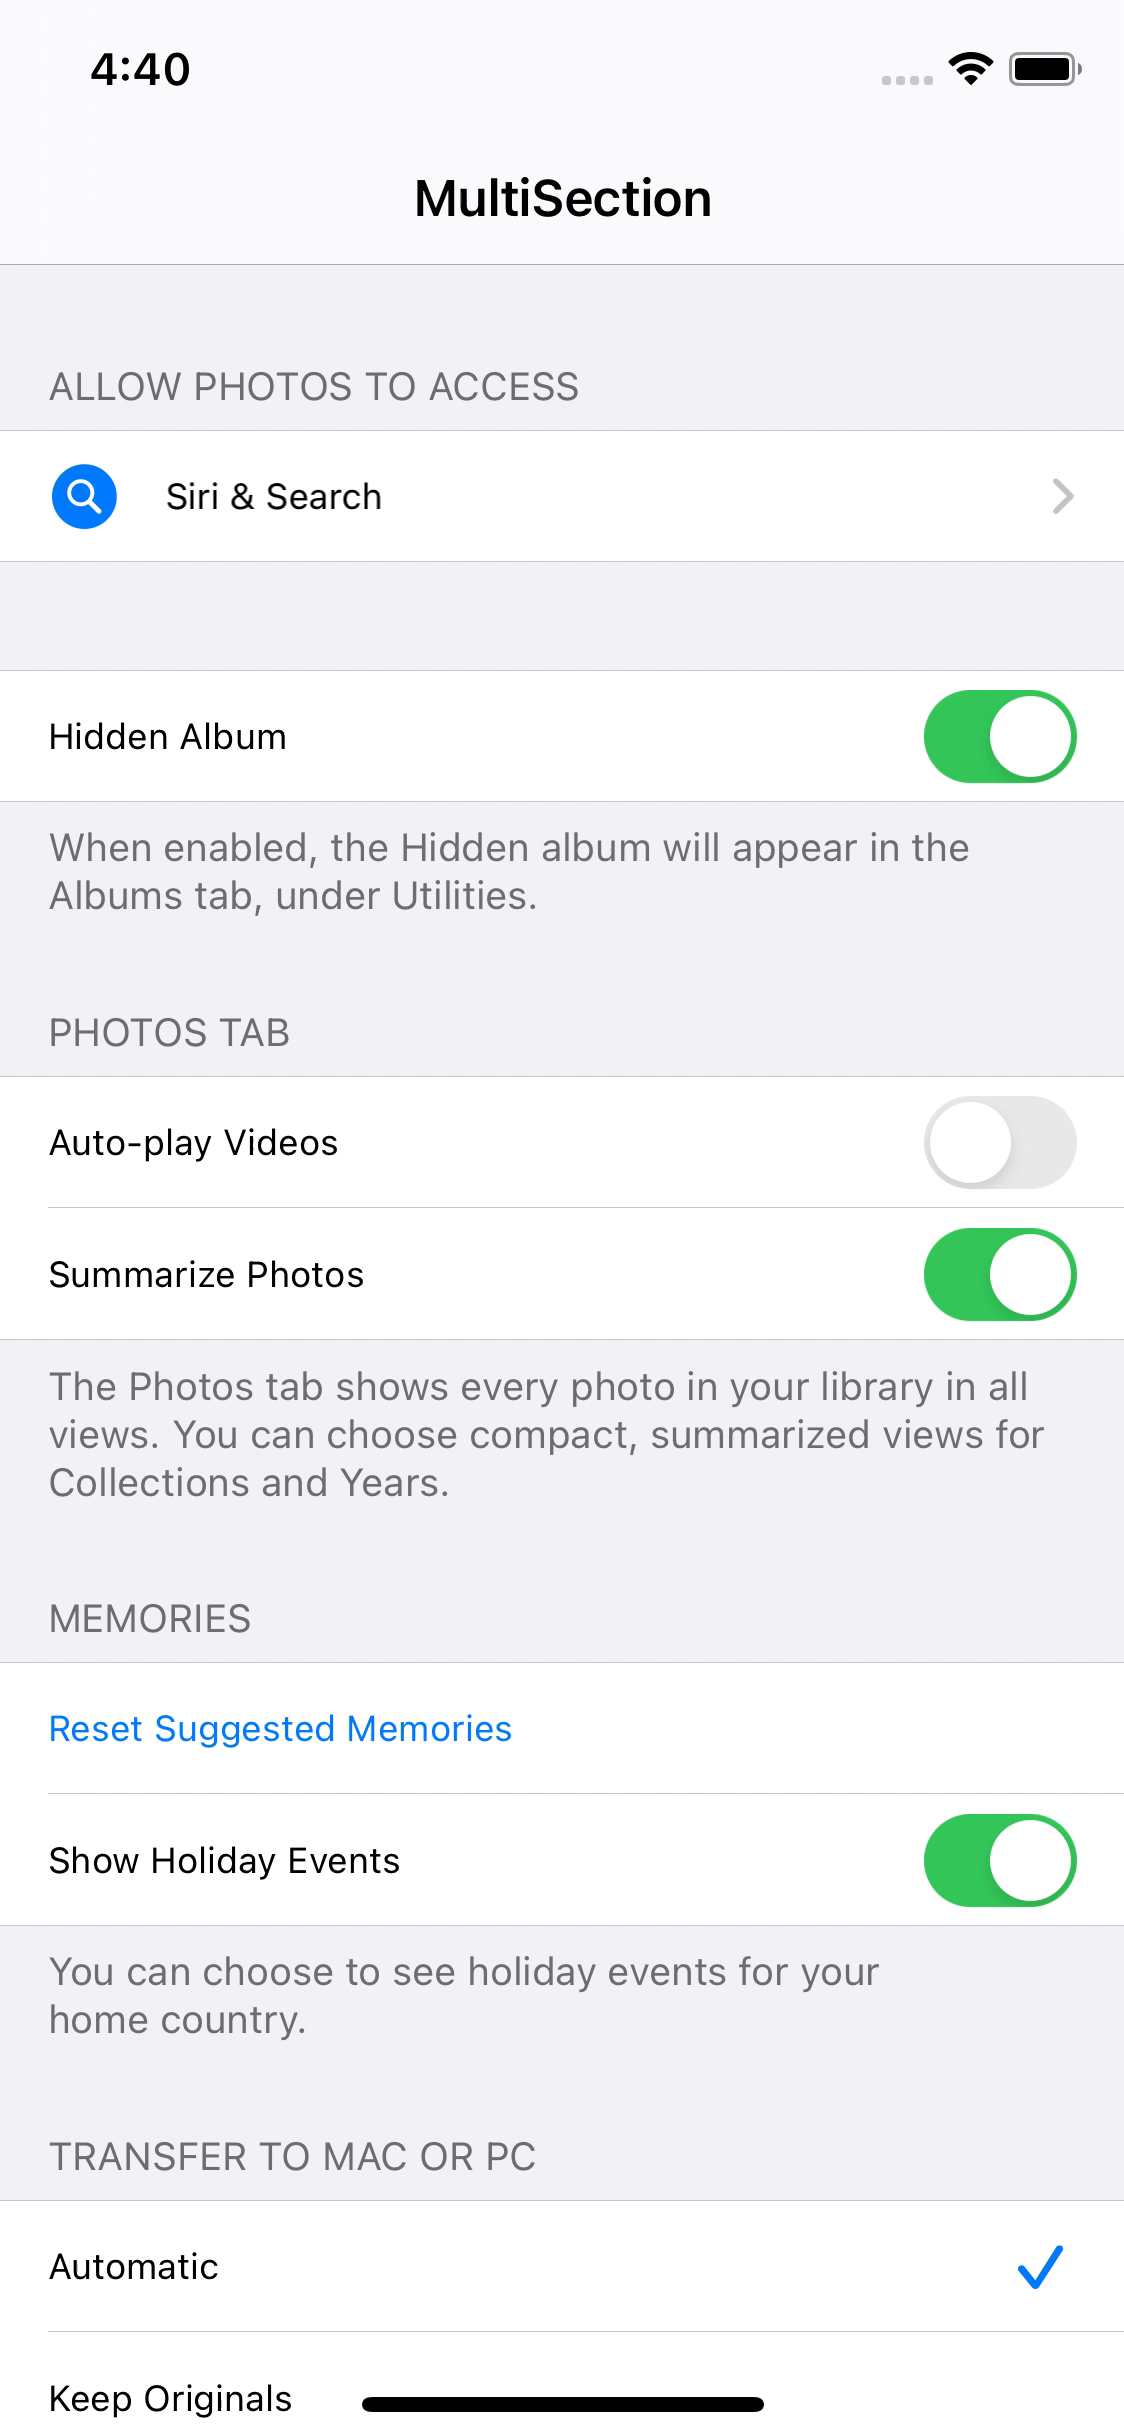
결과

거의 흡사해진 화면을 확인할 수 있다.


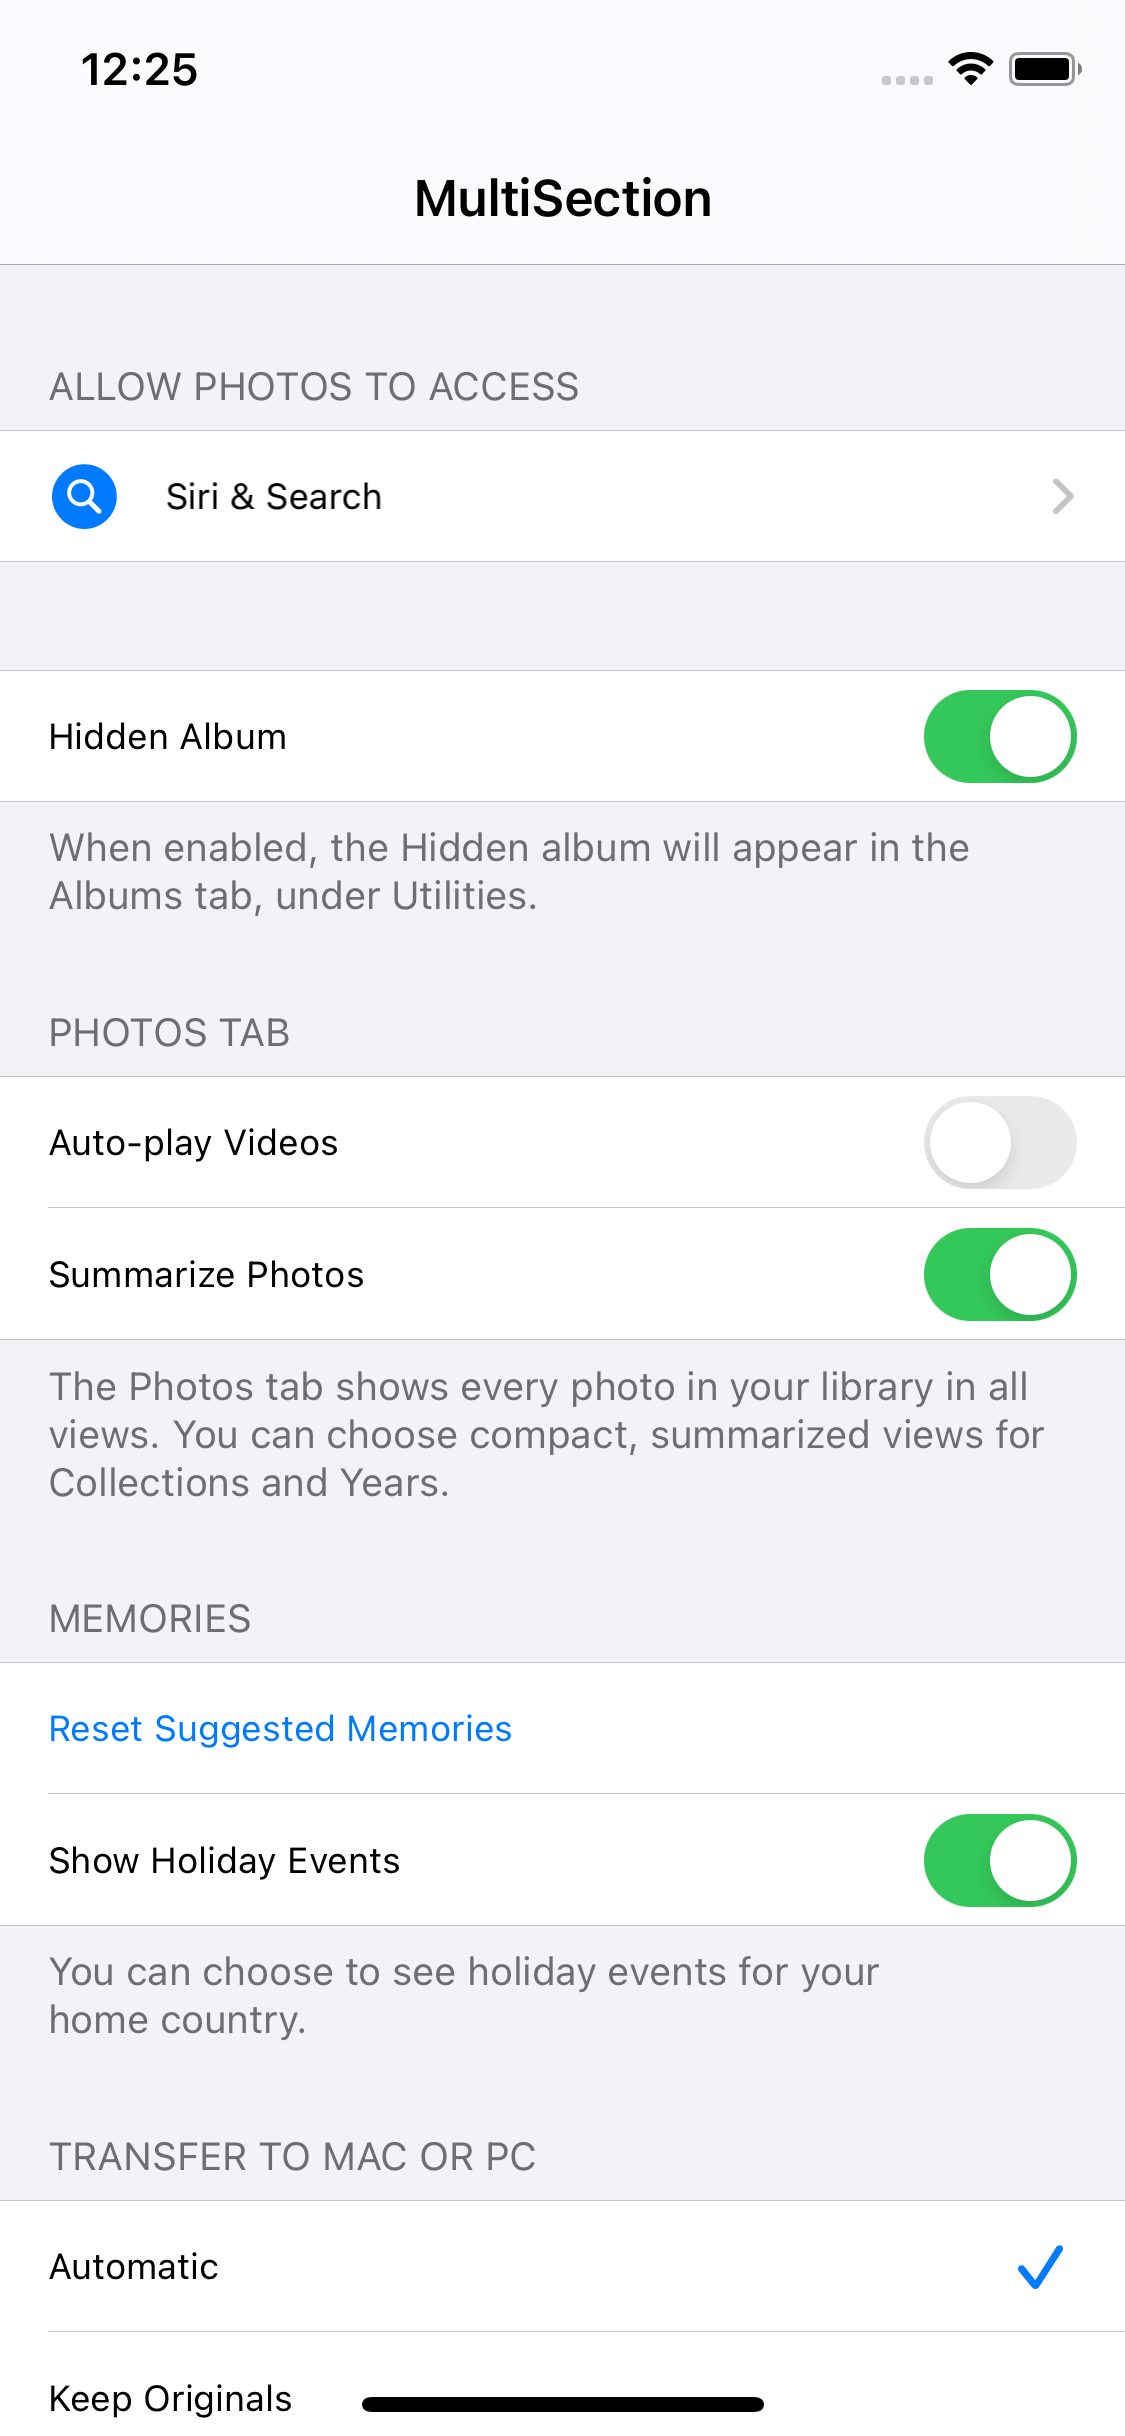
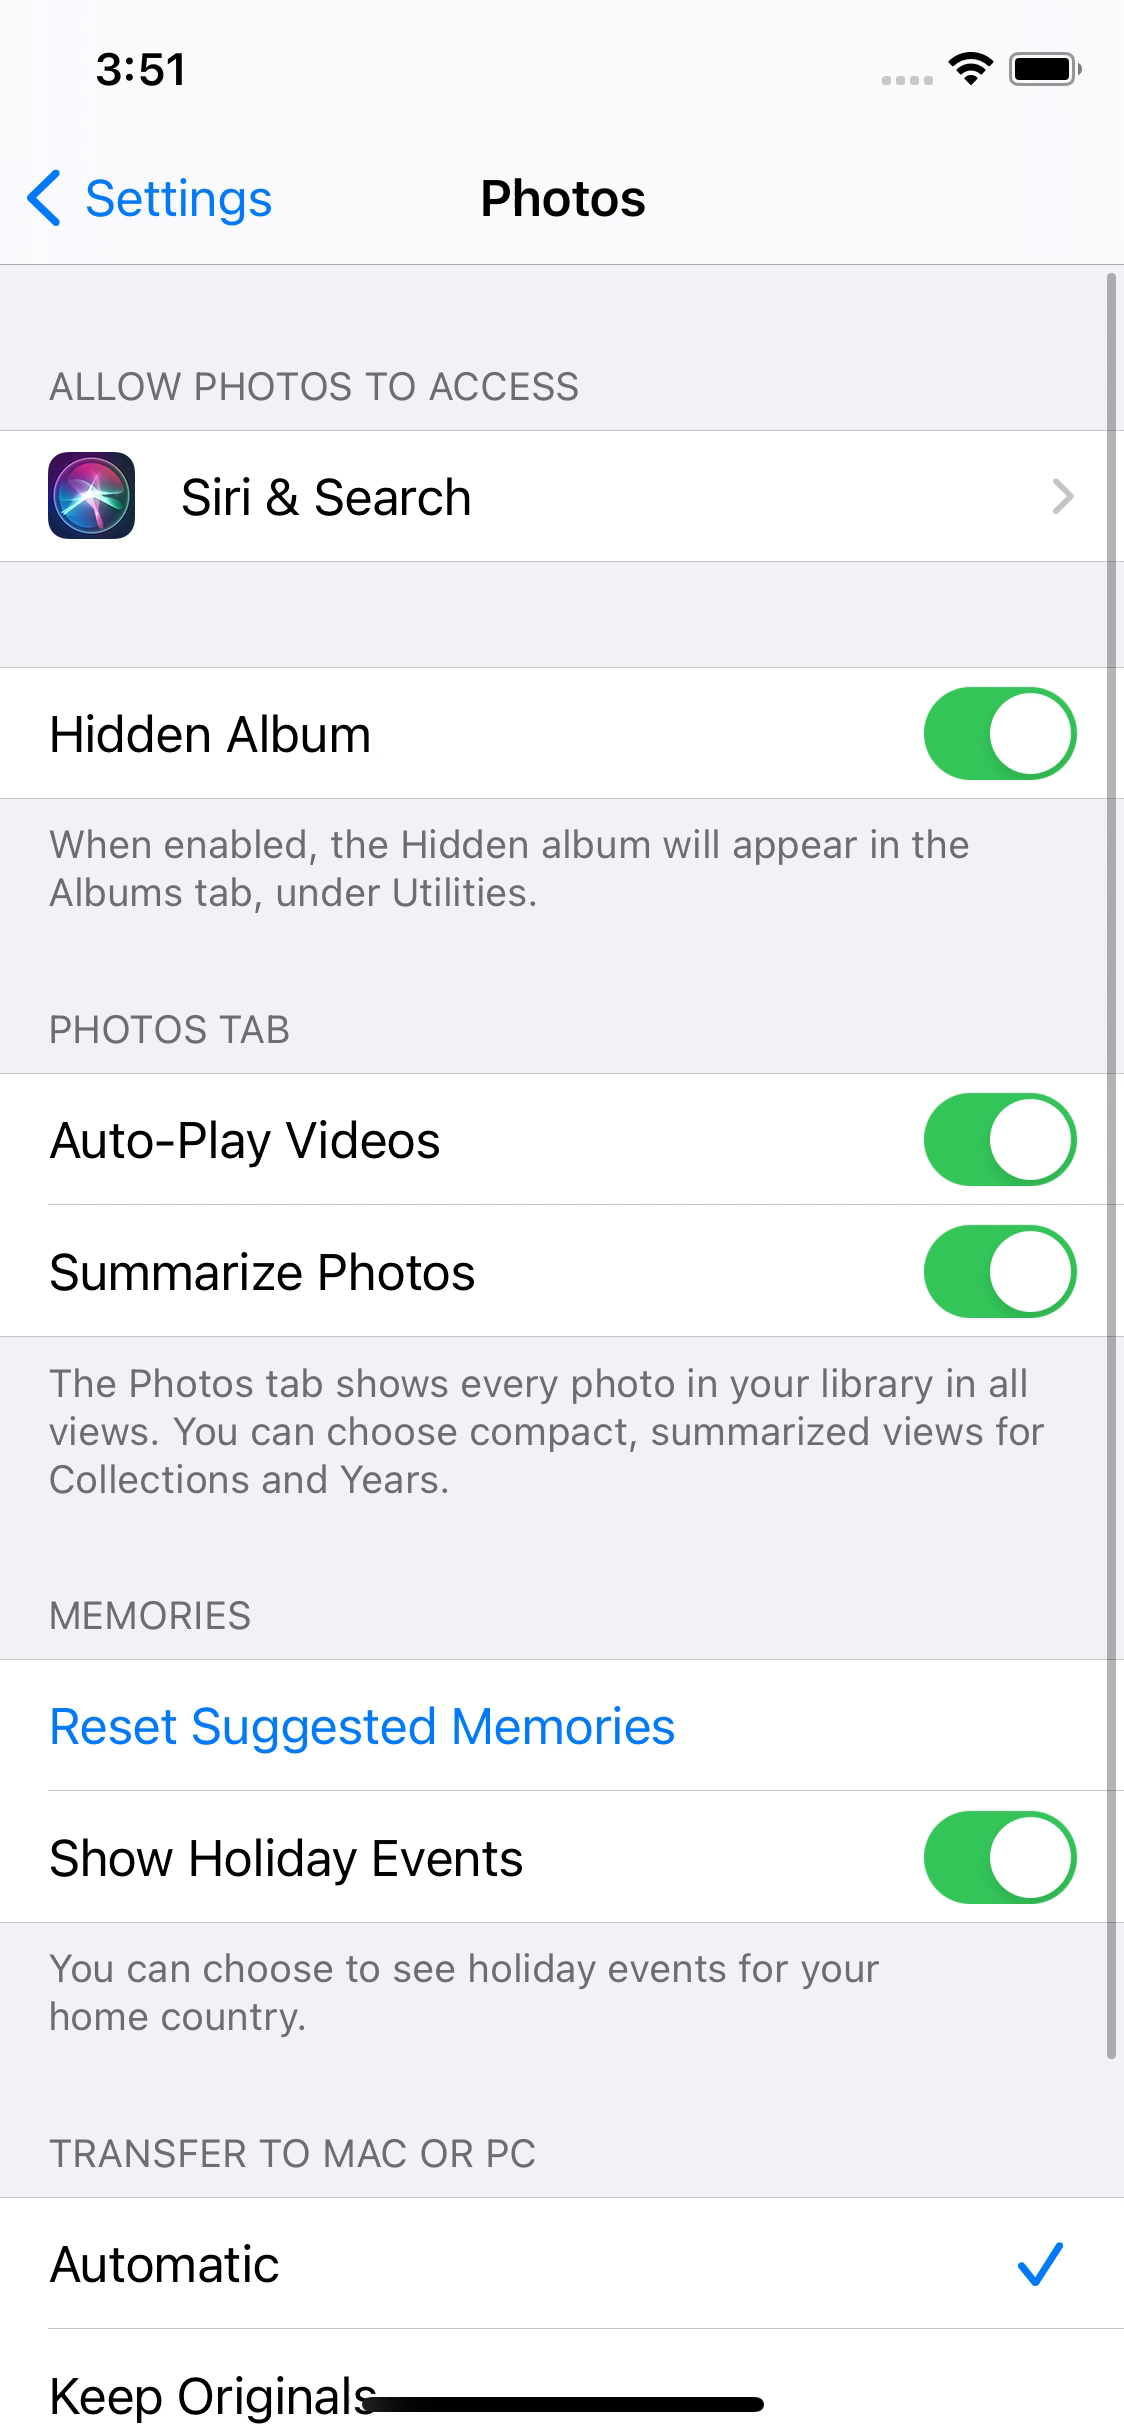
마지막으로 TableView의 Background 색을 System GroupedBackground Color로 변경하면
이제는 똑같다고 봐도 될 수준의 비주얼을 갖게 되었다.
여기까지가 UI 구성이다.

Siri & Search 셀은 하이라이트와 함께 새로운 화면으로 전환된다.
Switch가 포함된 셀은 하이라이트 없이 switch만 작동된다.
Reset Suggested Memories 셀은 하이라이트와 함께 ActionSheet가 표시된다.
CheckMark가 있는 셀은 하이라이트 없이 CheckMark만 전환된다.
하이라이트 없애기


하이라이트 효과가 필요 없는 switch와 checkmark 셀을 선택한 뒤,
Selection 속성을 None으로 변경한다.
새 Scene 생성, 연결

dataSource와 마찬가지로 delegate를 씬에 연결한다.

Siri & Search 셀을 터치하면 새로운 화면으로 전환되어야 하기 때문에 새로운 뷰 컨트롤러를 생성한 뒤,
첫 번째 셀과 show방식으로 연결한다.
@IBOutlet weak var listTable: UITableView!코드에는 TableView가 발생시키는 이벤트를 처리하기 위해 outlet으로 연결한다.
override func viewWillAppear(_ animated: Bool) {
	super.viewWillAppear(animated)

}
새로운 메서드를 작성한다.
viewDidLoad와는 이름이 좀 다른 viewWillAppear 메서드로, 씬이 나타나기 직전에 호출되는 메서드이다.
즉 다시 돌아올 때에도 호출되게 되는데, 이 메서드에서 강조됐던 셀을 원래대로 되돌려 놓도록 한다.
override func viewWillAppear(_ animated: Bool) {
	super.viewWillAppear(animated)

	if let selected = listTable.indexPathForSelectedRow {
		listTable.deselectRow(at: selected, animated: true)
	}
}
TableView의 indexPathForSelectedRow 속성을 통해 하이라이트 된 셀이 있는지 탐색한 뒤,
존재하면 해당 셀의 하이라이트를 해제한다.
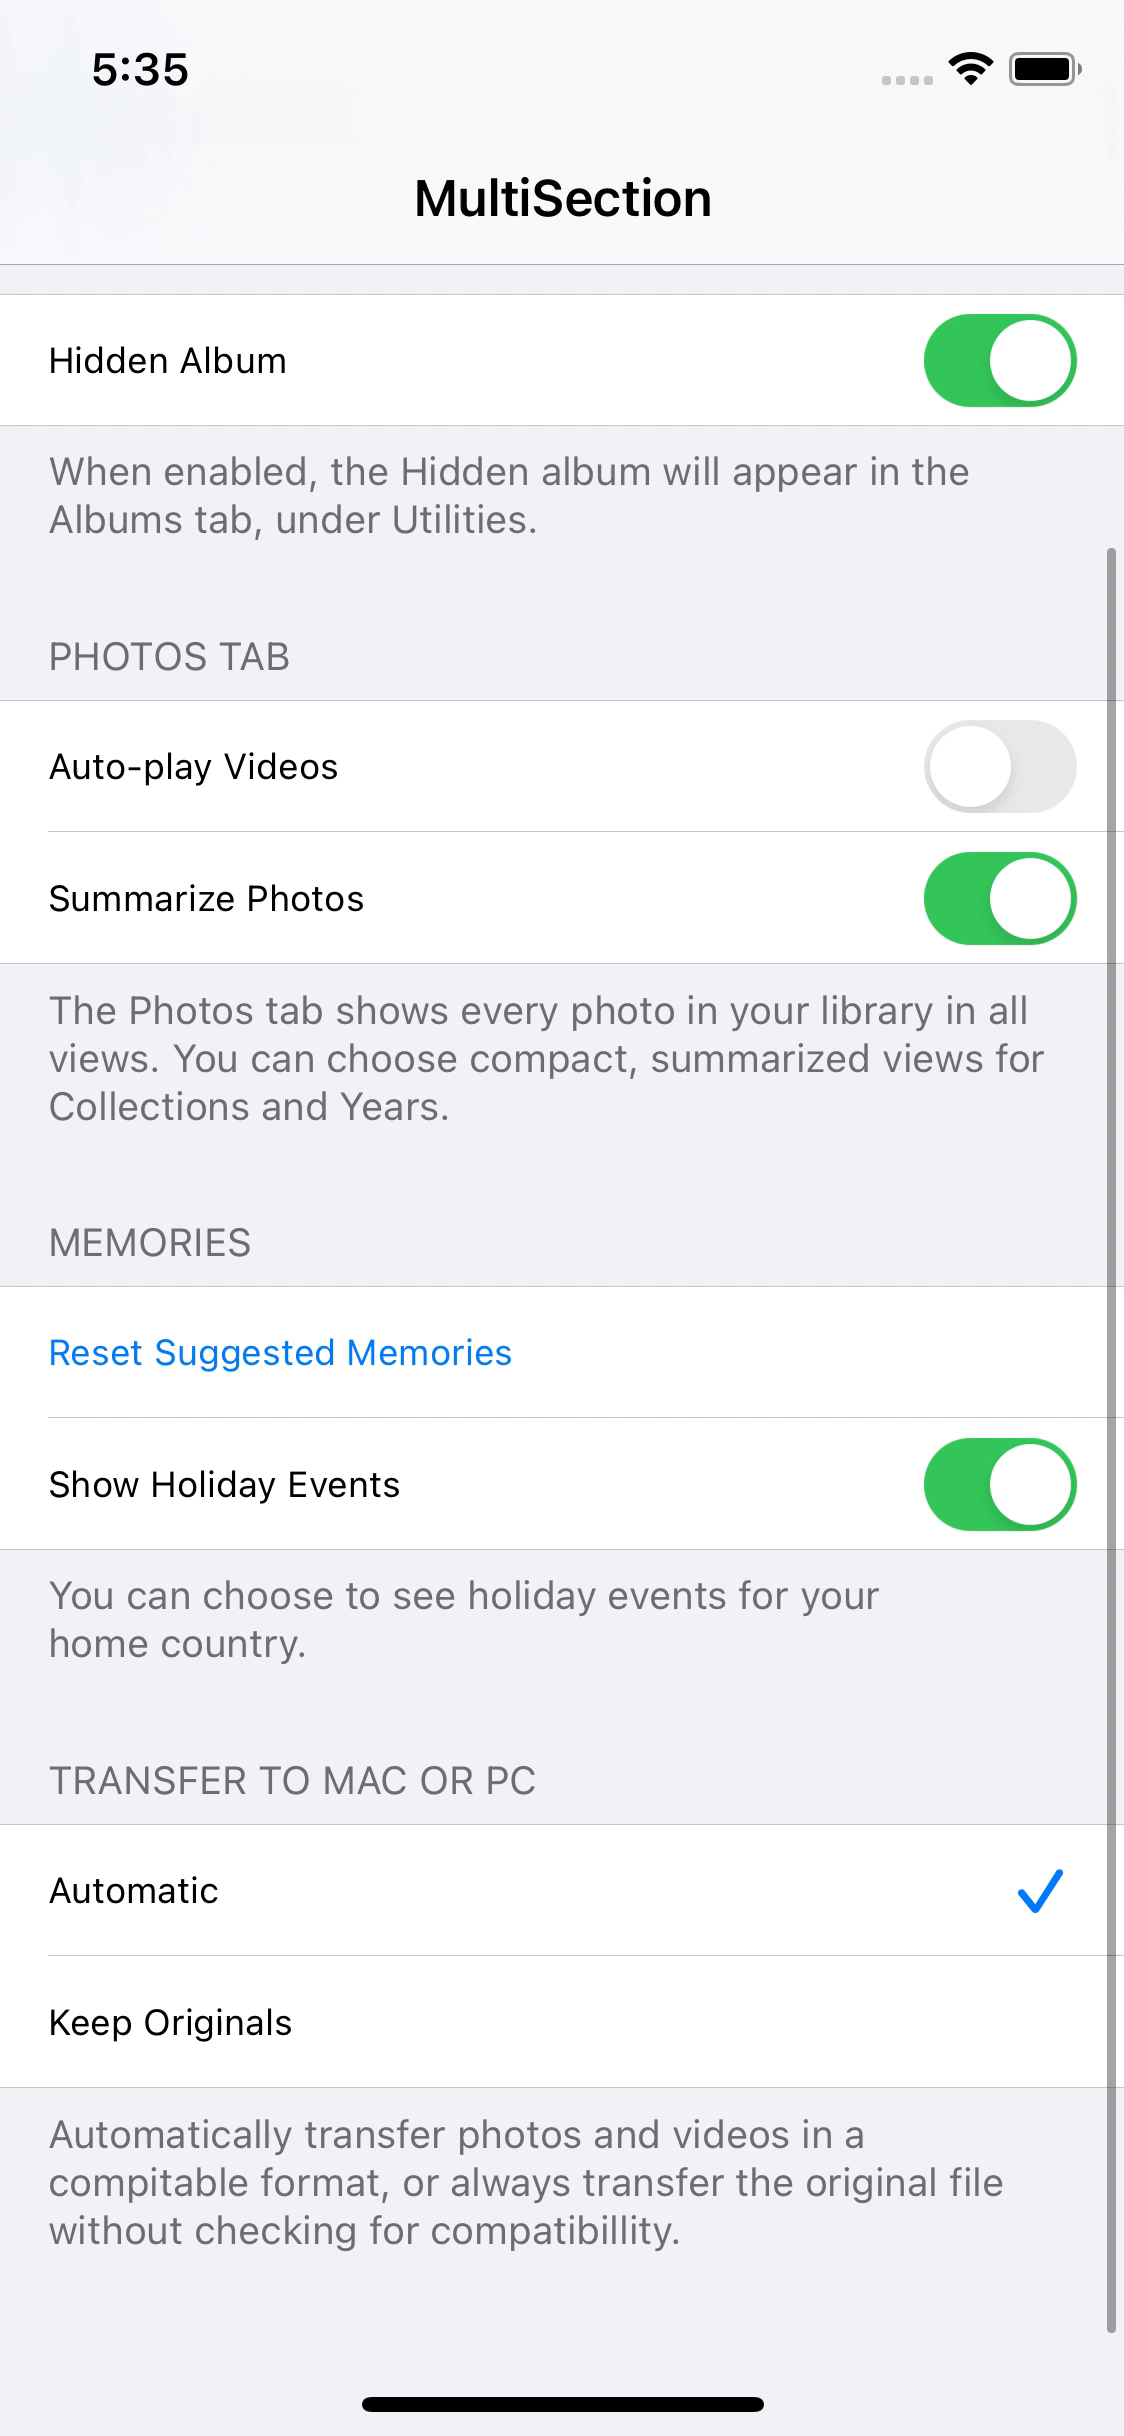
결과
의도한 대로 화면이 전환됐다가 돌아올 때는 하이라이트 효과가 사라진다.
case .switch:
	if let switchView = cell.accessoryView as? UISwitch {
	switchView.isOn = target.on


	}
switch에 실행 코드를 연결하기 위해 cellForRowAt 메서드 내의 switch 분기문을 수정한다.
화면에 표시되는 스위치 셀이 복수 존재하기 때문에 이들을 정확히 구별해 줘야 한다.
case .switch:
	if let switchView = cell.accessoryView as? UISwitch {
	switchView.isOn = target.on

	switchView.removeTarget(nil, action: nil, for: .valueChanged)


	}
현재 연결되어있는 메서드를 해제하고,
@objc func toggleHideAlbum(_ sender: UISwitch) {
	print(#function)
	list[1].items[0].on.toggle()
}

@objc func toggleAutoPlayVideos(_ sender: UISwitch) {
	print(#function)
	list[2].items[0].on.toggle()
}

@objc func toggleSummarizePhotos(_ sender: UISwitch) {
	print(#function)
	list[2].items[1].on.toggle()
}

@objc func toggleShowHolidauEvents(_ sender: UISwitch) {
	print(#function)
	list[3].items[1].on.toggle()
}
case .switch:
if let switchView = cell.accessoryView as? UISwitch {
switchView.isOn = target.on
switchView.removeTarget(nil, action: nil, for: .valueChanged)
if indexPath.section == 1 && indexPath.row == 0{
switchView.addTarget(self, action: #selector(toggleHideAlbum(_:)), for: .valueChanged)
}
}if문을 통해 indexPath가 section index 1, row index 0일 경우에 toggleHideAlbum 메서드를 호출하도록 한다.
이때, selector를 통해 전달되는 메서드는 @objc 키워드가 추가되어 있어야 한다.
결과

이렇게 Hidden Album 셀의 스위치를 조작했을 때만 해당 메서드를 호출한다.
case .switch:
	if let switchView = cell.accessoryView as? UISwitch {
		switchView.isOn = target.on

		switchView.removeTarget(nil, action: nil, for: .valueChanged)

		if indexPath.section == 1 && indexPath.row == 0{
			switchView.addTarget(self, action: #selector(toggleHideAlbum(_:)), for: .valueChanged)
		} else if indexPath.section == 2 && indexPath.row == 0 {
			switchView.addTarget(self, action: #selector(toggleAutoPlayVideos(_:)), for: .valueChanged)
		} else if indexPath.section == 2 && indexPath.row == 1 {
			switchView.addTarget(self, action: #selector(toggleSummarizePhotos(_:)), for: .valueChanged)
		} else if indexPath.section == 3 && indexPath.row == 1 {
			switchView.addTarget(self, action: #selector(toggleShowHolidauEvents(_:)), for: .valueChanged)
		}
	}
나머지 메서드도 적절한 조건에 연결한다.
extension TableViewViewController: UITableViewDelegate {

}
ActionSheet를 호출하기 위해 위와 같이 UITableViewDelegate 프로토콜을 채용하도록 수정한다.
func showActionSheet() {
	let sheet = UIAlertController(title: nil, message: "Resetting will allow previously blocked people, places, dates, or holidays to once again be included in new memories", preferredStyle: .actionSheet)

	let resetAction = UIAlertAction(title: "Reset", style: .destructive, handler: nil)
	let cancelAction = UIAlertAction(title: "Cancel", style: .cancel, handler: nil)

	sheet.addAction(resetAction)
	sheet.addAction(cancelAction)

	if let pc = sheet.popoverPresentationController {
		if let tbl = view.subviews.first(where: { $0 is UITableView}) as? UITableView {
			if let cell = tbl.cellForRow(at: IndexPath(row: 0, section: 3)) {
				pc.sourceView = cell
				pc.sourceRect = tbl.frame
			}
		}
	}

	present(sheet, animated: true, completion: nil)
}
extension TableViewViewController: UITableViewDelegate {
func tableView(_ tableView: UITableView, didSelectRowAt indexPath: IndexPath) {
showActionSheet()
}
}tablView의 셀을 터치하면 tableView(didSelectRowAt:) 메서드가 호출된다.
셀을 터치했을 때 호출되는 showActionSheet 메서드는 위와 같이 actionSheet를 구성하고, 화면에 표시하는 역할을 한다.
결과

셀을 터치하면 actionSheet가 표시된다.
하지만 지금 선택한 이후에 하이라이트가 해제되지 않고, 다른 셀을 선택하는 경우에도 actionSheet를 표시하는 문제가 있다.
extension TableViewViewController: UITableViewDelegate {
	func tableView(_ tableView: UITableView, didSelectRowAt indexPath: IndexPath) {
		if indexPath.section == 3 && indexPath.row == 0 {
			showActionSheet()

			tableView.deselectRow(at: indexPath, animated: true)
		}
	}
}
따라서 함께 전달되는 indexPath 파라미터로 셀을 구분해 주는 과정이 필요하고,
actionSheet를 띄운 다음에는 deselectRow 메서드를 사용해 하이라이트를 해제해 주면
결과

문제가 됐던 부분들이 사라졌다.
extension TableViewViewController: UITableViewDelegate {
	func tableView(_ tableView: UITableView, didSelectRowAt indexPath: IndexPath) {
		if indexPath.section == 3 && indexPath.row == 0 {
			showActionSheet()

			tableView.deselectRow(at: indexPath, animated: true)
		}

		if indexPath.section == 4 {
			if let cell = tableView.cellForRow(at: indexPath) {
				list[indexPath.section].items[indexPath.row].on.toggle()
				cell.accessoryType = list[indexPath.section].items[indexPath.row].on ? .checkmark : .none
			}
		}
	}
}
마찬가지로 셀이 터치됐을 때 동작해야 하기 때문에 tableView(didselectRowAt:) 메서드에서 구현하고,
해당 section의 모든 셀이 같은 기능을 사용하기 때문에 section으로만 예외처리를 진행한다.
결과
단, 샘플과는 다르게 두 개의 셀이 동시에 활성화된다.
이러한 문제는 다음과 같이 수정할 수 있다.
extension TableViewViewController: UITableViewDelegate {
	func tableView(_ tableView: UITableView, didSelectRowAt indexPath: IndexPath) {
		if indexPath.section == 3 && indexPath.row == 0 {
			showActionSheet()

			tableView.deselectRow(at: indexPath, animated: true)
		}

		if indexPath.section == 4 {
			if let cell = tableView.cellForRow(at: indexPath) {
				for cell in list[indexPath.section].items {
					if cell.on == true {
						cell.on = false
					}
				}
				list[indexPath.section].items[indexPath.row].on .toggle()
				cell.accessoryType = list[indexPath.section].items[indexPath.row].on ? .checkmark : .none
				listTable.reloadSections(transferIndex, with: .none)
			}
		}
	}
}
현재 구현하는 섹션은 단일 선택 섹션으로 내가 지금 선택할 셀을 제외하고는 on 속성이 true일 필요가 없다.
따라서 해당 섹션의 모든 셀을 돌며 on이 true인 속성을 찾아 false로 변경하고, 이전과 같이 on을 토글 해 값을 바꾸도록 한다.
이후, reloadSections(with:) 메서드를 사용해 해당 section을 통째로 새 로고 침해 변경된 값을 적용하도록 한다.
결과

목표로 하는 화면과 동일하게 작동한다.
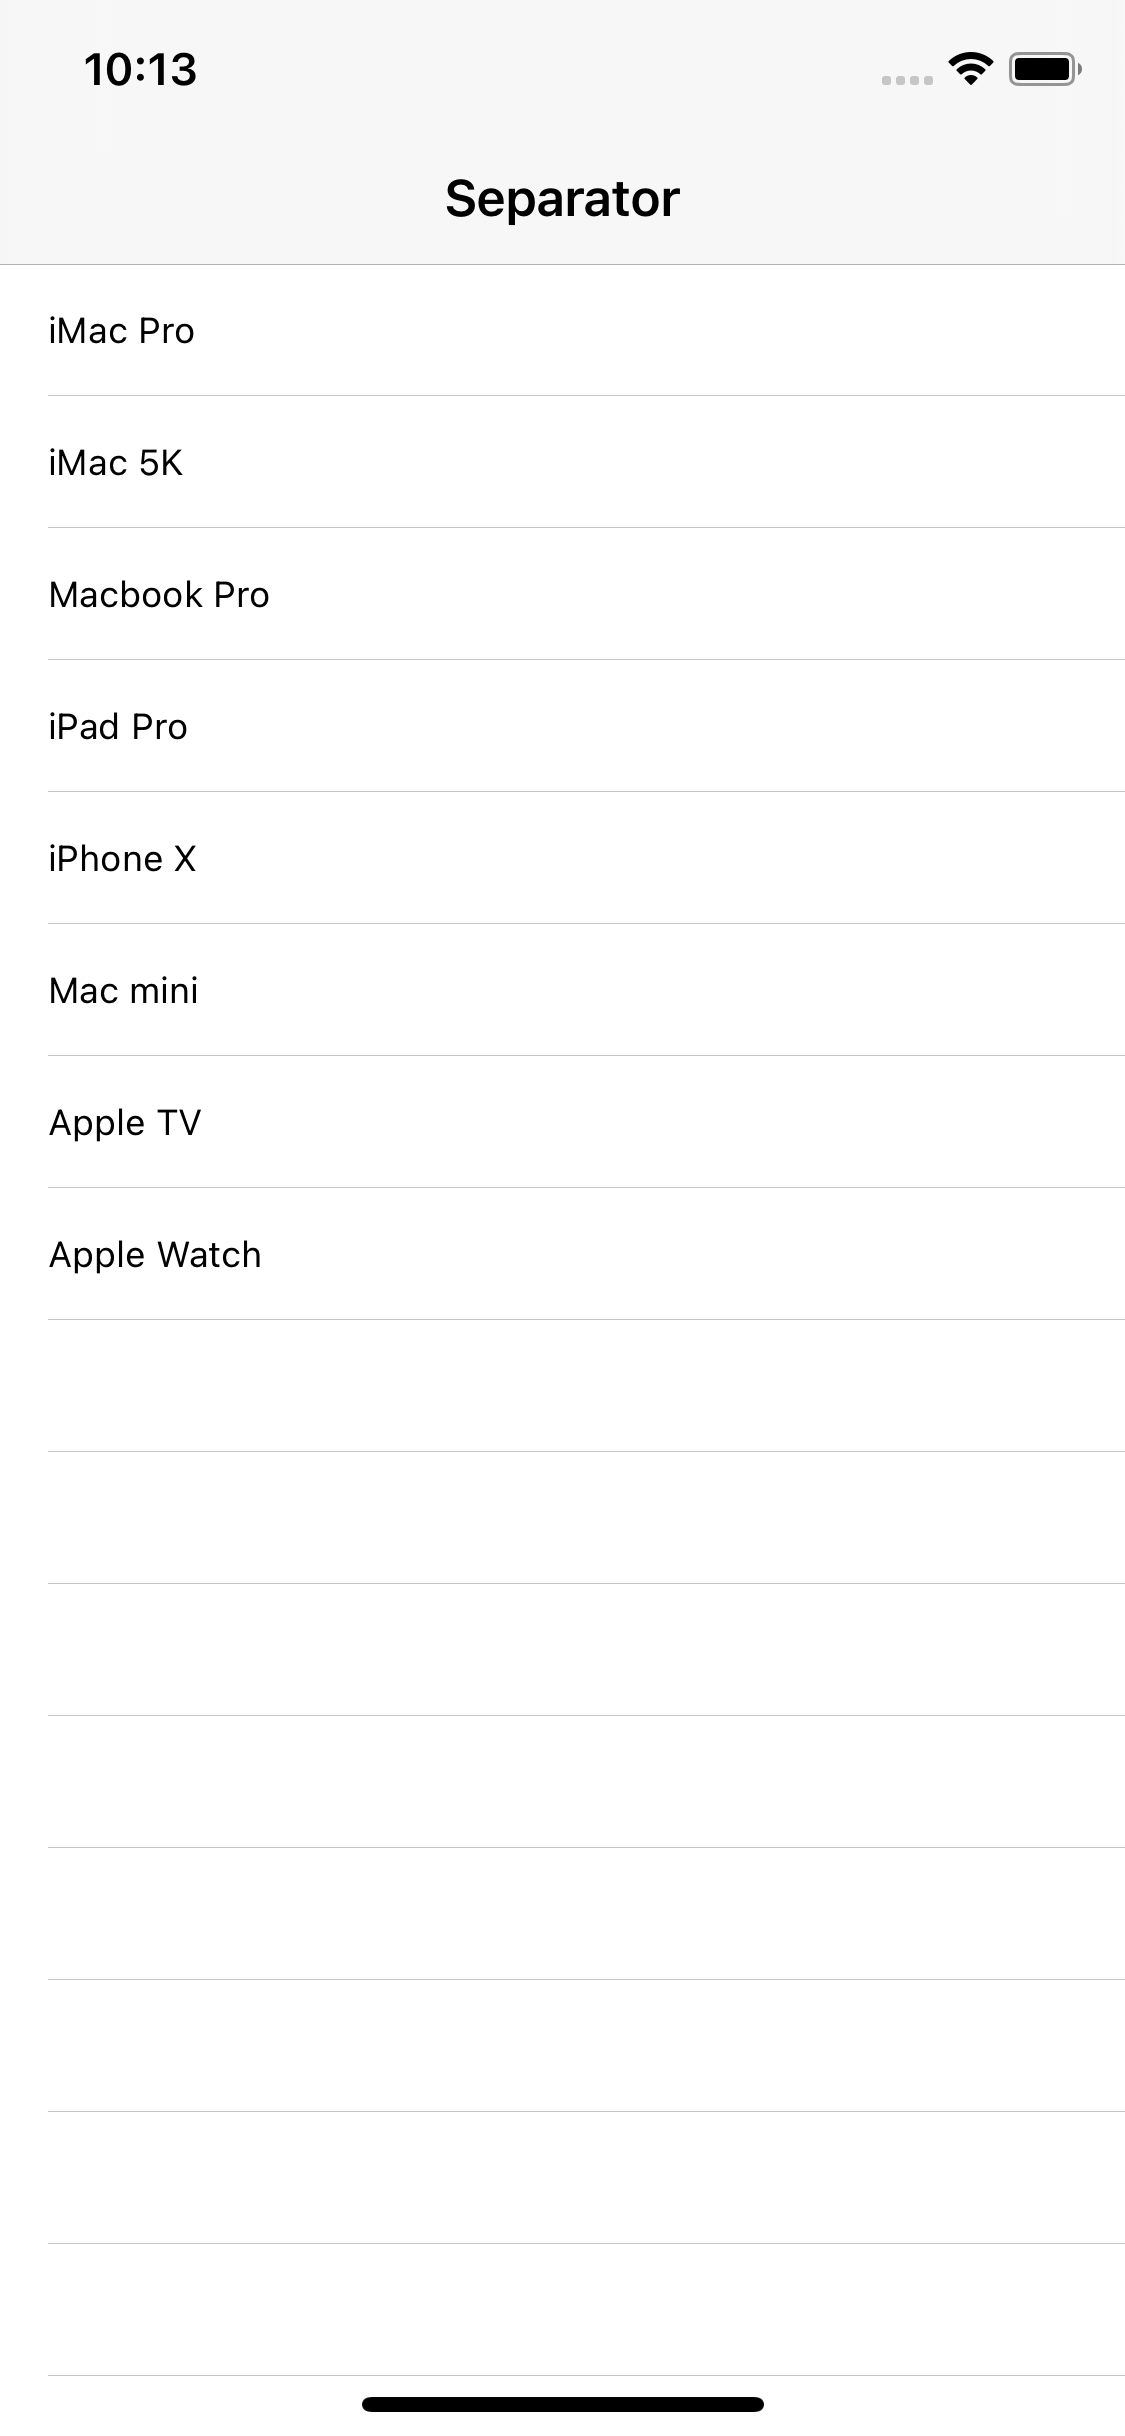
Separator

현재 화면에는 Cell들 사이에 구분하는 선이 존재한다.
지금의 상태가 기본 상태이고, 색을 변경하거나 좌우 여백을 설정하는 것도 가능하다.
단, 높이는 고정돼있기 때문에 높이를 변경할 수는 없고, CustomView를 separator로 지정하는 것도 불가능하다.
따라서 다른 디자인의 Separator를 사용하고 싶다면 Cell을 사용해서 직접 구현해야 한다.


- Default, Single Line
두 옵션은 같은 스타일이다. - None
Sepatator를 표시하지 않거나 Custom Sepatator를 구현할 때 사용한다. - Single Line Etched
더 이상 사용하지 않는 스타일이다.


바로 아래의 색상 옵션은 Separator의 색상을 변경한다.
만약 셀마다 별도의 Separator를 사용하고자 한다면 Custom Separator를 사용해야 한다.
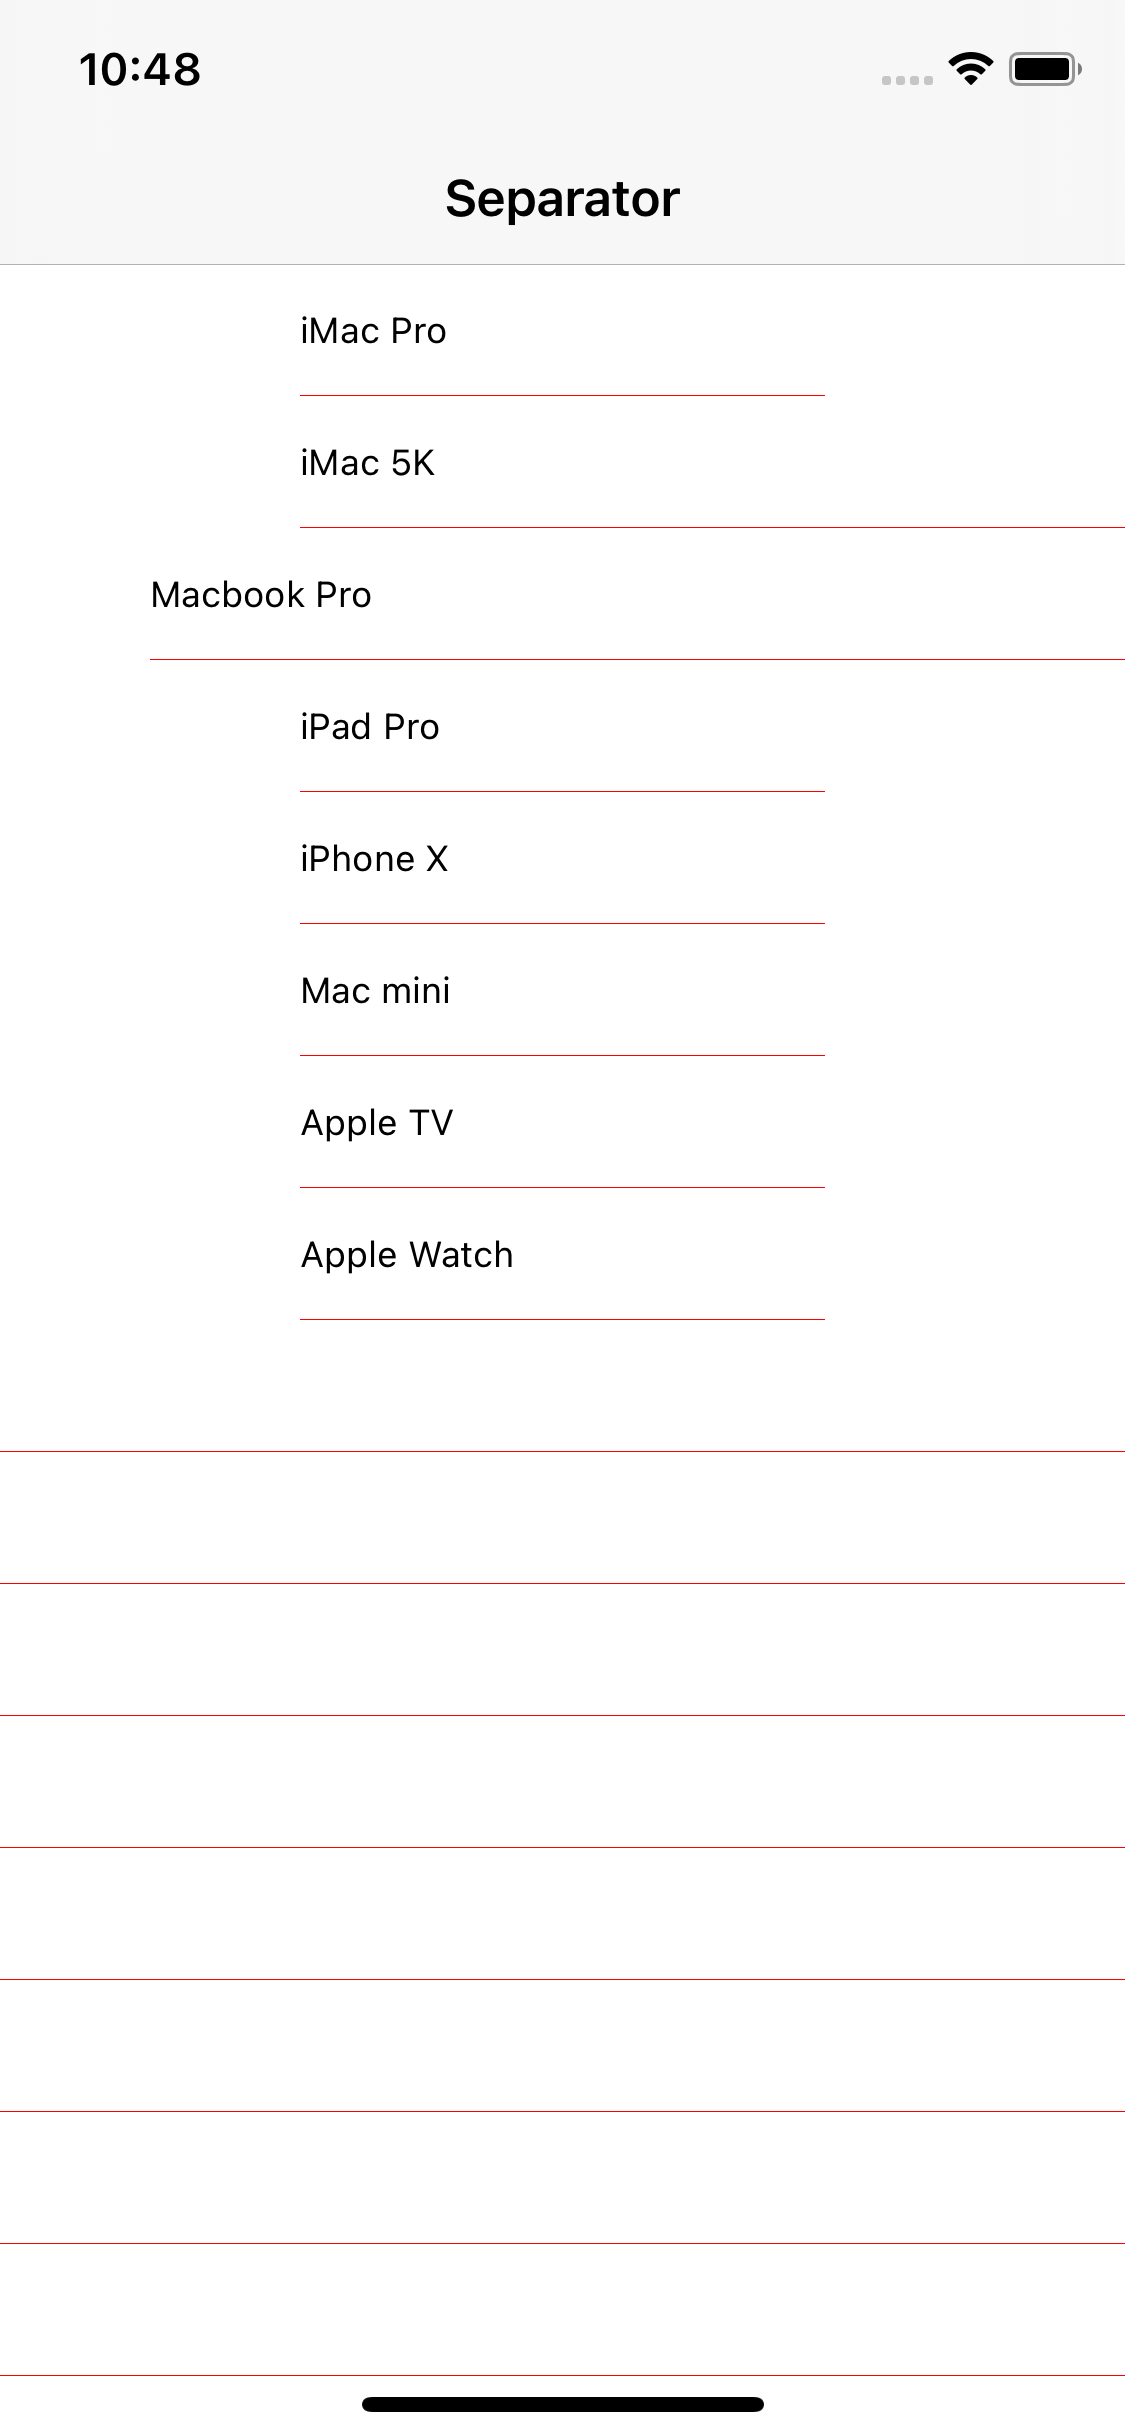
자세히 보면 Separator가 화면 전체를 덮지 않고 좌측에 여백을 두고 있는 것을 볼 수 있다.
이것은 Separator inset으로 기본값은 좌측 15, 우측 0이다.


이 값들을 각각 변경하여 Separator의 위치를 변경할 수 있다.
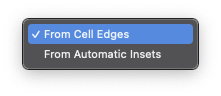
바로 아래는 inset의 계산 방식을 선택하는 것으로,
- From Cell Edges
Cell의 끝과 맞춘다. - From Automatic Insets
iOS가 상황에 따라 자동으로 맞춘다.
기본 여백을 활용해 다른 뷰와 겹치는 것을 방지하기 위해 사용한다.
재밌는 점은 Separator inset은 다른 속성들과 다르게 셀마다 별도의 inset을 설정할 수 있다.

지금처럼 Separate Inset이 Automatic으로 선택되어있으면 TableView의 inset을 자동으로 사용한다.
하지만 Custom을 선택 후 다른 inset을 입력하게 되면
결과
특정 셀에만 해당 inset이 적용된다.
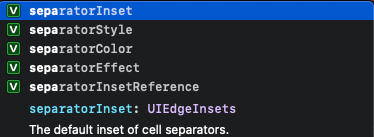
UITableView 클래스는 sparator로 시작하는 여러 속성을 제공한다.
- separatorStyle
separator의 시각적인 스타일을 결정한다.
앞서 설명했듯 none과 singleLine 중 하나를 선택할 수 있다.

- separatorColor
separator의 색상을 선택한다. - separatorInset
separator의 inset을 설정한다.
UIEdgeInset 속성을 사용하며, 함께 있는 Top과 Bottom은 무시된다.

- separatorInsetReference
sparator의 inset 계산 방식을 설정한다.

여기까지는 TableView를 통한 전체 셀의 separator의 속성을 설정했다.
extension ViewController: UITableViewDataSource {
	func tableView(_ tableView: UITableView, numberOfRowsInSection section: Int) -> Int {
		return list.count
	}

	func tableView(_ tableView: UITableView, cellForRowAt indexPath: IndexPath) -> UITableViewCell {
		let cell = tableView.dequeueReusableCell(withIdentifier: "listCell", for: indexPath)

		if indexPath.row == 1 {
			cell.separatorInset = UIEdgeInsets(top: 0, left: 100, bottom: 0, right: 0)
		} else if indexPath.row == 2 {
			cell.separatorInset = UIEdgeInsets(top: 0, left: 50, bottom: 0, right: 0)
		}
		cell.textLabel?.text = list[indexPath.row]
		return cell
	}
}
개별 셀들의 separator inset을 변경하고 싶다면 dataSource에서 셀을 반환하기 전 속성을 바꾸어 반환해야 한다.
결과
잘 적용이 된 것 같지만 부분 부분 의도와는 다르게 적용된 것이 보인다.
특히 interface builder에서 설정한 inset이 코드에서 설정한 inset 대신 자연스럽게 사용되기도 한다.
이는 TableView가 재사용 메커니즘을 사용하기 때문으로, 재사용 하기 이전 Text는 업데이트하지만 separator는 업데이트하지 않는다.
func tableView(_ tableView: UITableView, cellForRowAt indexPath: IndexPath) -> UITableViewCell {
	let cell = tableView.dequeueReusableCell(withIdentifier: "listCell", for: indexPath)

	if indexPath.row == 1 {
		cell.separatorInset = UIEdgeInsets(top: 0, left: 100, bottom: 0, right: 0)
	} else if indexPath.row == 2 {
		cell.separatorInset = UIEdgeInsets(top: 0, left: 50, bottom: 0, right: 0)
	} else {
		cell.separatorInset = listTable.separatorInset
	}
	cell.textLabel?.text = list[indexPath.row]
	return cell
}
따라서 else 블록을 추가해 TableView의 inset으로 다른 모든 셀들의 inset을 초기화해 주면 문제가 해결된다.

Table View Cell
TableViewCell은 UITableViewCell의 인스턴스이다.
Table에서 한 줄에 개별적으로 표시된다.
4개의 스타일을 제공하고, 원하는 방식으로 직접 구성하는 것도 가능하다.
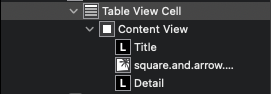
Cell의 내부는 세 개의 구역으로 나뉜다.
- Content View
기본 상태에서 Cell의 전체 영역을 차지한다.
CellUI을 구성할 때는 이 Content View 내부에서 구현한다. - Accessory View
항상 Cell의 오른쪽에 표시되는 영역이다.
기본 제공하는 Standard Accessory View를 사용하거나 직접 구성하는 것도 가능하다. - Editing Control
편집 모드에서 Cell의 왼쪽에 표시되는 영역이다.
경우에 따라 오른쪽에 삭제나 정렬 버튼이 표시되기도 한다.
Content View는 UI 구현에 제한이 없지만 나머지 구역은 제한적인 커스텀만 가능하다.
Cell은 네 가지의 스타일을 기본으로 제공한다.
Cell에 표시할 이미지를 지정하지 않은 경우 ImageView는 공간을 차지하지 않는다.
| Image | textLabel | |||
| Image | textLabel | detailTextLabel | |
| detailTextLabel | textLabel | ||
| Image | textLabel |
| detailTextLabel |
이미지를 지정하면 가장 왼쪽에 ImageView가 자리 잡게 된다.
기본 스타일들은 클래스에 선언되어있는 속성과 outlet으로 연결되어있다.
customCell을 구현하고 outlet을 연결할 때는 기본 스타일의 outlet 이름과 충돌하지 않도록 주의해야 한다.
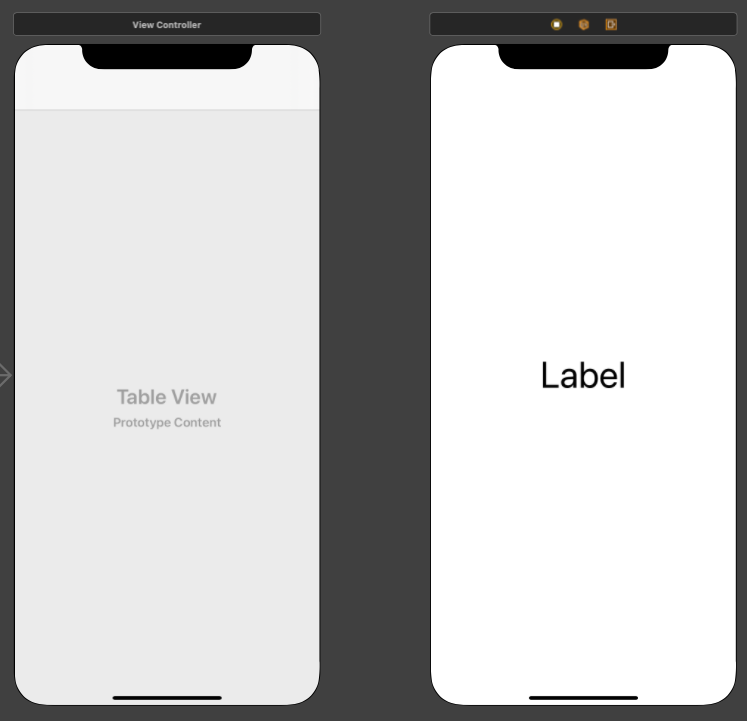
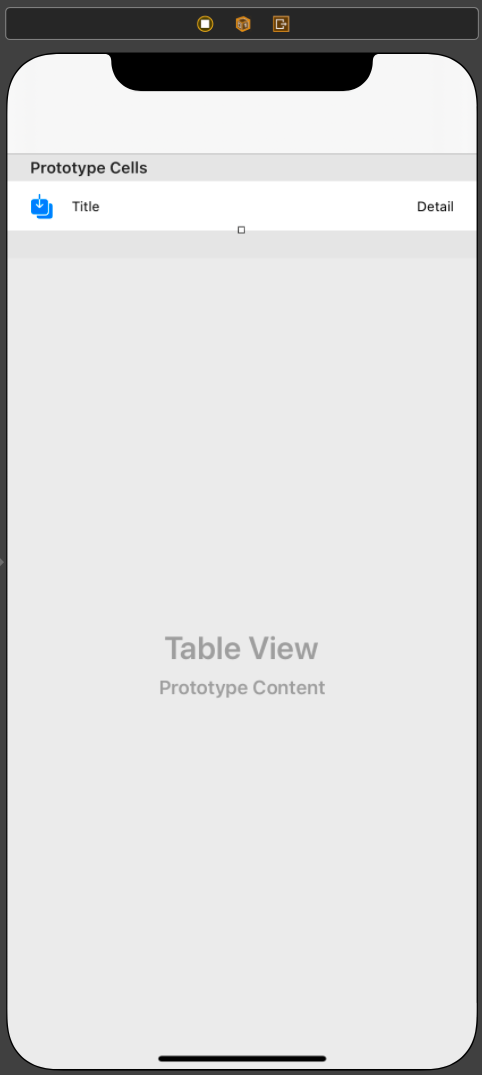
사용할 씬은 위와 같다.
왼쪽의 빈 TableView에 Cell을 추가한다.


Cell은 기본적으로 Custom 스타일로 설정되고,
자동으로 ContentView가 추가된 것을 볼 수 있다.
CustomCell을 구성하고자 한다면 해당 View의 아래에 추가해야 한다.
Basic

Basic 스타일을 선택하면 ContentView의 아래에 Label이 추가되고,
해당 Label은 TitleLabel 속성과 자동으로 연결된다.
Basic with Image

image속성에서 이미지를 지정하면 imageView가 추가되고 씬에도 Label의 왼쪽에 이미지가 추가된 것을 볼 수 있다.
결과

Right Detail
Right Detail 스타일을 선택하면 오른쪽에 또 다른 Label이 표시되고,
DetailText 속성과 outlet으로 연결된다.
결과
Left Detail

Left Detail 스타일을 선택하면 배치가 변경되고,
TitleLabel과 DetailLabel이 사용된다.
단, 이미지를 표시할 수는 없다.
결과

Subtitle

Subtitle 스타일은 titleLabel과 detailLabel이 수직으로 배치되고,
왼쪽에 imageView로 이미지를 표시할 수 있다.
결과

이와 같은 기본 스타일들을 사용하거나 처음부터 직접 구성해 사용할 수 있다.


Cell의 스타일은 Basic으로, Identifier는 cell로 설정한다.
dataSource와 delegate도 씬과 연결해 준다.
//
// ViewController.swift
// TableViewCell
//
// Created by Martin.Q on 2021/09/03.
//
import UIKit
class ViewController: UIViewController {
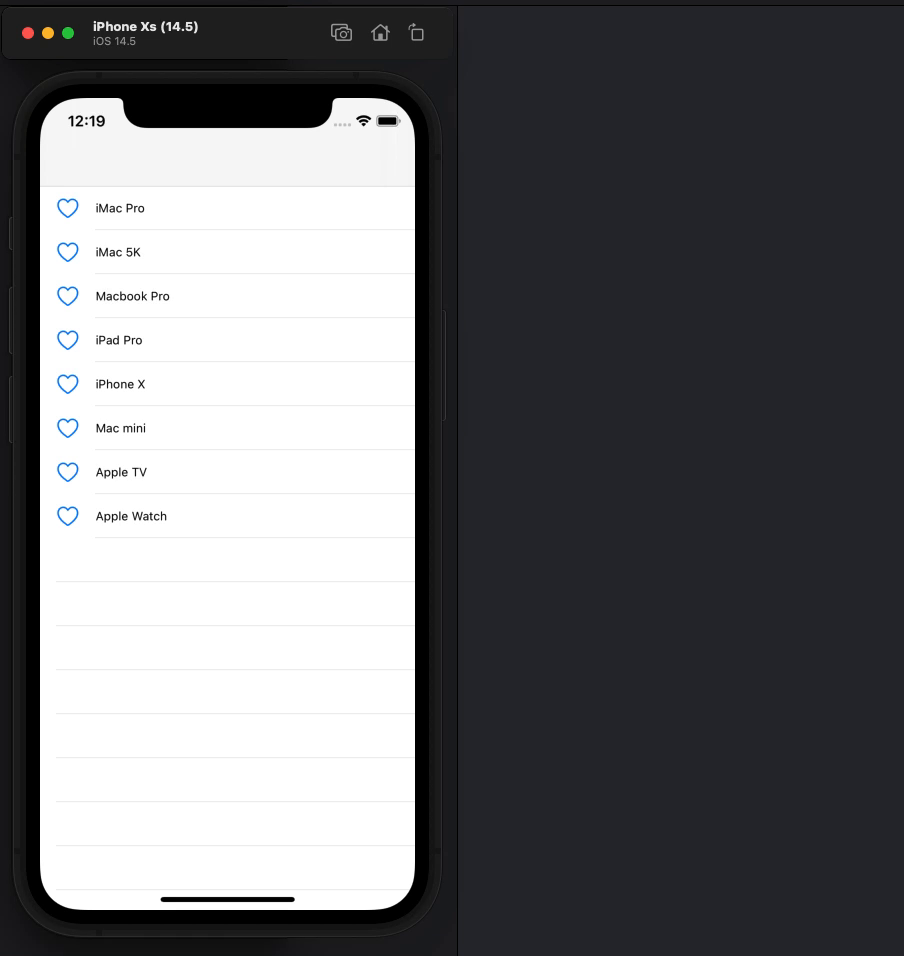
let list = ["iMac Pro", "iMac 5K", "Macbook Pro", "iPad Pro", "iPhone X", "Mac mini", "Apple TV", "Apple Watch"]
override func viewDidLoad() {
super.viewDidLoad()
}
}
extension ViewController: UITableViewDataSource {
func tableView(_ tableView: UITableView, numberOfRowsInSection section: Int) -> Int {
return list.count
}
func tableView(_ tableView: UITableView, cellForRowAt indexPath: IndexPath) -> UITableViewCell {
let cell = tableView.dequeueReusableCell(withIdentifier: "cell", for: indexPath)
cell.textLabel?.text = list[indexPath.row]
return cell
}
}Cell에 표시할 데이터는 list로 작성하고,
dataSource를 구성한다.
cell.textLabel?.text = list[indexPath.row]Cell의 Label을 설정할 때에는 cell의 textLabel의 text 속성에 접근해 설정한다.
BasicStyle이 제공하는 Label에 list에서 가져온 문자열을 출력한다.
cell.imageView?.image = UIImage(systemName: "heart")마찬가지로 이미지를 설정할 때도 imageView의 image 속성에 원하는 이미지를 전달한다.
결과
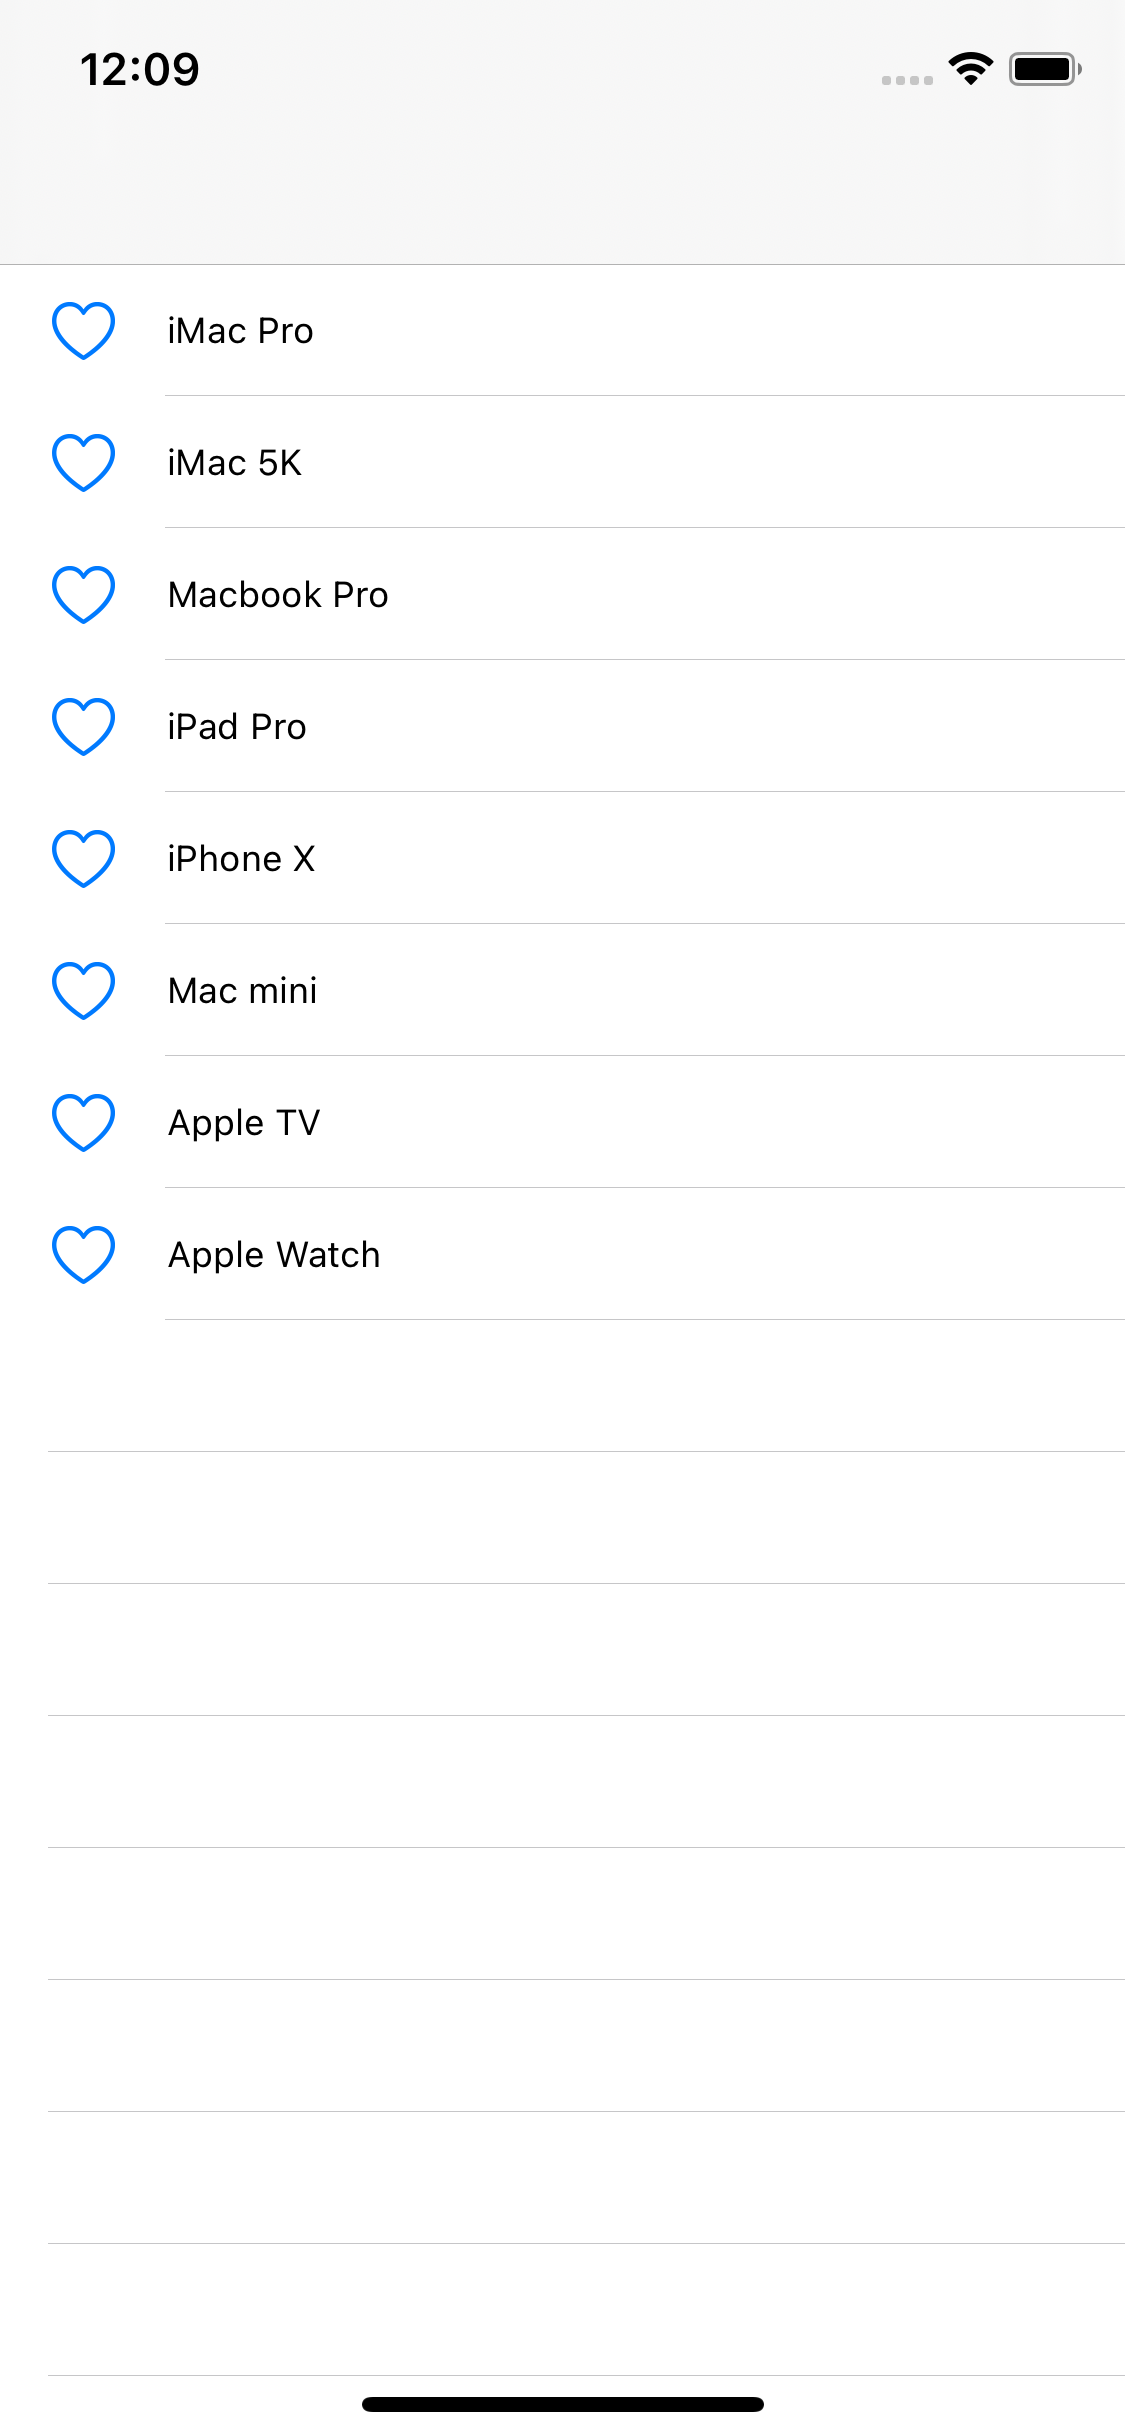
Cell의 왼쪽에 하트 모양 이미지가 표시된다.
UITableView 클래스는 셀에 접근하는 다양한 메서드를 제공한다.
extension ViewController: UITableViewDelegate {
	func tableView(_ tableView: UITableView, didSelectRowAt indexPath: IndexPath) {

	}
}
UITableViewDelegate를 채용하고,
tableVew(didSelectRowAt:) 메서드를 통해 선택된 Cell에 접근할 수 있다.
위와 같은 방식으로 선택된 Cell의 Label을 콘솔에 출력해 보자.
extension ViewController: UITableViewDelegate {
	func tableView(_ tableView: UITableView, didSelectRowAt indexPath: IndexPath) {
		if let target = tableView.cellForRow(at: indexPath) {
			print(target.textLabel?.text ?? "")
		}
	}
}
tableVew(didSelectRowAt:) 메서드는 두 번째 파라미터인 IndexPath를 통해 선택된 Cell의 인덱스를 전달받고,
cellForRow(at:) 메서드는 인덱스를 전달받으면 Cell에 접근한 후 Cell을 반환하고, 없을 경우 nil을 반환한다.
따라서 반환받은 Cell의 textLable의 text속성의 값을 출력하도록 구현했다.
결과
Cell의 제목이 콘솔에 출력된다.
위의 경우와 반대로 Cell을 통해 indexPath를 얻어야 하는 경우도 있다.
예를 들면 Cell과 Secene이 Segue로 연결돼 있고, TableView의 데이터를 새 Scene으로 전달해야 하는 경우이다.

위와 같이 Cell을 다른 Scene과 연결했다.
Cell을 터치하면 새 scene이 열리고, Scene의 Label에 Cell의 제목이 표시되도록 코드를 구성해 본다.
//
//  DetailViewController.swift
//  TableViewCell
//
//  Created by Martin.Q on 2021/09/04.
//

import UIKit

class DetailViewController: UIViewController {
	@IBOutlet weak var label: UILabel!

	var value: String?


	override func viewDidLoad() {
		super.viewDidLoad()

		label.text = value

	}


}
새 씬에 연결된 코드는 위와 같이 Label이 outlet으로 연결되어있다.
또한, value의 값으로 Label을 초기화한다.
override func prepare(for segue: UIStoryboardSegue, sender: Any?) {
}
초기화하는데 쓸 value의 값은 TableView에서 전달하도록 한다.
이때 사용하는 메서드는 prepare(segue:sender:) 메서드로 sender를 통해 전달된다.
따라서 선택한 Cell이 어떤 Cell인지 index를 통해 구별해야만 한다.
class ViewController: UIViewController {
	@IBOutlet weak var listTable: UITableView!

	let list = ["iMac Pro", "iMac 5K", "Macbook Pro", "iPad Pro", "iPhone X", "Mac mini", "Apple TV", "Apple Watch"]

	override func prepare(for segue: UIStoryboardSegue, sender: Any?) {
		if let cell = sender as? UITableViewCell {
			if let index = listTable.indexPath(for: cell) {

			}
		}
	}

	override func viewDidLoad() {
		super.viewDidLoad()
	}
}
Table의 indexpath에 접근하기 위해 Table을 outlet으로 연결해 준 뒤,
전달된 sender를 UITableViewCell로 typeCasting 해 준다.
indexPath(for:) 메서드를 사용해 해당 셀의 indexPath를 얻을 수 있다.
override func prepare(for segue: UIStoryboardSegue, sender: Any?) {
	if let cell = sender as? UITableViewCell {
		if let index = listTable.indexPath(for: cell) {
			if let vc = segue.destination as? DetailViewController {
				vc.value = list[index.row]
			}
		}
	}
}
이제 씬으로 해당 cell을 전달할 수 있다.
결과

이 외에도 Cell에 접근할 수 있는 메서드가 여럿 존재한다.
listTable.indexPathForRow(at: CGPoint)indexPathForRow(at:) 메서드는 CGPoint 좌표로 Cell을 전달한다.
해당 좌표에 Cell이 존재한다면 indexPath를 반환하고, 없다면 nil을 반환한다.
listTable.indexPathsForRows(in: CGRect)indexPathsForRows(in:) 메서드는 CGRect 구조체로 frame을 지정한다.
해당 Frame에 Cell이 존재한다면 indexPath들을 반환하고, 없다면 nil을 반환한다.
listTable.visibleCellsvisivleCells 속성은 화면에 표시되는 Cell을 배열로 반환한다.
listTable.indexPathsForVisibleRowsindexPathsForVisibleRows 속성은 화면에 표시된 Cell의 indexPath가 필요한 경우 사용한다.

Cell을 선택한 뒤 Attribute inspector를 확인해 보면 Background 속성이 존재한다.
Default 상태에서는 Light 모드에서 흰색을, Dark 모드에선 검은색을 표시한다.
해당 속성을 지정하는 것으로 별도의 Cell 배경색을 사용할 수 있다.
모든 Cell이 같은 색을 가져야 한다면 해당 옵션을 변경하는 것이 가장 간단하다.
코드에서 설정한다면 awakeFromNib 메서드에서 설정하게 된다.
하지만 Cell마다 다른 배경색을 설정해야 한다면 cellForRow(at:) 메서드에서 구현하거나 tableView(willDisplay:forRowAt:) 메서드에서 구현한다.
func tableView(_ tableView: UITableView, willDisplay cell: UITableViewCell, forRowAt indexPath: IndexPath) {
	if indexPath.row.isMultiple(of: 2) {
		cell.backgroundColor = UIColor.systemTeal
	} else {
		cell.backgroundColor = UIColor.systemPink
	}
}
indexPath가 2로 나누어지지 않으면, 즉 홀수이면 Teal 색상으로 표시하고,
나누어 떨어지면, 즉 짝수이면 Pink 생상으로 표시한다.
결과


