Reordering Item
Collection View는 별도의 편집 모드를 제공하지 않는다.
따라서 Table View와 같은 Reordering Control을 제공하지 않는다.
대신 Pan Gesture를 사용해 이를 구현한다.
셀을 이동시키는 기능과 애니메이션은 이미 구현되어있지만 이동시킬 셀과 Panning 제스처를 추적하는 부분은 직접 구현해야 한다.
extension ...: UICollectionViewDataSource {

}
먼저 Delegate 메소드를 현하고 Reordering 기능을 활성화시킨다.
해당하는 메소드는 UICollectionViewDataSource 프로토콜에 구현되어있다.
또 다른 방법은 Pan gestureRecognizer를 Collection View와 연결하고,
제스처가 인식되면 Collection View가 이를 인식할 수 있도록 구현해야 한다.

//
//  ReorderingViewController.swift
//  CollectionViewPractice
//
//  Created by Martin.Q on 2021/10/17.
//

import UIKit

class ReorderingViewController: UIViewController {

	var list = MaterialColorDataSource.generateMultiSectionData()

	@IBOutlet weak var collectionView: UICollectionView!

	override func viewDidLoad() {
		super.viewDidLoad()

		// Do any additional setup after loading the view.
	}
}

extension ReorderingViewController: UICollectionViewDataSource {
	func numberOfSections(in collectionView: UICollectionView) -> Int {
		return list.count
	}
	func collectionView(_ collectionView: UICollectionView, numberOfItemsInSection section: Int) -> Int {
		return list[section].colors.count
	}
	func collectionView(_ collectionView: UICollectionView, cellForItemAt indexPath: IndexPath) -> UICollectionViewCell {
		let cell = collectionView.dequeueReusableCell(withReuseIdentifier: "cell", for: indexPath)
		cell.contentView.backgroundColor = list[indexPath.section].colors[indexPath.row]
		return cell
	}
}

extension ReorderingViewController: UICollectionViewDelegate {

}
사용할 씬과 코드는 위와 같다.
우선 Pan Gesture Recognizer를 씬에 추가한다.
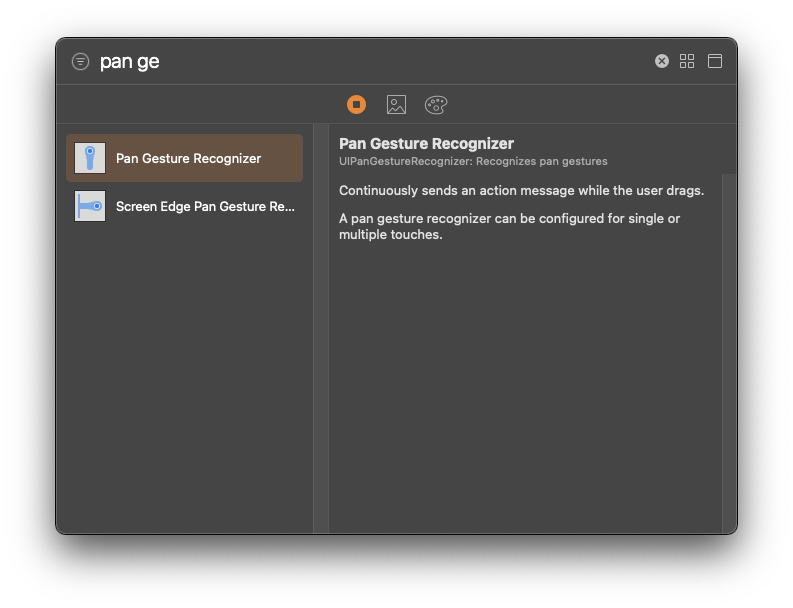

라이브러리에서 Pan Gesture Recognizer를 찾아 씬 독에 추가한다.
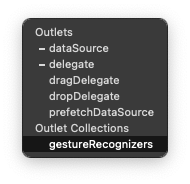
이후 Collection View를 끌어다 Pan Gesture Recognizer를 GestureRecognizers로 연결한다.
class ReorderingViewController: UIViewController {

	var list = MaterialColorDataSource.generateMultiSectionData()

	@IBOutlet weak var collectionView: UICollectionView!
	@IBAction func handlePanGesture(_ sender: UIPanGestureRecognizer) {
	}


	override func viewDidLoad() {
		super.viewDidLoad()

		// Do any additional setup after loading the view.
	}
}
이후 Pan Gesture를 코드에 Action으로 연결한다.
이때 Type을 UIPanGestureRecognizer로 설정한다.
@IBAction func handlePanGesture(_ sender: UIPanGestureRecognizer) {

}
해당 Action 내에서 상태에 따라 API를 호출하면 된다.
@IBAction func handlePanGesture(_ sender: UIPanGestureRecognizer) {
	let location = sender.location(in: collectionView)
}
먼저 제스처가 일어난 위치를 받아온다.
@IBAction func handlePanGesture(_ sender: UIPanGestureRecognizer) {
	let location = sender.location(in: collectionView)

	switch sender.state {
	case .began:
		if let targetIndex = collectionView.indexPathForItem(at: location) {
			collectionView.beginInteractiveMovementForItem(at: targetIndex)
		}
	}
}
이후 제스처의 상태에 따라 분기해 코드를 실행한다.
제스처가 시작되면 대상 셀의 indexPath를 전달한다.
@IBAction func handlePanGesture(_ sender: UIPanGestureRecognizer) {
	let location = sender.location(in: collectionView)

	switch sender.state {
	case .began:
		if let targetIndex = collectionView.indexPathForItem(at: location) {
			collectionView.beginInteractiveMovementForItem(at: targetIndex)
		}
	case .changed:
		collectionView.updateInteractiveMovementTargetPosition(location)
	}
}
제스처가 진행되는 동안에는 위치를 지속적으로 업데이트해야 한다.
updateInteractiveMovementTargetPosition 메소드는 전달된 위치로 대상 셀의 위치를 이동시킨다.
또한, 위치에 따라 나머지 셀의 위치도 함께 조정한다.
@IBAction func handlePanGesture(_ sender: UIPanGestureRecognizer) {
	let location = sender.location(in: collectionView)

	switch sender.state {
	case .began:
		if let targetIndex = collectionView.indexPathForItem(at: location) {
			collectionView.beginInteractiveMovementForItem(at: targetIndex)
		}
	case .changed:
		collectionView.updateInteractiveMovementTargetPosition(location)
	case .ended:
		collectionView.endInteractiveMovement()
	}
}
제스처가 종료되면 endInteractiveMovement 메소드를 호출한다.
셀이 제스터가 종료된 위치로 실제로 이동하고, 연관된 Delegate 메소드가 호출된다.
@IBAction func handlePanGesture(_ sender: UIPanGestureRecognizer) {
	let location = sender.location(in: collectionView)

	switch sender.state {
	case .began:
		if let targetIndex = collectionView.indexPathForItem(at: location) {
			collectionView.beginInteractiveMovementForItem(at: targetIndex)
		}
	case .changed:
		collectionView.updateInteractiveMovementTargetPosition(location)
	case .ended:
		collectionView.endInteractiveMovement()
	default:
		collectionView.cancelInteractiveMovement()
	}
}
이외의 경우 cancelInteractiveMovement 메소드를 호출해 작업을 취소한다.
이렇게 되면 셀이 원래의 위치로 돌아간다.
이제는 delegate 메소드를 구현하고, reordering 기능을 실제로 활성화해야 한다.
extension ReorderingViewController: UICollectionViewDataSource {
	func numberOfSections(in collectionView: UICollectionView) -> Int {
		return list.count
	}
	func collectionView(_ collectionView: UICollectionView, numberOfItemsInSection section: Int) -> Int {
		return list[section].colors.count
	}
	func collectionView(_ collectionView: UICollectionView, cellForItemAt indexPath: IndexPath) -> UICollectionViewCell {
		let cell = collectionView.dequeueReusableCell(withReuseIdentifier: "cell", for: indexPath)
		cell.contentView.backgroundColor = list[indexPath.section].colors[indexPath.row]
		return cell
	}
	func collectionView(_ collectionView: UICollectionView, moveItemAt sourceIndexPath: IndexPath, to destinationIndexPath: IndexPath) {

	}
}
collectionView(moveItemAt:)메소드는 Pan 제스터가 정상적으로 종료된 이후에 호출된다.
해당 메소드가 구현되어 있어야 Reordering이 실제로 동작한다.
따라서 해당 코드에는 바뀐 위치에 따라 데이터를 업데이트하는 코드가 구현되어야 한다.
func collectionView(_ collectionView: UICollectionView, moveItemAt sourceIndexPath: IndexPath, to destinationIndexPath: IndexPath) {
	let target = list[sourceIndexPath.section].colors.remove(at: sourceIndexPath.item)
	list[destinationIndexPath.section].colors.insert(target, at: destinationIndexPath.item)
}
이렇게 배열을 수정하면 된다.
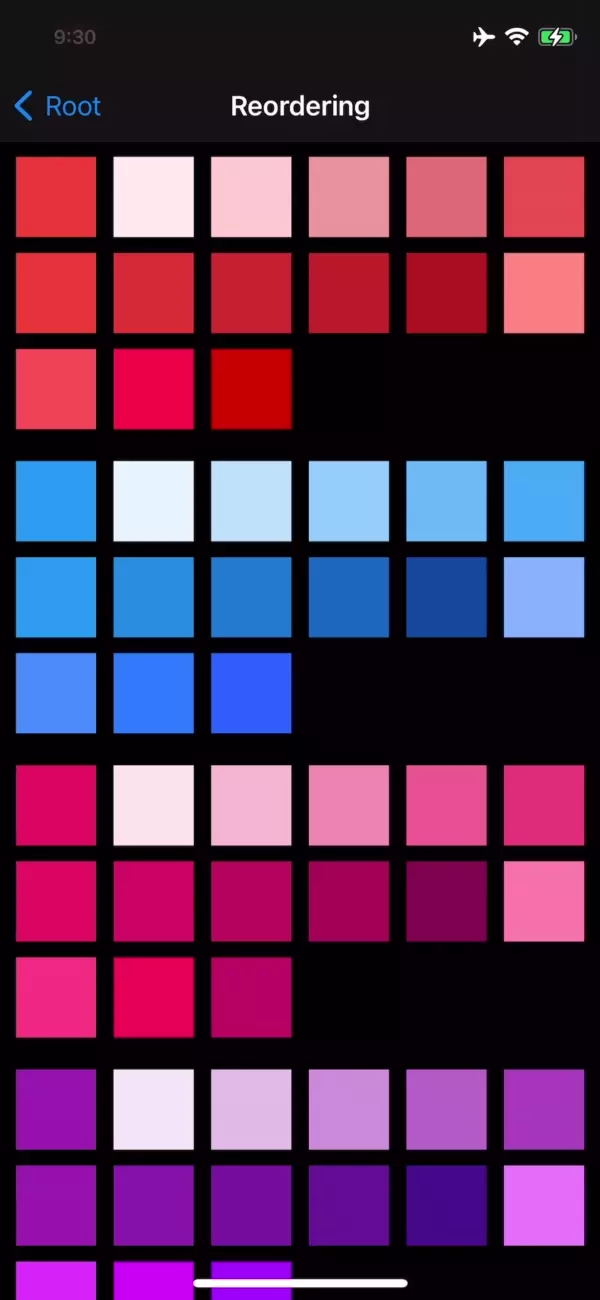
원활하게 동작하는 것을 확인할 수 있다.
지금은 제약 없이 이동 가능하지만, 조건에 따라 이동을 제한해야 한다면 delegate 메소드를 구현해야 한다.
func collectionView(_ collectionView: UICollectionView, canMoveItemAt indexPath: IndexPath) -> Bool {
	return true
}
collectionView(canMoveItemAt:)메소드는 셀을 이동시키기 전에 호출된다.
해당 메소드에서 true를 반환하면 실제 이동이 진행되고, false를 반환하면 이동은 진행되지 않는다.
Prefetching
Prefetching이 가장 크게 영향을 끼치는 부분은 스크롤 성능이다.
스크롤 성능을 증가시키기 위해 Cell Prefetching과 Data Prefetching을 지원한다.
- Cell Prefetching
셀이 표시되어야 할 때 한 라인에 표시되는 셀을 한 번에 로딩하면 부하가 증가한다.
그리고 이는 스크롤 성능 하락으로 이어진다.
이를 해결하기 위해 셀을 실제 필요한 시점보다 조금 더 일찍, 순차적으로 로딩한다.
이는 기본적으로 활성화되어있다. - Data Prefetching
셀에 필요한 데이터를 미리 준비한다.
셀이 데이터를 요구하는 시점에 데이터를 준비하면, 로딩하거나 다운로드하여 오는 시간만큼 딜레이가 발생한다.
또한 이러한 코드를 동기방식으로 구현하면 스크롤 성능이 급격히 나빠진다.
따라서 현재 위치와 스크롤 상태에 따라 미리 준비해야 하는 셀을 Delegate에 알려준다.
이 또한 기본적으로 활성화되어있다.
다만, 필요한 데이터를 요청하는 코드를 직접 구현해야 한다.
Cell Prefetching
//
//  prefetchingViewController.swift
//  CollectionViewPractice
//
//  Created by Martin.Q on 2021/10/17.
//

import UIKit

class prefetchingViewController: UIViewController {
    @IBOutlet weak var collectionView: UICollectionView!

    lazy var refreshControl: UIRefreshControl = { [weak self] in
        let control = UIRefreshControl()
        return control
    }()

    @objc func refresh() {
        DispatchQueue.global().async { [weak self] in
            guard let strongSelf = self else { return }
            strongSelf.list = Landscape.generateData()
            strongSelf.downloadTasks.forEach { $0.cancel() }
            strongSelf.downloadTasks.removeAll()
            Thread.sleep(forTimeInterval: 2)

            DispatchQueue.main.async {
                strongSelf.collectionView.reloadData()
            }
        }
    }

    var list = Landscape.generateData()
    var downloadTasks = [URLSessionTask]()

    override func viewDidLoad() {
        super.viewDidLoad()

    }
}

extension prefetchingViewController: UICollectionViewDataSource {
    func collectionView(_ collectionView: UICollectionView, numberOfItemsInSection section: Int) -> Int {
        return list.count
    }

    func collectionView(_ collectionView: UICollectionView, cellForItemAt indexPath: IndexPath) -> UICollectionViewCell {
        let cell = collectionView.dequeueReusableCell(withReuseIdentifier: "cell", for: indexPath)

        if let imageView = cell.viewWithTag(100) as? UIImageView {
            if let image = list[indexPath.row].image {
                imageView.image = image
            } else {
                imageView.image = nil
                downloadImage(at: indexPath.row)
            }
        }
        return cell
    }
}

extension prefetchingViewController {
    func downloadImage(at index: Int) {
        guard list[index].image == nil else {
            return
        }

        let targetUrl = list[index].url
        guard !downloadTasks.contains(where: { $0.originalRequest?.url == targetUrl }) else {
            return
        }

        print(#function, index)

        let task = URLSession.shared.dataTask(with: targetUrl) { [weak self] (data, response, error) in
            if let error = error {
                print(error.localizedDescription)
                return
            }

            if let data = data, let image = UIImage(data: data), let strongSelf = self {
                strongSelf.list[index].image = image
                let reloadTargetIndexPath = IndexPath(row: index, section: 0)
                DispatchQueue.main.async {
                    if strongSelf.collectionView.indexPathsForVisibleItems.contains(reloadTargetIndexPath) == .some(true) {
                        strongSelf.collectionView.reloadItems(at: [reloadTargetIndexPath])
                    }
                }
                strongSelf.completeTaks()
            }
        }
        task.resume()
        downloadTasks.append(task)
    }
    func completeTaks() {
        downloadTasks = downloadTasks.filter { $0.state != .completed }
    }

    func cancelDownload(at index: Int) {
        let targetUrl = list[index].url
        guard let taskIndex = downloadTasks.firstIndex(where: { $0.originalRequest?.url == targetUrl }) else {
            return
        }
        let task = downloadTasks[taskIndex]
        task.cancel()
        downloadTasks.remove(at: taskIndex)
    }
}
사용할 씬과 코드는 위와 같다.
//
//  Landscape.swift
//  CollectionViewPractice
//
//  Created by Martin.Q on 2021/10/06.
//

import UIKit

class Landscape {
	let urlString: String


	var url: URL {
		guard let url = URL(string: urlString) else {
			fatalError("invalid URL")
		}
		return url
	}


	var image: UIImage?


	init(urlString: String) {
		self.urlString = urlString
	}


	static func generateData() -> [Landscape] {
		return (1...36).map {
			Landscape(urlString: "URL" )
		}
	}
}
사용한 Landscape 클래스는 이미지를 다운로드할 URL과 다운로드한 이미지가 저장된다.
generateData 메소드에서 이미지를 담을 배열을 반환한다.
if let imageView = cell.viewWithTag(100) as? UIImageView {
	if let image = list[indexPath.row].image {
		imageView.image = image
	} else {
		imageView.image = nil
		downloadImage(at: indexPath.row)
	}
}
image 속성에 이미지가 저장되어 있다면 imageView에 표시하고, 아니라면 다운로드하도록 되어있다.
func downloadImage(at index: Int) {
	guard list[index].image == nil else {
		return
	}

	let targetUrl = list[index].url
	guard !downloadTasks.contains(where: { $0.originalRequest?.url == targetUrl }) else {
		return
	}

	print(#function, index)

	let task = URLSession.shared.dataTask(with: targetUrl) { [weak self] (data, response, error) in
		if let error = error {
			print(error.localizedDescription)
			return
		}

		if let data = data, let image = UIImage(data: data), let strongSelf = self {
			strongSelf.list[index].image = image
			let reloadTargetIndexPath = IndexPath(row: index, section: 0)
			DispatchQueue.main.async {
				if strongSelf.collectionView.indexPathsForVisibleItems.contains(reloadTargetIndexPath) == .some(true) {
					strongSelf.collectionView.reloadItems(at: [reloadTargetIndexPath])
				}
			}
			strongSelf.completeTaks()
		}
	}
	task.resume()
	downloadTasks.append(task)
}
다운로드를 진행하는 downloadImage 메소드는
URLSession을 사용해 이미지를 다운로드하고, Landscape속 image 속성에 저장한다.
이후 셀을 다시 불러온다.
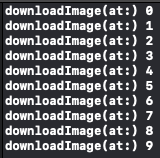
로그를 확인해 보면 화면에 표시되는 만큼 이미지를 다운로드하고 있다.
DispatchQueue.main.async {
	if strongSelf.collectionView.indexPathsForVisibleItems.contains(reloadTargetIndexPath) == .some(true) {
		strongSelf.collectionView.reloadItems(at: [reloadTargetIndexPath])
	}
}
이미지를 다운로드하고, 셀이 실제로 Collection View에 표시되는지 확인한다.
또한, 표시되어 있는 경우에 셀을 업데이트한다.
Cell Prefetching이 활성화되어있다면 화면에 표시되는 시점보다 이르게 로딩된다.
실제로 다운로드가 완료됐지만 해당 부분 때문에 정상적으로 업데이트되지는 않는다.
가장 간단하게는 if문을 제거하고 항상 reload 하도록 하는 방법이 있고,
조금 더 효율적인 방법은 실제 표시되기 직전에 데이터를 다시 확인하고, 필요한 코드를 구현하는 것이다.
extension prefetchingViewController: UICollectionViewDelegate {

}
새로 UICollectionViewDelegate 프로토콜을 채용하도록 extension을 추가한다.
extension prefetchingViewController: UICollectionViewDelegate {
	func collectionView(_ collectionView: UICollectionView, willDisplay cell: UICollectionViewCell, forItemAt indexPath: IndexPath) {

	}
}
여기에 새로운 메소드를 추가한다.
collectionView(willDisplay:) 메소드는 셀이 디스플레이에 표시되기 직전에 호출된다.
extension prefetchingViewController: UICollectionViewDelegate {
	func collectionView(_ collectionView: UICollectionView, willDisplay cell: UICollectionViewCell, forItemAt indexPath: IndexPath) {
		if let imageView = cell.viewWithTag(100) as? UIImageView {
			if let image = list[indexPath.row].image {
				imageView.image = image
			} else {
				imageView.image = nil
			}
		}
	}
}
위에서 사용했던 코드에서 이미지를 다운로드하는 부분만 제외하고 재사용한다.


이전처럼 사진이 표시되지 않고 공백으로 표시되는 문제가 해결됐다.
지금처럼 비동기 패턴으로 구현하면 Cell Prefetching 만으로 만족할 만한 성능을 얻을 수 있다.
하지만 Data Prefetching까지 구현하면 장점이 극대화된다.
Data Prefetching
override func viewDidLoad() {
	super.viewDidLoad()
	collectionView.prefetchDataSource = self
}
viewDidLoad에서 prefetchDataSource를 지정하고,
extension prefetchingViewController: UICollectionViewDataSourcePrefetching {

}
새로운 extension을 추가해 UICollectionViewDataSourcePrefetching 프로토콜을 채용하도록 작성한다.
해당 프로토콜에는 필수 메소드와 옵션 메소드가 하나씩 선언되어있다.
Table View의 Prefetching과 동일한 방식으로 구현한다.
extension prefetchingViewController: UICollectionViewDataSourcePrefetching {
	func collectionView(_ collectionView: UICollectionView, prefetchItemsAt indexPaths: [IndexPath]) {

	}
}
ColelctionView는 미리 로드해야 할 셀을 판단하고 필수 메소드인 colelctionView(prefetchItemsAt:)메소드를 호출한다.
해당 메소드에서 데이터를 미리 다운로드하거나, 미리 읽어 오면 지연을 최소화할 수 있다.
전달된 IndexPath에 필요한 이미지를 다운로드하도록 구현한다.
extension prefetchingViewController: UICollectionViewDataSourcePrefetching {
	func collectionView(_ collectionView: UICollectionView, prefetchItemsAt indexPaths: [IndexPath]) {
		for indexPath in indexPaths {
			downloadImage(at: indexPath.item)
		}
		print(#function, indexPaths)
	}
}
idnexPath에 해당하는 이미지를 다운로드하고 작업을 완료하며 로그를 출력한다.
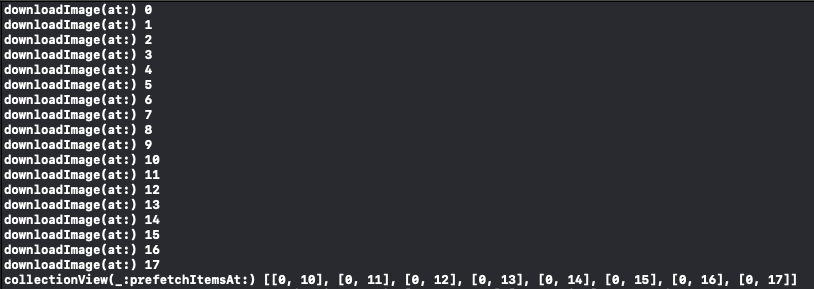
로그를 확인해 보면 이전보다 많은 양의 데이터를 다운로드했고,
extension에서 구현했던 메소드가 호출되고, 10번부터 17번까지 전달되었다.
따라서 해당하는 10번부터 17번까지의 데이터가 Data Prefetching이 요청한 데이터이다.
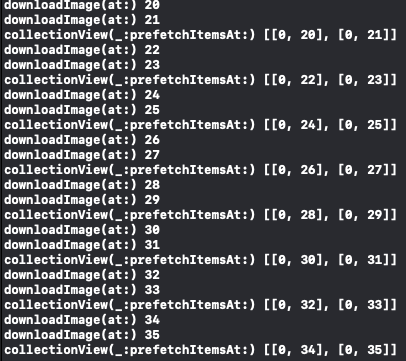
계속 스크롤하면 필요한 데이터를 지속해서 요청하는 것을 볼 수 있다.
짧은 시간 동안 여러 번 호출되거나, 같은 indexPath가 전달될 수 있기에 작업이 중복되지 않도록 구현해야 한다.
func downloadImage(at index: Int) {
	guard list[index].image == nil else {
		return
	}

	let targetUrl = list[index].url
	guard !downloadTasks.contains(where: { $0.originalRequest?.url == targetUrl }) else {
		return
	}

	print(#function, index)

	let task = URLSession.shared.dataTask(with: targetUrl) { [weak self] (data, response, error) in
		if let error = error {
			print(error.localizedDescription)
			return
		}

		if let data = data, let image = UIImage(data: data), let strongSelf = self {
			strongSelf.list[index].image = image
			let reloadTargetIndexPath = IndexPath(row: index, section: 0)
			DispatchQueue.main.async {
				if strongSelf.collectionView.indexPathsForVisibleItems.contains(reloadTargetIndexPath) == .some(true) {
					strongSelf.collectionView.reloadItems(at: [reloadTargetIndexPath])
				}
			}
			strongSelf.completeTaks()
		}
	}
	task.resume()
	downloadTasks.append(task)
}
downloadImage 메소드를 다시 보면
다운로드를 진행하기 전에 두 가지의 조건을 확인한다.
guard list[index].image == nil else {
	return
}
먼저 다운로드가 된 이미지가 있는지 확인한다.
let targetUrl = list[index].url
guard !downloadTasks.contains(where: { $0.originalRequest?.url == targetUrl }) else {
	return
}
이어서 동일한 작업이 존재하는지 확인한다.
따라서 동일한 다운로드를 요청하더라도 중복되어 실행되지 않는다.
Collection View를 빠르게 스크롤하면 Prefetching 대사잉 동적으로 변경된다.
따라서 대상이 되었다가 바로 제외될 수도 있다.
예를 들어 마지막까지 빠르게 스크롤 하면 중간의 이미지를 굳이 다운로드할 필요가 없어지는 것이다.
UICollectionViewDataSourcePrefetching 프로토콜에는 Prefetching 지정을 취소하는 메소드도 제공한다.
extension prefetchingViewController: UICollectionViewDataSourcePrefetching {
	func collectionView(_ collectionView: UICollectionView, prefetchItemsAt indexPaths: [IndexPath]) {
		for indexPath in indexPaths {
			downloadImage(at: indexPath.item)
		}
		print(#function, indexPaths)
	}
	func collectionView(_ collectionView: UICollectionView, cancelPrefetchingForItemsAt indexPaths: [IndexPath]) {

	}
}
collectionView(cancelPrefetchingForItemsAt:)메소드는 취소되는 대상이 있을 때마다 호출된다.
로그를 출력하고 다운로드를 취소하도록 구현한다.
func collectionView(_ collectionView: UICollectionView, cancelPrefetchingForItemsAt indexPaths: [IndexPath]) {
	print(#function, indexPaths)
	for indexPath in indexPaths {
		cancelDownload(at: indexPath.item)
	}
}
스크롤을 빠르게 진행하면 위와 같이 cancel 메소드가 호출된다.
해당 메소드도 반복적으로 호출될 수 있기 때문에 로그처럼 대상에서 제외됐다가 다시 지정되는 것도 가능하다.
Refresh Control
lazy var refreshControl: UIRefreshControl = { [weak self] in
	let control = UIRefreshControl()
	return control
}()
이미 작성해 둔 refreshControl을 Collection View 위에 표시한다.
override func viewDidLoad() {
	super.viewDidLoad()
	collectionView.prefetchDataSource = self

	collectionView.refreshControl = refreshControl
	refreshControl.addTarget(self, action: #selector(refresh), for: .valueChanged)
}
collectionView의 refreshControl 속성에 refreshControl을 연결하면 pull to refresh 기능을 사용할 수 있다.
이어서 addTarget 메소드로 refresh 메소드도 연결한다.

잘 작동하는 듯 하지만 데이터가 새로고침 된 이후에도 refresh control이 종료되지 않는다.
lazy var refreshControl: UIRefreshControl = { [weak self] in
	let control = UIRefreshControl()
	control.tintColor = self?.view.tintColor
	return control
}()
우선 Control의 색상을 rootView의 tintColor로 변경한다.
@objc func refresh() {
	DispatchQueue.global().async { [weak self] in
		guard let strongSelf = self else { return }
		strongSelf.list = Landscape.generateData()
		strongSelf.downloadTasks.forEach { $0.cancel() }
		strongSelf.downloadTasks.removeAll()
		Thread.sleep(forTimeInterval: 2)

		DispatchQueue.main.async {
			strongSelf.collectionView.reloadData()
			strongSelf.collectionView.refreshControl?.endRefreshing()
		}
	}
}
reloadData 메소드를 호출한 뒤 refreshControl의 endRefreshing 메소드를 호출해
새로고침을 종료하도록 수정한다.

색도 변경됐고, 새로고침이 완료되면 정상적으로 종료도 된다.
'학습 노트 > iOS (2021)' 카테고리의 다른 글
| 108 ~ 109. Orientation, Rotation and Container View Controller (0) | 2021.10.23 |
|---|---|
| 105 ~ 107. View Controller, View Management and View Controller Life Cycle (0) | 2021.10.19 |
| 101 ~ 102. Managing the Selection and Edit Rows and Section (0) | 2021.10.17 |
| 100. Supplementary View (0) | 2021.10.13 |
| 097 ~ 099. Collection View, Flow Layout, Collection View Cell and Self Sizing Cell (0) | 2021.10.08 |


