Local Notification


캘린더 앱에는 알림을 설정할 수 있는 기능이 존재한다.
알림을 받고 싶은 때를 선택하면 해당 시점에 알림을 표시한다.
해당 기능은 Local Notification의 대표적인 기능이다.
iOS는 User Notification Center를 통해 Local Notification을 관리한다.
앱에서 Notification을 예약하면 해당 시점에 Notification을 전달한다.
앱이 실행 중이라면 앱으로 전달하고, 실행 중이 아니라면 직접 배너를 통해 표시한다.
Notification의 구현은 크게 세 단계로 나눌 수 있다.
- Local Notification 권한 요청하기
사용자가 직접 허용한 경우에만 Local Notification을 예약하고 받을 수 있다. - Notification 객체를 생성하고, 필요한 정보를 담아 Notification Center에 예약을 요청하기
- Notification이 전달되었을 때 실행할 코드를 구현하기
Local Notification은 실행 상태에 따라서 처리방식이 달라진다.
앱이 Foreground에서 사용되고 있다면 Delegate로 전달되고, Background에서 실행되고 있거나
실행되고 있지 않은 상태라면 직접 표시한다.
UserNotification Framework에는 UNUserNotificationCenter 클래스가 구현되어있다.
Local Notification은 해당 클래스가 제공하는 API를 통해 구현된다.
해당 클래스의 인스턴스를 직접 생성하는 것은 불가하고, current 메소드가 반환하는 Singletone 인스턴스를 사용한다.
앱으로 전달된 Local Notification은 UNUserNotificationCenterDelegate 프로토콜을 통해 처리한다.
Local Notification을 사용하려면 사용자에게 권한을 요청해야한다.
//
//  AppDelegate.swift
//  Local Notification
//
//  Created by Martin.Q on 2021/11/23.
//

import UIKit
import UserNotifications

@main
class AppDelegate: UIResponder, UIApplicationDelegate {


    func application(_ application: UIApplication, didFinishLaunchingWithOptions launchOptions: [UIApplication.LaunchOptionsKey: Any]?) -> Bool {
        // Override point for customization after application launch.
        return true
    }

    // MARK: UISceneSession Lifecycle

    func application(_ application: UIApplication, configurationForConnecting connectingSceneSession: UISceneSession, options: UIScene.ConnectionOptions) -> UISceneConfiguration {
        // Called when a new scene session is being created.
        // Use this method to select a configuration to create the new scene with.
        return UISceneConfiguration(name: "Default Configuration", sessionRole: connectingSceneSession.role)
    }

    func application(_ application: UIApplication, didDiscardSceneSessions sceneSessions: Set<UISceneSession>) {
        // Called when the user discards a scene session.
        // If any sessions were discarded while the application was not running, this will be called shortly after application:didFinishLaunchingWithOptions.
        // Use this method to release any resources that were specific to the discarded scenes, as they will not return.
    }


}
그러기 위해선 프로젝트의 AppDelegate 파일의
보통 application(_:didFinishLaunchingWithOptions:) 메서드에서 코드를 작성한다.
만약 다른 메소드에서 구현한다면 Local Notification과 관련된 코드가 실행되기 전에 호출될 수 있도록 구현해야 한다.
우선 UserNotifications를 import 한다.
//
//  AppDelegate.swift
//  Local Notification
//
//  Created by Martin.Q on 2021/11/23.
//

import UIKit
import UserNotifications

@main
class AppDelegate: UIResponder, UIApplicationDelegate {


    func application(_ application: UIApplication, didFinishLaunchingWithOptions launchOptions: [UIApplication.LaunchOptionsKey: Any]?) -> Bool {
        UNUserNotificationCenter.current().requestAuthorization(options: [.alert, .badge, .sound]) { granted, error in
            if granted {
                UNUserNotificationCenter.current().delegate = self
            }

            print("granted \(granted)")
        }
        return true
    }

    // MARK: UISceneSession Lifecycle

    func application(_ application: UIApplication, configurationForConnecting connectingSceneSession: UISceneSession, options: UIScene.ConnectionOptions) -> UISceneConfiguration {
        // Called when a new scene session is being created.
        // Use this method to select a configuration to create the new scene with.
        return UISceneConfiguration(name: "Default Configuration", sessionRole: connectingSceneSession.role)
    }

    func application(_ application: UIApplication, didDiscardSceneSessions sceneSessions: Set<UISceneSession>) {
        // Called when the user discards a scene session.
        // If any sessions were discarded while the application was not running, this will be called shortly after application:didFinishLaunchingWithOptions.
        // Use this method to release any resources that were specific to the discarded scenes, as they will not return.
    }


}

extension AppDelegate: UNUserNotificationCenterDelegate {

}
UNUserNotificationCenter의 싱글톤 인스턴스를 사용해 requestAuthorization 메서드를 호출한다.
첫 번째 파라미터로 UNAuthorizationOptions 구조체에 선언되어있는 옵션 값을 전달해야 한다.
이는 Notification을 전달하는 방식을 설정한다.
badge는 앱 아이콘에 숫자를 표시하고,
sound는 알림 사운드를 재생하고,
alert는 배너를 통해 메시지를 표시한다.
두 번째 파라미터는 사용자가 허가 여부를 선택한 후에 호출할 Closure를 전달한다.
Closure에는 허가 여부와 오류 정보가 파라미터로 전달된다.
보통은 사용자가 권한을 허가한 다음에 Delegate를 설정하고, 나머지 초기화를 구현한다.
실습 과정에서는 Delegate만 우선 설정했다.
마지막으로 extension을 추가하고 UNUserNotificationCenterDelegate를 채용하도록 설정한다.
Delegate 자체는 구현하지 않고 앱을 실행해 결과를 확인해 본다.
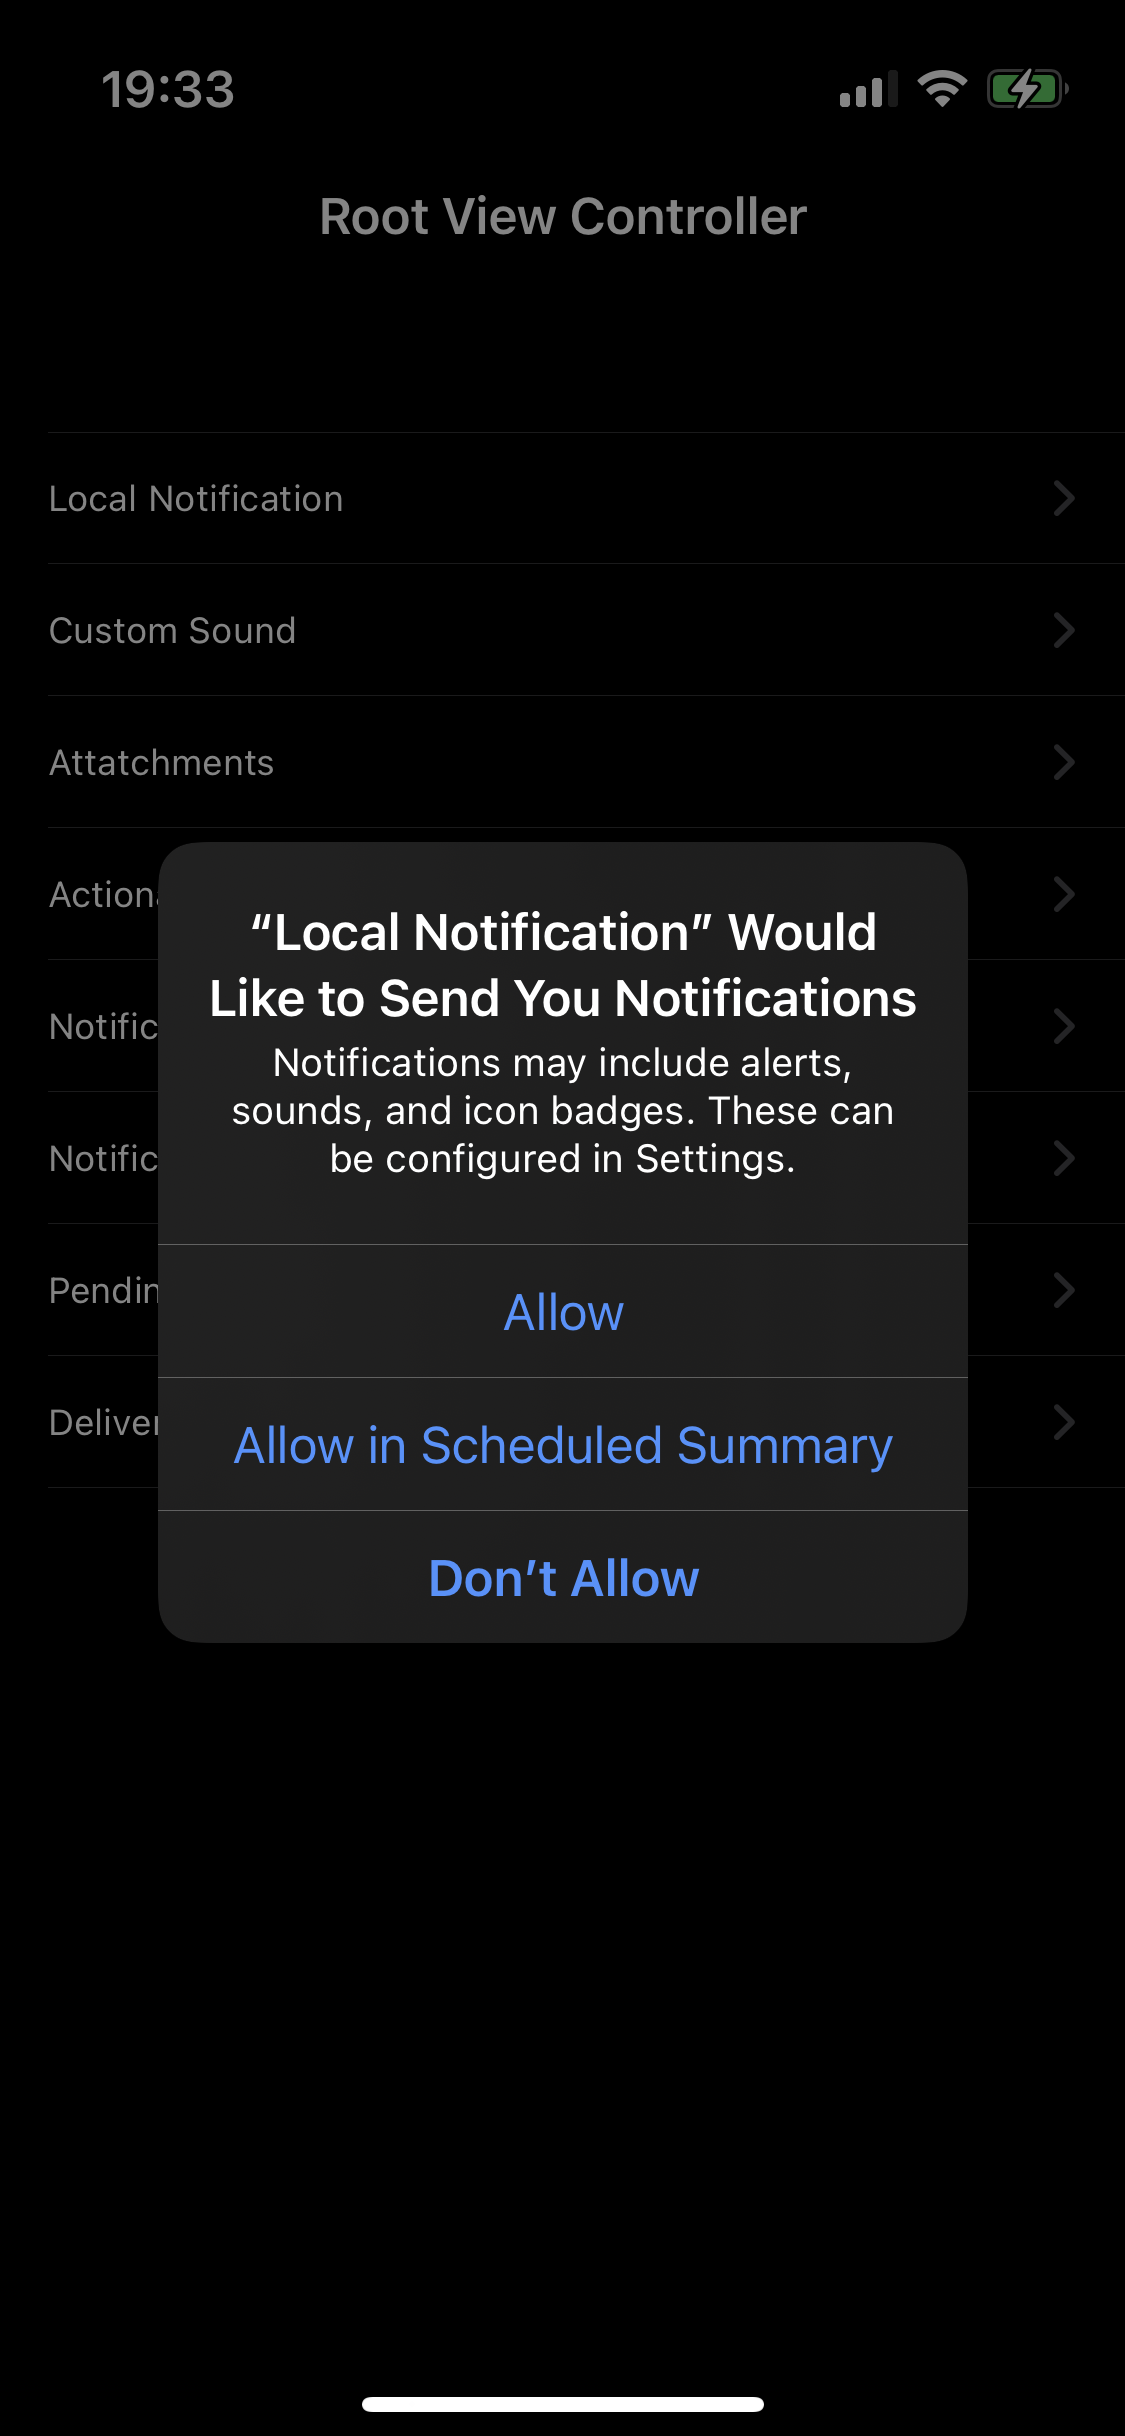
실행과 동시에 권한을 요청하는 경고창이 표시된다.
경고창 내의 문구에는 options에 전달했던 항목들이 기재되어 있는 것을 확인할 수 있다.
Allow를 선택하면 이제부터는 Notification을 예약하고 사용할 수 있다.

다시 실행하면 경고창은 다시 표시되지 않지만 Closure 자체는 반복돼서 호출되기 때문에
로그를 확인할 수 있다. 해당 로그는 설정 앱에서 Notification 권한을 해제하면 false로 표시된다.
Notification과 관련된 초기화 작업은 항상 requestAuthorization의 Closure로 전달되는 파라미터를 기준으로 진행해야 한다.
기존의 사용자의 선택 값을 Cache에 저장하고 재사용하는 것은 잘못된 방식이다.
지금까지의 과정은 Local Notification을 처리하기 위한 최소한의 코드이다.
이는 Remote Notification에도 동일하게 사용된다.

Local Norification Scene에는 Text Field와 Picker View, Button이 존재한다.
//
//  LocalNotificationViewController.swift
//  Local Notification
//
//  Created by Martin.Q on 2021/11/23.
//

import UIKit
import UserNotifications

class LocalNotificationViewController: UIViewController {
    var interval: TimeInterval = 1

    @IBOutlet weak var inputField: UITextField!

    @IBAction func schedule(_ sender: Any) {
    }

    override func viewDidLoad() {
        super.viewDidLoad()
    }
}

extension LocalNotificationViewController: UIPickerViewDataSource {
    func numberOfComponents(in pickerView: UIPickerView) -> Int {
        return 1
    }

    func pickerView(_ pickerView: UIPickerView, numberOfRowsInComponent component: Int) -> Int {
        return 60
    }


}

extension LocalNotificationViewController: UIPickerViewDelegate {
    func pickerView(_ pickerView: UIPickerView, titleForRow row: Int, forComponent component: Int) -> String? {
        return "\(row + 1)"
    }
    func pickerView(_ pickerView: UIPickerView, didSelectRow row: Int, inComponent component: Int) {
        interval = TimeInterval(row + 1)
    }
}
해당 Scene은 동명의 클래스와 연결되어있다.
Picker View는 1 ~ 60초 까지를 표시 하도록 구현되어있고,
선택한 시간은 interval에 저장된다.
Text Field에 메시지를 입력하고, Picker View에서 시간을 선택한 다음 버튼을 누르면
Local Notification을 예약하도록 구현한다.
이를 위해 UserNotifications를 import 한다.
class LocalNotificationViewController: UIViewController {
    var interval: TimeInterval = 1

    @IBOutlet weak var inputField: UITextField!

    @IBAction func schedule(_ sender: Any) {
        let content = UNMutableNotificationContent()
        content.title = "Hello"
        content.body = inputField.text ?? "Empty"
        content.badge = 2
        content.sound = UNNotificationSound.default
    }

    override func viewDidLoad() {
        super.viewDidLoad()
    }
}
버튼과 연결된 메서드에서 Local Notification을 예약한다.
UNMutableNotificationContent 클래스의 인스턴스를 생성한다.
해당 클래스의 속성을 통해 Local Notification의 기본 정보를 설정한다.
Title은 제목을, Body는 내용을 설정한다.
Badge는 앱 아이콘에 표시할 배지의 숫자를 설정한다. 양수를 설정하면 숫자가 표시되고, 0으로 설정하면 표시되지 않는다.
Sound는 Notification이 전달됐을 때 재생할 소리를 설정한다.
기본 소리를 재생할 수도 있고, 별도의 소리도 재생 가능하다.
지금 설정한 속성들은 모두 허가가 필요하다.
예를 들어 sound 속성을 설정했다고 해서 항상 소리가 재생되는 것은 아니다.
권한 요청 시 sound 옵션이 추가되어있어야 하고, 설정 앱에서도 허가되어있어야 한다.
@IBAction func schedule(_ sender: Any) {
    let content = UNMutableNotificationContent()
    content.title = "Hello"
    content.body = inputField.text ?? "Empty"
    content.badge = 2
    content.sound = UNNotificationSound.default

    let trigger = UNTimeIntervalNotificationTrigger(timeInterval: interval, repeats: false)
}
Trigger를 통해 Local Notification이 전달되는 조건을 지정한다.
- UNCalendarNotificationTrigger
Notification이 전달되는 날짜와 시간을 직접 지정할 때 사용한다.
매일 아침 지정된 시간에 전달되거나 특정 날짜에 전달되어야 한다면 해당 Trigger를 사용한다. - UNTimerIntervalNotificationTrigger
현재 시점을 기준으로 시간을 지정할 때 사용된다.
한 시간 뒤에 전달되는 알림을 구현할 때 사용된다. - UNLocationNotificationTrigger
특정 위치에서 Notification을 전달해야 할 때 사용한다.
사용자가 매장 부근에 진입했을 때 Notification을 통해 프로모션 정보 등을 전달할 수 있다.
UNTimeIntervalNotificationTrigger를 Trigger로 지정하고,
Picker View에서 선택한 값을 Interval로 설정한다.
두 번째 파라미터인 repeats에 true를 전달하면 알림을 반복해서 표시한다.
이때 60보다 작은 값을 전달하면 충돌이 발생하므로 주의해야 한다.
실습에선 false를 전달했다.
@IBAction func schedule(_ sender: Any) {
    let content = UNMutableNotificationContent()
    content.title = "Hello"
    content.body = inputField.text ?? "Empty"
    content.badge = 2
    content.sound = UNNotificationSound.default

    let trigger = UNTimeIntervalNotificationTrigger(timeInterval: interval, repeats: false)
    let request = UNNotificationRequest(identifier: "test", content: content, trigger: trigger)
}
UNNotificationRequest 인스턴스를 생성한다.
첫 번째 파라미터로 식별자를 전달한다. 예약된 Notification을 삭제할 때 사용하는 문자열이다.
나머지 파라미터에는 앞에서 생성한 동명의 인스턴스를 전달한다.
@IBAction func schedule(_ sender: Any) {
    let content = UNMutableNotificationContent()
    content.title = "Hello"
    content.body = inputField.text ?? "Empty"
    content.badge = 2
    content.sound = UNNotificationSound.default

    let trigger = UNTimeIntervalNotificationTrigger(timeInterval: interval, repeats: false)
    let request = UNNotificationRequest(identifier: "test", content: content, trigger: trigger)

    UNUserNotificationCenter.current().add(request) { (error) in
        if let error = error {
            print(error)
        } else {
            print("Done")
        }
    }

    inputField.text = nil
}
실제 예약을 진행한다.
UNUserNotificationCenter의 add메서드를 사용해 request 인스턴스를 전달하고,
Complete Handler에서 에러가 발생하면 이를 콘솔에 출력하도록 구현한다.
Local Notification의 예약이 끝나면 Text Field를 초기화하도록 한다.

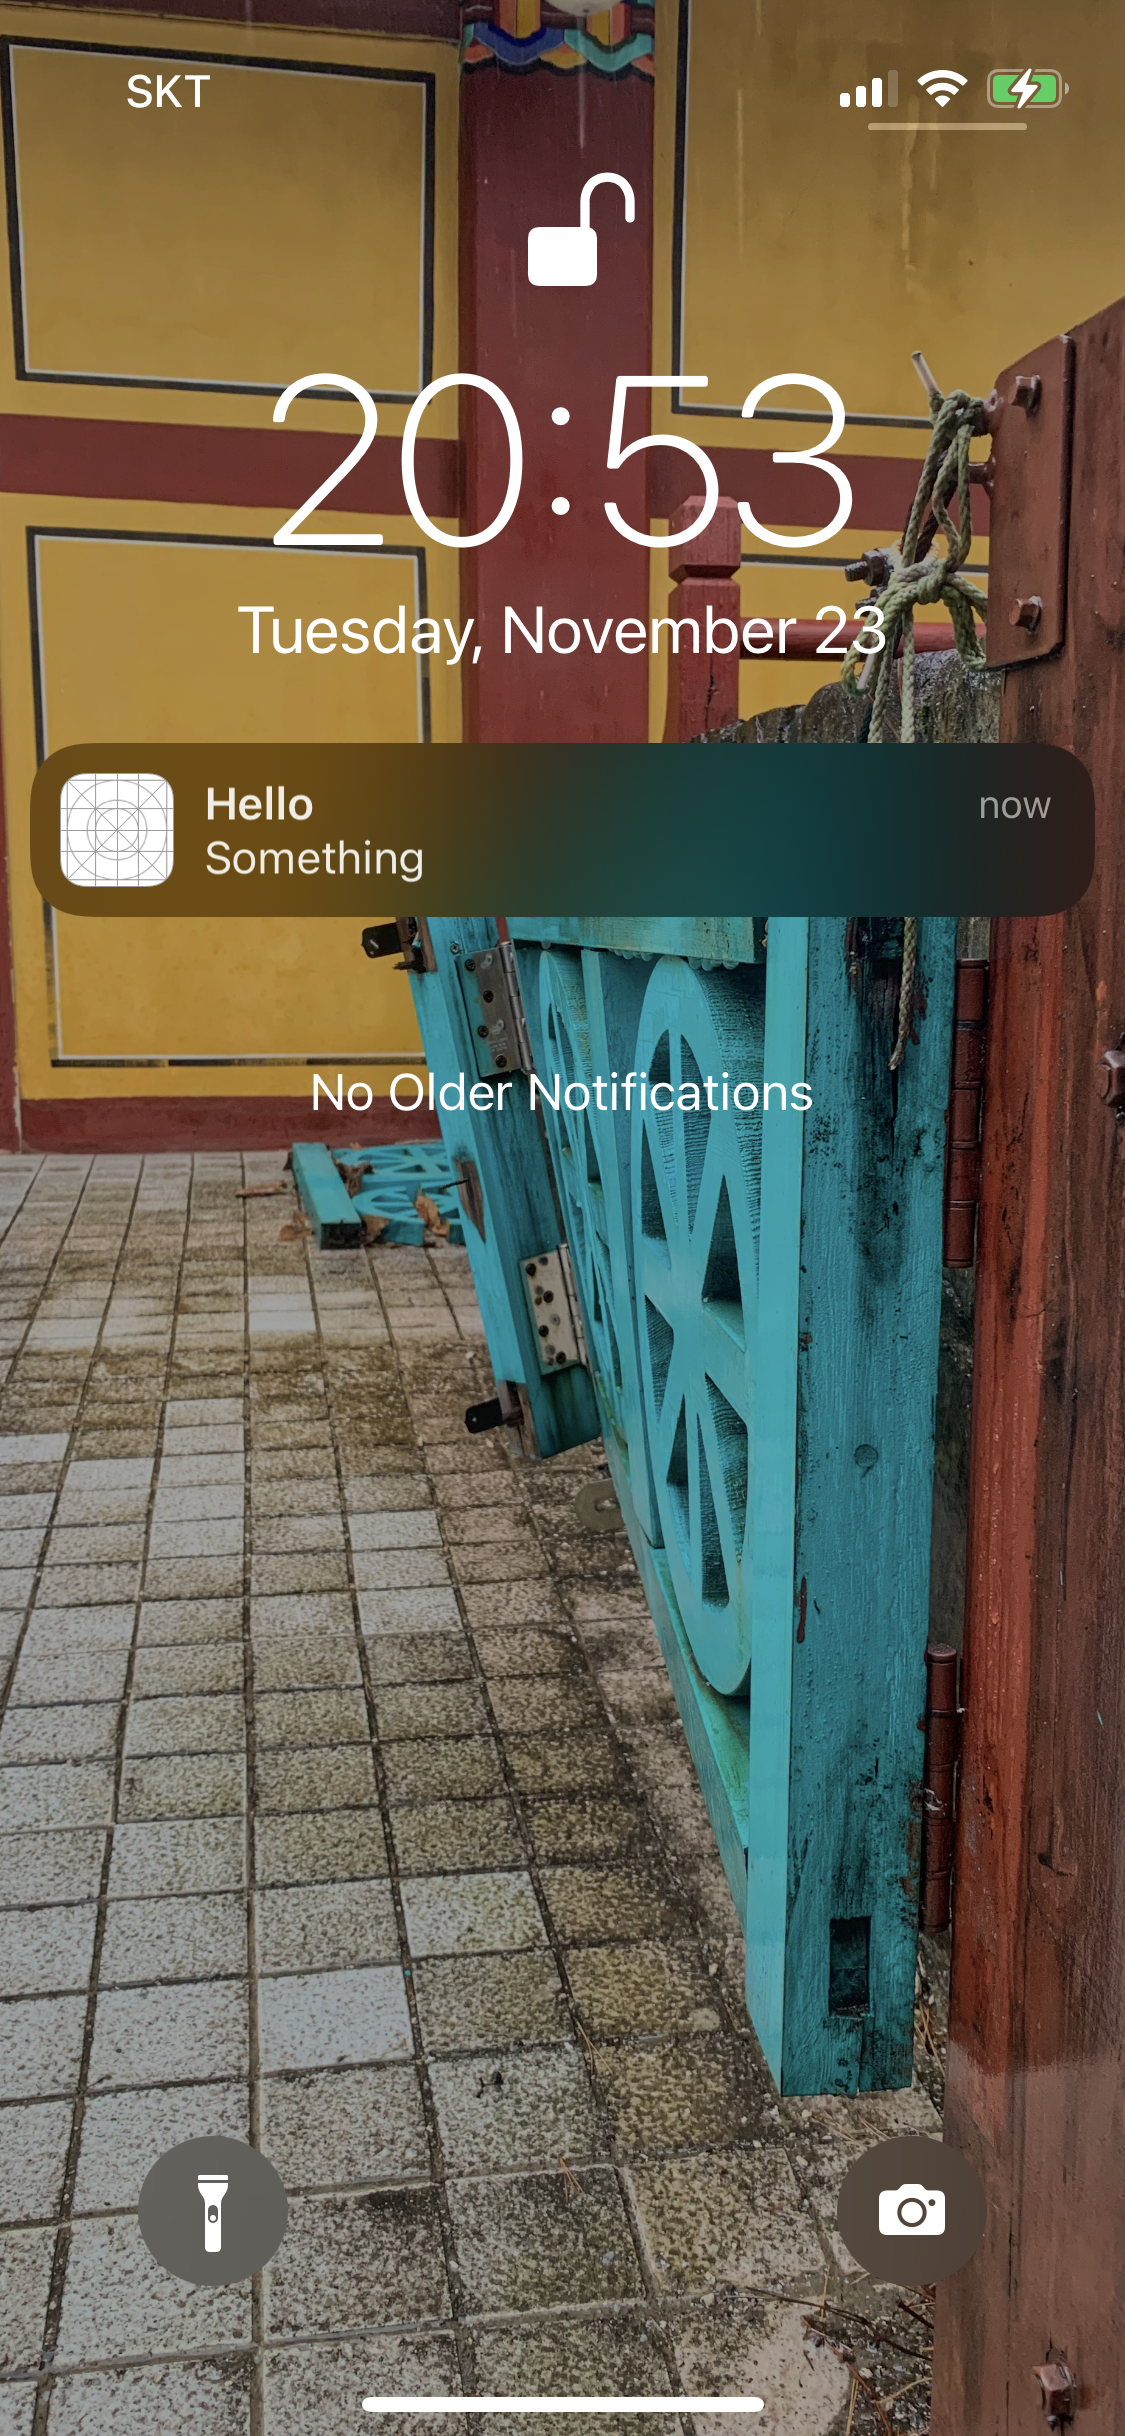
Picker View에서 설정한 시간이 흐르면 Notification이 전달된다.
사용 중엔 Banner로 표시되지만, 확인하지 않으면 iOS Notification Center에서 이를 확인하고,
터치하면 앱으로 이동할 수 있다.
Notification에서 직접 실행한 항목들은 iOS Notification Center에서 자동으로 삭제된다.
앱으로 이동하지 않고 바로 삭제하는 것도 가능하다.

다시 Notification을 예약하면 시간이 지나도 Banner가 표시되지 않는다.
Local Notification은 앱의 실행 상태에 따라 다른 방식으로 처리된다.
앱이 Background에 있거나 실행 중이지 않은 상태라면 iOS가 직접 Notification을 표시한다.
반대로 앱이 Foreground에서 실행되고 있다면 Delegate 메서드가 호출된다.
실습 과정에서 Delegate의 구현을 건너뛰었기 때문에 앱을 표시하고 있을 때는 Notification이 표시되지 않는다.
extension AppDelegate: UNUserNotificationCenterDelegate {
    func userNotificationCenter(_ center: UNUserNotificationCenter, willPresent notification: UNNotification, withCompletionHandler completionHandler: @escaping (UNNotificationPresentationOptions) -> Void) {

    }
}
AppDelegate의 extension에서 userNotificationCenter(willPresent:withCompletionHandler:) 메서드를 추가한다.
@available(iOS 14.0, *)
extension AppDelegate: UNUserNotificationCenterDelegate {
    func userNotificationCenter(_ center: UNUserNotificationCenter, willPresent notification: UNNotification, withCompletionHandler completionHandler: @escaping (UNNotificationPresentationOptions) -> Void) {
        let content = notification.request.content
        let trigger = notification.request.trigger

        completionHandler([UNNotificationPresentationOptions.banner])
    }
}
Foreground에서 실행 중일 때 Local Notification이 전달되면 해당 메서드가 호출된다.
두 번째 파라미터를 통해 Notification 객체가 전달된다.
또한 request 속성을 통해 Local Notification을 요청할 때 전달한 Content와 Trigger 인스턴스에 접근할 수 있다.
필요한 기능을 구현한 다음 반드시 세 번째 파라미터로 전달된 Completion Handler를 호출하고 Notification 처리 방식을 지정해야 한다.
강의에서 사용하는 alert 방식은 iOS 14부터 더 이상 사용되지 않는 방식으로 banner를 대신 사용했다.
지금은 banner만 전달했기 때문에 소리와 배지는 사용되지 않는다.

이제는 앱을 화면에 표시한 상황에서도 Notification을 받을 수 있다.
func userNotificationCenter(_ center: UNUserNotificationCenter, didReceive response: UNNotificationResponse, withCompletionHandler completionHandler: @escaping () -> Void) {
    let content = response.notification.request.content
    let trigger = response.notification.request.trigger

    completionHandler()
}
만약 사용자가 Notification을 터치해 앱으로 진입했거나 Action을 통해 별도의 동작을 실행했다면
userNotificationCenter(didReceive:withCompletionHandler:) 메서드가 호출된다.
해당 메서드를 통해 추가적인 동작을 구현할 수 있다.
두 번째 파라미터로 전달된 response를 통해 전달된 content와 trigger에 접근할 수 있고,
세 번째 파라미터의 CompletionHandler를 호출해야 한다.
class LocalNotificationViewController: UIViewController {
    var interval: TimeInterval = 1

    @IBOutlet weak var inputField: UITextField!

    @IBAction func schedule(_ sender: Any) {
        let content = UNMutableNotificationContent()
        content.title = "Hello"
        content.body = inputField.text ?? "Empty"
        content.badge = 2
        content.sound = UNNotificationSound.default

        let trigger = UNTimeIntervalNotificationTrigger(timeInterval: interval, repeats: false)
        let request = UNNotificationRequest(identifier: "test", content: content, trigger: trigger)

        UNUserNotificationCenter.current().add(request) { (error) in
            if let error = error {
                print(error)
            } else {
                print("Done")
            }
        }

        print(interval)
        inputField.text = nil
    }

    override func viewDidLoad() {
        super.viewDidLoad()

        UIApplication.shared.applicationIconBadgeNumber = 0
    }
}
앱 아이콘에는 배지가 표시되어있지만 Notification을 확인했을 때 이를 제거하는 것은 직접 구현해야 한다.
viewDidLoad에서 이를 구현하면 해당 Scene에 진입했을 때 badge를 초기화할 수 있다.
UIApplication의 shared 속성에 접근하면 앱의 Singletone 인스턴스에 접근할 수 있다.
applicationIconBadgeNumber 속성을 0으로 초기화해 Badge를 전부 삭제한다.
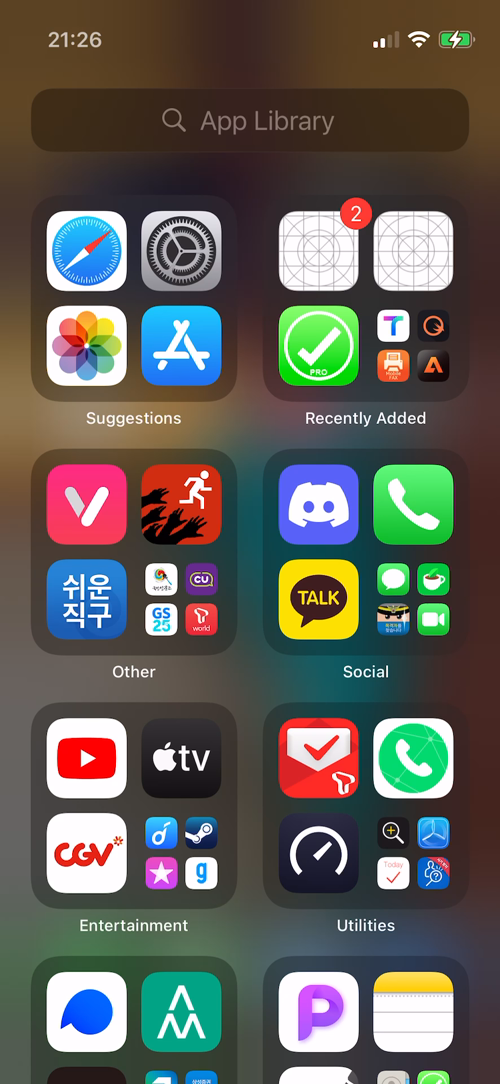
표시되어있던 Badge가 Local Notification Scene에 접속한 이후엔 초기화되는 것을 확인할 수 있다.
실제로 구현할 때는 확인하지 않는 알림을 확인할 때 이를 삭제하도록 구현해야 하며,
무조건 0으로 초기화하는 것이 아니라 확인할 내용의 수를 방영하는 것이 바람직하다.
Custom Notification Sound & Attachment
Custom Notification Sound

//
//  CustomSoundViewController.swift
//  Local Notification
//
//  Created by Martin.Q on 2021/11/23.
//

import UIKit
import UserNotifications

class CustomSoundViewController: UIViewController {
    @IBAction func useCustomSound(_ sender: Any) {
        let content = UNMutableNotificationContent()
        content.title = "hello"
        content.body = "Custom Sound"
        content.sound = UNNotificationSound.default

        let trigger = UNTimeIntervalNotificationTrigger(timeInterval: 5, repeats: false)
        let request = UNNotificationRequest(identifier: "CustomSound", content: content, trigger: trigger)

        UNUserNotificationCenter.current().add(request, withCompletionHandler: nil)
    }


    override func viewDidLoad() {
        super.viewDidLoad()
    }
}
사용할 Scene과 연결된 클래스는 위와 같다.
클래스에는 Scene의 Custom Sound 버튼과 연결된 메서드에 Local Notification을 예약하는 코드가 구현되어있다.
권한을 요청하는 코드는 지난 챕터에서 AppDelegate에 구현한 것을 그대로 사용한다.
앱을 실행하고 Notification을 예약해 보면 기본 사운드와 함께 Notification이 표시된다.
이번에는 이 소리를 변경해 본다.

사용할 사운드 파일은 강의의 샘플 파일을 그대로 사용한다.
Notification에 사용할 사운드 파일은 반드시 로컬에 존재해야 한다.
즉, 프로젝트에 포함시키는 것이 가장 쉬운 방법이다.
서버에서 다운로드하도록 구현한다면 Local Notification을 예약하기 전에 다운로드해야 하고,
반드시 Library 아래에 폴더를 만들고 저장해야 한다.
다른 경로에 저장하는 경우 정상적으로 재생하지 못할 수 있다.
class CustomSoundViewController: UIViewController {
    @IBAction func useCustomSound(_ sender: Any) {
        let content = UNMutableNotificationContent()
        content.title = "hello"
        content.body = "Custom Sound"
        content.sound = UNNotificationSound.default

        let trigger = UNTimeIntervalNotificationTrigger(timeInterval: 5, repeats: false)
        let request = UNNotificationRequest(identifier: "CustomSound", content: content, trigger: trigger)

        UNUserNotificationCenter.current().add(request, withCompletionHandler: nil)
    }


    override func viewDidLoad() {
        super.viewDidLoad()
    }
}
사운드 속성의 형식은 UNNotificationSound 클래스이다.
지금처럼 default 값을 전달하면 기본 사운드가 출력된다.
Custom Sound 파일은 Linear PCM, MA4, µLaw, aLaw의 형식만 지원하고 30초 이하여야 한다.
지원하지 않는 포맷이거나 30초를 초과하면 기본 사운드가 재생된다.
class CustomSoundViewController: UIViewController {
    @IBAction func useCustomSound(_ sender: Any) {
        let content = UNMutableNotificationContent()
        content.title = "hello"
        content.body = "Custom Sound"
        content.sound = UNNotificationSound(named: "bell.aif")

        let trigger = UNTimeIntervalNotificationTrigger(timeInterval: 5, repeats: false)
        let request = UNNotificationRequest(identifier: "CustomSound", content: content, trigger: trigger)

        UNUserNotificationCenter.current().add(request, withCompletionHandler: nil)
    }


    override func viewDidLoad() {
        super.viewDidLoad()
    }
}
이렇게 UNNotificationSound(named:) 생성자를 사용해 확장자를 포함한 파일의 이름을 전부 전달하면
바뀐 소리로 알림을 표시한다.
Attachment
Notification Banner에는 기본적으로 제목과 내용이 표시된다.
여기에 Image, Audio, Video를 추가할 수 있다.
특히 Audio, Video는 Banner에서 직접 재생하는 것도 가능하다.
이러한 요소들은 UNNotificationAttachment 객체를 통해 추가할 수 있다.
또한 Attachment로 사용되는 파일들은 반드시 Local에 저장되어있어야 한다.

사용항 Scene에는 버튼이 세 개가 배치되어있고
//
//  AttachmentViewController.swift
//  Local Notification Practice
//
//  Created by Martin.Q on 2021/11/24.
//

import UIKit

class AttachmentViewController: UIViewController {

    @IBAction func addImageAttach(_ sender: Any) {
        let content = UNMutableNotificationContent()
        content.title = "Hello"
        content.body = "Image Attach"
        content.sound = UNNotificationSound.default

        let trigger = UNTimeIntervalNotificationTrigger(timeInterval: 5, repeats: false)
        let request = UNNotificationRequest(identifier: "ImageAttachment", content: content, trigger: trigger)
        UNUserNotificationCenter.current().add(request, withCompletionHandler: nil)
    }

    @IBAction func addAudioAttach(_ sender: Any) {
        let content = UNMutableNotificationContent()
        content.title = "Hello"
        content.body = "Audio Attach"
        content.sound = UNNotificationSound.default

        let trigger = UNTimeIntervalNotificationTrigger(timeInterval: 5, repeats: false)
        let request = UNNotificationRequest(identifier: "AudioAttachment", content: content, trigger: trigger)
        UNUserNotificationCenter.current().add(request, withCompletionHandler: nil)
    }

    @IBAction func addVideoAttach(_ sender: Any) {
        let content = UNMutableNotificationContent()
        content.title = "Hello"
        content.body = "Video Attach"
        content.sound = UNNotificationSound.default

        let trigger = UNTimeIntervalNotificationTrigger(timeInterval: 5, repeats: false)
        let request = UNNotificationRequest(identifier: "VideoAttachment", content: content, trigger: trigger)
        UNUserNotificationCenter.current().add(request, withCompletionHandler: nil)
    }


    override func viewDidLoad() {
        super.viewDidLoad()
    }

}
연결된 클래스에는 각각의 버튼들의 Notification을 예약하는 코드가 미리 구현되어있다.

프로젝트에 추가되어있는 콘텐츠들을 추가해 본다.
@IBAction func addImageAttach(_ sender: Any) {
    let content = UNMutableNotificationContent()
    content.title = "Hello"
    content.body = "Image Attach"
    content.sound = UNNotificationSound.default

    guard let url = Bundle.main.url(forResource: "hello", withExtension: "png") else {
        return
    }

    let trigger = UNTimeIntervalNotificationTrigger(timeInterval: 5, repeats: false)
    let request = UNNotificationRequest(identifier: "ImageAttachment", content: content, trigger: trigger)
    UNUserNotificationCenter.current().add(request, withCompletionHandler: nil)
}
파일의 url을 가져와 이를 저장한다.
@IBAction func addImageAttach(_ sender: Any) {
    let content = UNMutableNotificationContent()
    content.title = "Hello"
    content.body = "Image Attach"
    content.sound = UNNotificationSound.default

    guard let url = Bundle.main.url(forResource: "hello", withExtension: "png") else {
        return
    }

    guard let imageAttachment = try? UNNotificationAttachment(identifier: "hello-image", url: url, options: nil) else {
        return
    }

    let trigger = UNTimeIntervalNotificationTrigger(timeInterval: 5, repeats: false)
    let request = UNNotificationRequest(identifier: "ImageAttachment", content: content, trigger: trigger)
    UNUserNotificationCenter.current().add(request, withCompletionHandler: nil)
}
UNNotificationAttachment 생성자를 호출하고 식별자와 url을 전달한다.
options에는 썸네일의 표시 방식을 설정하지만 지금은 사용하지 않으므로 nil을 전달한다.
@IBAction func addImageAttach(_ sender: Any) {
let content = UNMutableNotificationContent()
content.title = "Hello"
content.body = "Image Attach"
content.sound = UNNotificationSound.default
guard let url = Bundle.main.url(forResource: "hello", withExtension: "png") else {
return
}
guard let imageAttachment = try? UNNotificationAttachment(identifier: "hello-image", url: url, options: nil) else {
return
}
content.attachments = [imageAttachment]
let trigger = UNTimeIntervalNotificationTrigger(timeInterval: 5, repeats: false)
let request = UNNotificationRequest(identifier: "ImageAttachment", content: content, trigger: trigger)
UNUserNotificationCenter.current().add(request, withCompletionHandler: nil)
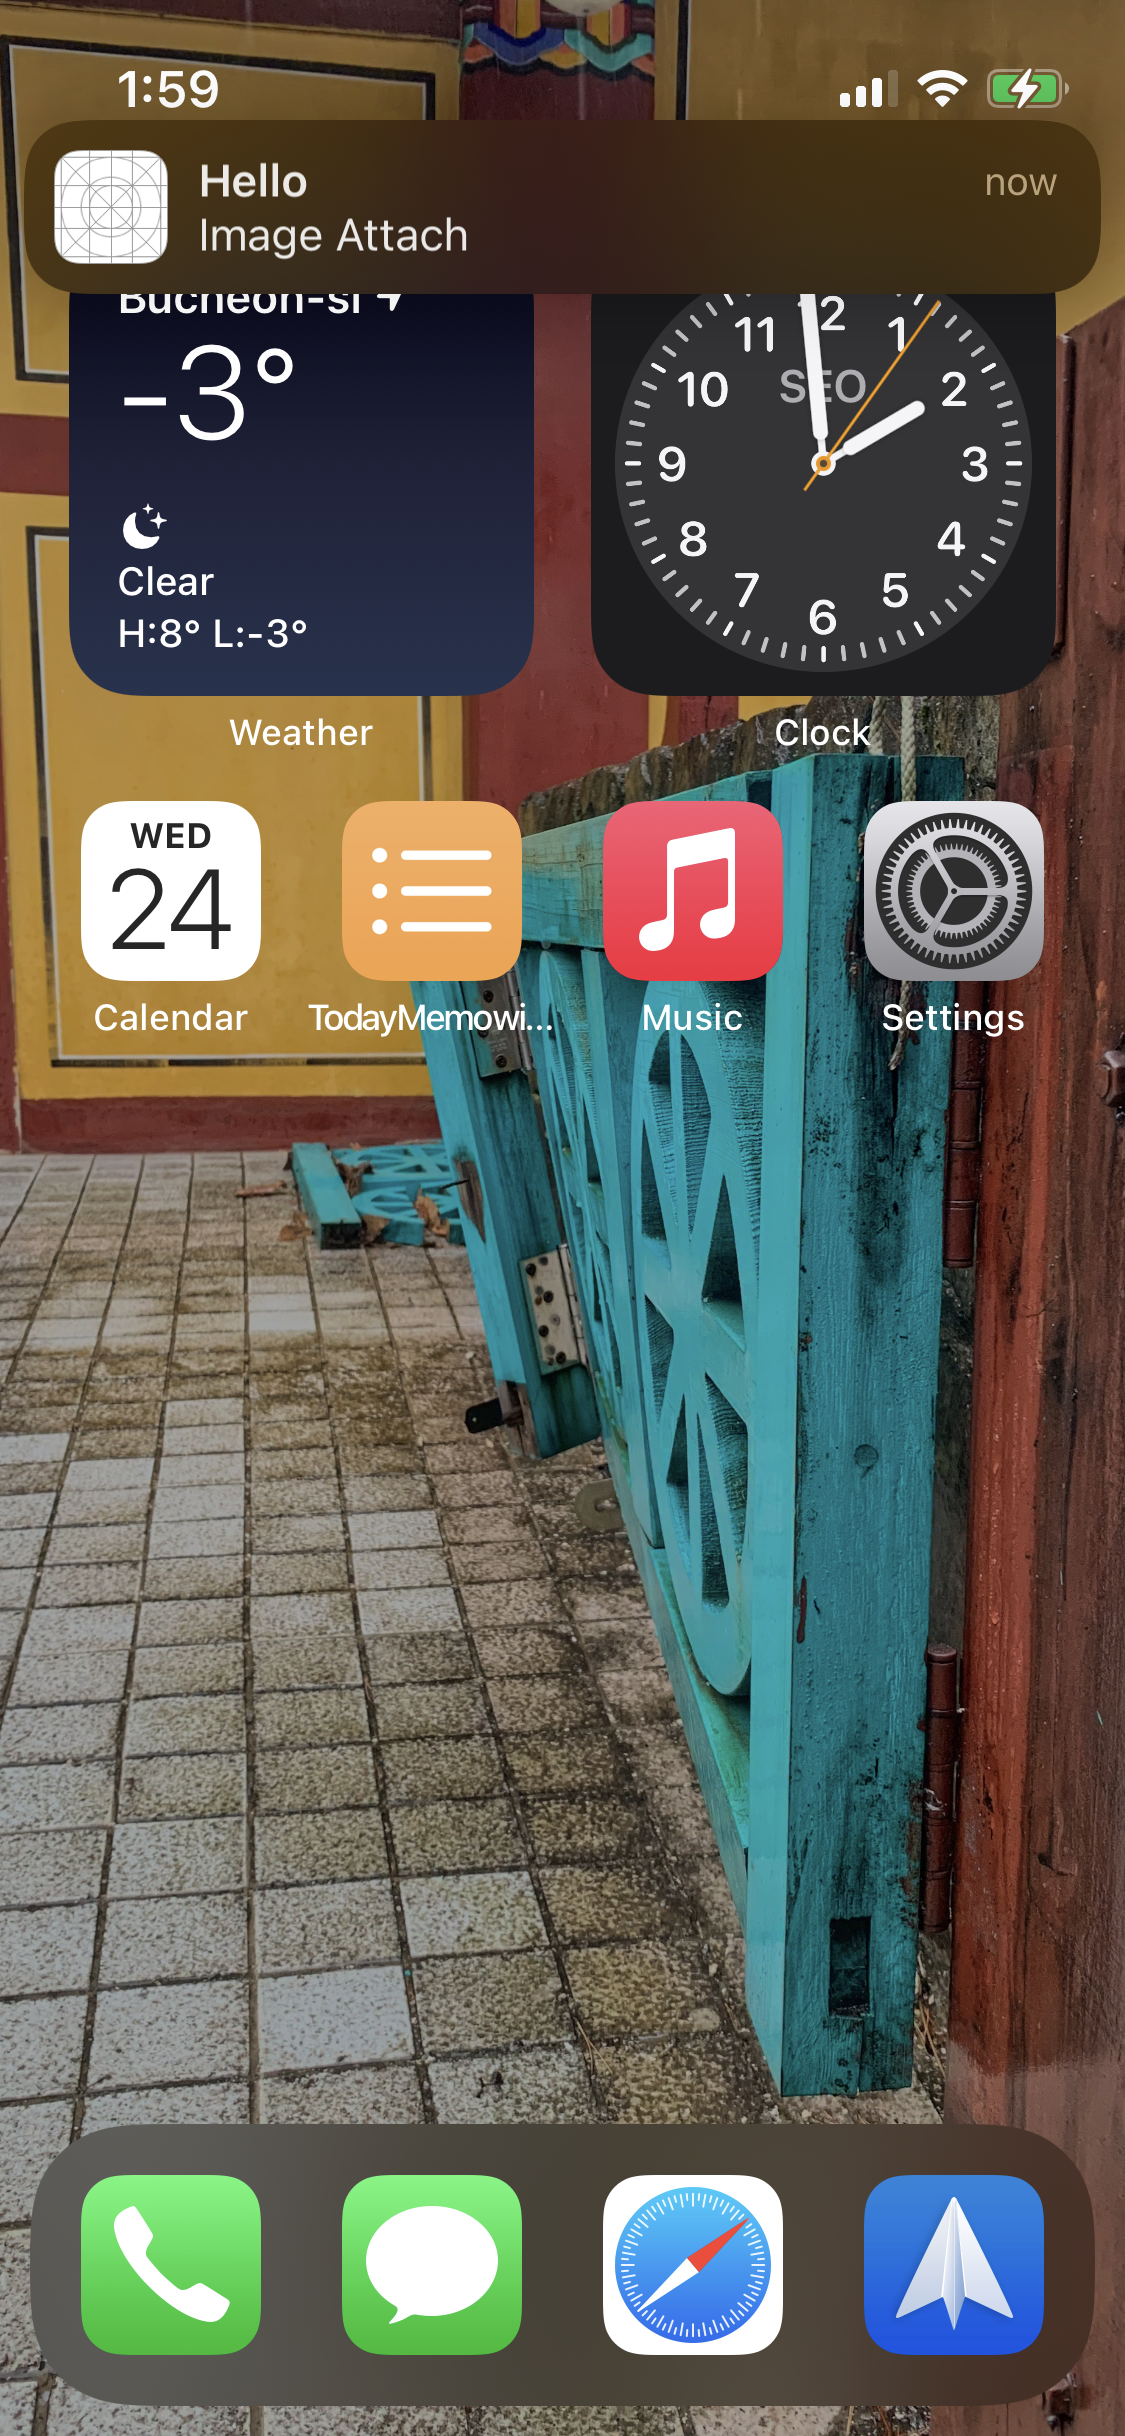
}Attachment 속성에 방금 만든 인스턴스를 전달한다


실행해 보면 Banner의 오른쪽에 썸네일이 표시된다.
또한 Banner를 끌어내리면 전체 이미지를 확인할 수 있다.
Image Attachment로 사용할 수 있는 파일의 크기는 최대 10MB이다.
PNG, JPG, GIF를 지원한다.
이번엔 option을 조절해 썸네일을 조절해 본다.
Attachment Option은 Dictionary 형태로 전달해야 한다.

사용할 수 있는 옵션은 위와 같다.
@IBAction func addImageAttach(_ sender: Any) {
    let content = UNMutableNotificationContent()
    content.title = "Hello"
    content.body = "Image Attach"
    content.sound = UNNotificationSound.default

    guard let url = Bundle.main.url(forResource: "hello", withExtension: "png") else {
        return
    }

    let options = [UNNotificationAttachmentOptionsThumbnailHiddenKey: true]

    guard let imageAttachment = try? UNNotificationAttachment(identifier: "hello-image", url: url, options: nil) else {
        return
    }

    content.attachments = [imageAttachment]

    let trigger = UNTimeIntervalNotificationTrigger(timeInterval: 5, repeats: false)
    let request = UNNotificationRequest(identifier: "ImageAttachment", content: content, trigger: trigger)
    UNUserNotificationCenter.current().add(request, withCompletionHandler: nil)
}
옵션을 Dictionary로 구성해 이를 세 번째 파라미터에 전달한다.

결과를 확인해 보면 Banner의 오른쪽에 썸네일이 사라졌지만 Pulldown에서는 그대로 노출되는 것을 확인할 수 있다.
@IBAction func addAudioAttach(_ sender: Any) {
    let content = UNMutableNotificationContent()
    content.title = "Hello"
    content.body = "Audio Attach"
    content.sound = UNNotificationSound.default

    guard let url = Bundle.main.url(forResource: "bell", withExtension: "aif") else {
        return
    }

    guard let audioAttachment = try? UNNotificationAttachment(identifier: "Audio-Attach", url: url, options: nil) else {
        return
    }

    content.attachments = [audioAttachment]

    let trigger = UNTimeIntervalNotificationTrigger(timeInterval: 5, repeats: false)
    let request = UNNotificationRequest(identifier: "AudioAttachment", content: content, trigger: trigger)
    UNUserNotificationCenter.current().add(request, withCompletionHandler: nil)
}
Audio Attachment를 구현하는 코드는 완전히 동일하다.


썸네일은 표시되지 않지만 Pulldown시 파일을 재생할 수 있다.
Attachment로 추가할 수 있는 Audio 파일은 최대 5MB이다.
MP3, MP4 Audio, Wave 파일 등 대부분의 Audio 파일을 지원한다.
@IBAction func addVideoAttach(_ sender: Any) {
    let content = UNMutableNotificationContent()
    content.title = "Hello"
    content.body = "Video Attach"
    content.sound = UNNotificationSound.default

    guard let url = Bundle.main.url(forResource: "video", withExtension: "mp4") else {
        return
    }

    guard let videoAttatchment = try? UNNotificationAttachment(identifier: "Video-Attach", url: url, options: nil) else {
        return
    }

    content.attachments = [videoAttatchment]

    let trigger = UNTimeIntervalNotificationTrigger(timeInterval: 5, repeats: false)
    let request = UNNotificationRequest(identifier: "VideoAttachment", content: content, trigger: trigger)
    UNUserNotificationCenter.current().add(request, withCompletionHandler: nil)
}
Video Attachment도 구현 방법은 동일하다.


썸네일이 표시되고, Pulldown시에 재생할 수 있다.
Video Attachment는 최대 50MB까지,
MPEG2, MPEG4, AVI를 지원한다.
'학습 노트 > iOS (2021)' 카테고리의 다른 글
| 138 ~ 139. Remote Notification & Push Certificates, Provider and Client App (0) | 2021.11.26 |
|---|---|
| 137. Actionable Notification (0) | 2021.11.25 |
| 133 ~ 134. Notification Center and Notification (0) | 2021.11.23 |
| 130 ~ 132. Custom Presentation, Custom Transition and Interactive Transition (0) | 2021.11.20 |
| 128 ~ 129. View Transition and View Controller Presentation (0) | 2021.11.20 |


