서론
지난 글에서 테스트 중에는 크게 불편함을 느끼지 못했던 에디터의 몇몇 문제에 대해 이야기 한 적이 있다.
( https://chillog.page/board/chillog/1617855589867 )
시각적인 부분과 몇몇 간단한 문제들은 당일, 익일에 걸쳐 수정을 완료했지만,
아마 부족한 내 실력과 더불어
'문서화가 잘 되어 있지만 잘 되어 있지 않다.'
라는 어느 분이 지적한 문제가 겹쳐 상당히 해멘 Toast UI의 vue에서의 plugin 적용 법에 관한 이야기 이다.
이번 글에서 적용한 plugin은 tui markdown editor에서 셀 병합 기능을 추가해 주는 plugin으로,
학습 내용을 정리하던 중 너무 불편해 이걸 해결하지 않고는 차마 견딜 수가 없었다.
따라하고 있던 fkkmemi 님의 강의에서도 해당 부분은 tui의 plugin 대신에 사용자가 직접 만든 plugin을 적용 하는 것으로 내용이 대체되어
document 부터 검색까지 거한 삽질이 시작됐다.
본론
설치
설치 자체는 문서 그대로 적용하면 된다.
해당 내용은 tui editor의 git 내용을 참고하자.
$ npm install @toast-ui/editor-plugin-table-merged-cell

or

$ yarn add @toast-ui/editor-plugin-table-merged-cell
둘 중 환경에 맞는 명령어를 사용해 설치하면 된다.
특별히 내 경우에만 해당되는 문제일지 모르겠는데, plugin을 설치하면
algolia, firebase를 찾을 수 없는 오류가 생긴다.
설치하면서 프로젝트 dependancies를 건들이거나 경로를 바꾸는 것 같은데
$ yarn add firebase
$ yarn add algoliasearch
당황하지 말고 다시 설치해 주면 오류는 사라진다.
import & instance
모듈을 import하는 것도 동일하다.
다만, 위치가 다르다.
현재 Chillog의 tui관련 import는 editor.js에 되어있어 문서를 참고할 게 없다.
import Vue from 'vue'
import 'codemirror/lib/codemirror.css'
import '@toast-ui/editor/dist/toastui-editor.css'
import '@toast-ui/editor/dist/toastui-editor-viewer.css'
import '@toast-ui/editor/dist/i18n/ko-kr'

import { Editor, Viewer } from '@toast-ui/vue-editor'

Vue.component('viewer', Viewer)
Vue.component('editor', Editor)
구조 자체가 달라서 그대로 사용할 수 없는 게 문제인데 document에 해당 부분이 create instance라고 되어 있는 것에 의구심을 가졌어야 했다.
여러
( https://v1.vuejs.org/guide/components.html )
자료를
( https://snyk.io/advisor/npm-package/@toast-ui/editor-plugin-code-syntax-highlight )
검색해도
( https://vuejsexamples.com/toast-ui-editor-for-vue/ )
답이 안 보여서
( https://stackoverflow.com/questions/63939582/v-model-in-toast-ui-editor-for-vuejs )
포기할까 고민하던 차에 한 줄기 빛이 보였다.
( https://github.com/nhn/tui.editor/issues/989 )
애초에 Chillog는 다른 곳에서 import 후 사용시에 불러 오는 방식이라 해당 코드들이 다른 곳에 빠져 있었다.
이미 삽질하다 짐작을 하긴 했는데 꼭 필요한 부분에 대한 자료가 없어 같은 자리를 빙빙 돌았던 것이다.
아래 코드는 글 목록에서 미리보기를 표시해 주는 list-normal.vue의 전문이다.
<template>
    <div>
        <template v-for="(item, i) in items">
            <v-card :key="item.id" :class="$vuetify.breakpoint.xs ? '' : 'ma-4'" :flat="$vuetify.breakpoint.xs">
                <v-card color="transparent" flat :to="category ? `${boardId}/${item.id}?category=${category}` : `${boardId}/${item.id}`">
                    <v-card-subtitle class="text--primary body-1" :class="item.important > 0 ? 'text-truncate': ''">
                        <display-title :item="item"/>
                        <v-spacer/>
                        <display-count v-if="item.important > 0" :item="item" :column="false"></display-count>
                    </v-card-subtitle>
                    <template v-if="!item.important">
                        <v-card-text>
                            <viewer class=
                            "tui-dark"
                            v-if="item.summary"
                            :initialValue="item.summary"
                            @load="onViewerLoad"
                            :options="tuiOptions"></viewer>
                            <v-container v-else>
                                <v-row justify="center" align="center">
                                    <v-progress-circular indeterminate></v-progress-circular>
                                </v-row>
                            </v-container>
                        </v-card-text>
                        <v-card-actions class="d-flex justify-center">
                            <v-btn text color="default" class="mb-4">
                                <v-icon left>mdi-dots-vertical</v-icon>
                            </v-btn>
                        </v-card-actions>
                    </template>
                </v-card>
                <template v-if="!item.important">
                    <v-card-actions>
                        <span class="font-weight-black caption ml-3"><display-time :time="item.createdAt"></display-time></span>
                        <v-spacer/>
                        <display-user :user="item.user"></display-user>
                    </v-card-actions>
                    <v-card-actions>
                        <v-spacer/>
                        <display-count :item="item" :column="false"></display-count>
                    </v-card-actions>
                    <v-card-text>
                        <v-row justify="start" align="center" class="px-4">
                            <v-btn
                                color="info"
                                depressed
                                small
                                outlined
                                class="mr-4"
                                :to="`${$route.path}?category=${item.category}`"
                                width="100"
                            >
                            {{item.category}}
                                <v-icon right>mdi-menu-right</v-icon>
                            </v-btn>
                            <v-chip
                            small
                            label
                            outlined
                            color="default"
                            class="mt-2 mr-2 mb-2"
                            v-for="tag in item.tags"
                            :key="tag" v-text="tag"></v-chip>
                        </v-row>
                    </v-card-text>
                </template>
            </v-card>
            <v-divider v-if="i < items.length -1 && $vuetify.breakpoint.xs" :key="i"/>
        </template>
    </div>
</template>
<script>
import DisplayTime from '@/components/display-time'
import DisplayUser from '@/components/display-user'
import DisplayTitle from '@/components/display-title'
import DisplayCount from '@/components/display-count'
import getSummary from '@/util/getSummary'
import addYoutubeIframe from '@/util/addYoutubeIframe'

export default {
  components: { DisplayTime, DisplayUser, DisplayTitle, DisplayCount },
  props: ['items', 'boardId', 'category'],
  data () {
    return {
      tuiOptions: {
        linkAttribute: {
          target: '_blank'
        }
      },
      getSummary
    }
  },
  computed: {
    fireUser () {
      return this.$store.state.fireUser
    }
  },
  methods: {
    read (item) {
      this.$router.push({ path: this.$route.path + '/' + item.id })
    },
    liked (item) {
      if (!this.fireUser) return false
      return item.likeUids.includes(this.fireUser.uid)
    },
    onViewerLoad (v) {
      addYoutubeIframe(v.preview.el, this.$vuetify.breakpoint)
    }
  }
}
</script>
해당 코드에서 눈여겨 볼 곳은
<viewer class="tui-dark" v-if="item.summary" :initialValue="item.summary" @load="onViewerLoad" :options="tuiOptions"></viewer>viewer을 불러오는 부분과 항상 궁금했던 ':options'의 정체이다.
data () {
    return {
      tuiOptions: {
        linkAttribute: {
          target: '_blank'
        }
      },
      getSummary
    }
  }
정말 별 거 없는 저 ':options'가 항상 찝찝했고, 궁금했는데 오늘에서야 쓸 데가 생긴 것이다.
우선 import를 여기서 진행한다.
그렇다. viewer와 editor import와 함께 써 있길래 난 엉뚱한 곳을 쑤신다고 시간을 내다 버리고, 스트레스를 양껏 받았다.
<script>
import DisplayTime from '@/components/display-time'
import DisplayUser from '@/components/display-user'
import DisplayTitle from '@/components/display-title'
import DisplayCount from '@/components/display-count'
import getSummary from '@/util/getSummary'
import addYoutubeIframe from '@/util/addYoutubeIframe'
이 줄 뒤에
<script>
import DisplayTime from '@/components/display-time'
import DisplayUser from '@/components/display-user'
import DisplayTitle from '@/components/display-title'
import DisplayCount from '@/components/display-count'
import getSummary from '@/util/getSummary'
import addYoutubeIframe from '@/util/addYoutubeIframe'
import tableMergedCell from '@toast-ui/editor-plugin-table-merged-cell'
plugin import를 위해 한 줄 추가 해 주고,
data () {
    return {
      tuiOptions: {
      plugins: [tableMergedCell],
        linkAttribute: {
          target: '_blank'
        }
      },
      getSummary
    }
  }
options에도 한 줄 추가 해 주면
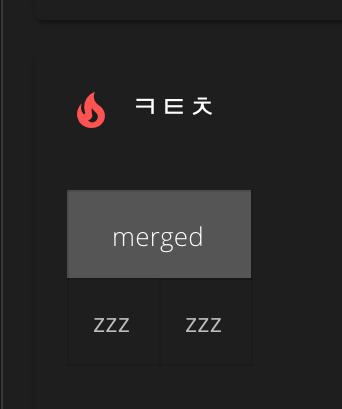
짜잔~ 셀 병합이 가능 해 졌다 :)
결론 & 사용하기
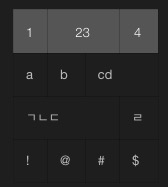
markdown 모드에서 작동하는 plugin이기 때문에 markdown문법으로 사용해야 한다.
| 1 | @cols=2:23 | 4 |
| --- | --- | --- | --- |
| a | b | @cols=2:cd |
| @cols=3:ㄱㄴㄷ | ㄹ |
| ! | @ | # | $ |
위와 같이
@cols='병합 칸 수':'내용'
의 문법으로 셀을 병합 할 수 있고, 결과는 다음과 같다.

편안~~~~~
Log
2021.07.23.
블로그 이전으로 인한 글 옮김 및 수정.
'프로젝트 > Chillog (Blog)' 카테고리의 다른 글
| Google 검색에 등록하기 (#1) (0) | 2021.07.23 |
|---|---|
| Toast UI Editor (tui editor) plugin 적용하기 (#2) (0) | 2021.07.23 |
| 왠진 모르겠지만 첨부한 사진이 날아가는 문제. (0) | 2021.07.23 |
| 운영하다보니 날 괴롭히는 editor 문제 (0) | 2021.07.23 |
| Firebase Hosting 도메인 연결 후 google authentication 인증 문제 (0) | 2021.07.22 |


