Tap Gesture
.onTapGesture
Apple Developer Documentation
developer.apple.com
struct TapGesture_Tutorials: View {
    @State private var tapCount = 0

    var body: some View {
        VStack {
            Text("\(tapCount)")
                .font(.system(size: 250))

            HStack {
                Image(systemName: "minus.circle")
                    .font(.system(size: 100))
                    .foregroundColor(.red)
                    .padding()
                    .onTapGesture {
                        tapCount -= 1
                    }

                Image(systemName: "plus.circle")
                    .font(.system(size: 100))
                    .foregroundColor(.blue)
                    .padding()
                    .onTapGesture {
                        tapCount += 1
                    }
            }
        }
    }
}
Image(systemName: "plus.circle")
    .font(.system(size: 100))
    .foregroundColor(.blue)
    .padding()
    .onTapGesture {
        tapCount += 1
    }
사용한 onTapGesture modifier는 적용하는 View가 TapGesture를 인식할 수 있도록 한다.
Image(systemName: "plus.circle")
    .font(.system(size: 100))
    .foregroundColor(.blue)
    .padding()
    .onTapGesture(count: 2) {
        tapCount += 1
    }
파라미터인 count를 지정해 이를 인식하기 위한 탭의 횟수를 지정할 수 있다.
기본값은 1이다.
.gesture
Apple Developer Documentation
developer.apple.com
Image(systemName: "minus.circle")
    .font(.system(size: 100))
    .foregroundColor(.red)
    .padding()
    .gesture(TapGesture().onEnded({ _ in
        tapCount -= 1
    }))
gesture modifier를 사용하면 동작 시점을 지정하는 등 조금 더 심화된 Gesture를 설정할 수 있다.
.gesture(TapGesture().onEnded({
    tapCount -= 1
}))
원하는 Gesture의 생성자를 전달하고, 동작 시점과 동작을 전달하면 된다.
자세한 내용은 아래와 같다.
Apple Developer Documentation
developer.apple.com
지금은 간단한 동작이라 별 문제가 없어 보이지만 가독성이 떨어지는 편이라 Gesture 자체는 따로 구성해 전달하는 것이 좋다.
struct TapGesture_Tutorials: View {
    @State private var tapCount = 0

    var tapToPlus: some Gesture {
        TapGesture()
            .onEnded {
                tapCount += 1
            }
    }

    var body: some View {
        VStack {
            Text("\(tapCount)")
                .font(.system(size: 250))

            HStack {
                Image(systemName: "minus.circle")
                    .font(.system(size: 100))
                    .foregroundColor(.red)
                    .padding()
                    .gesture(TapGesture().onEnded({ _ in
                        tapCount -= 1
                    }))

                Image(systemName: "plus.circle")
                    .font(.system(size: 100))
                    .foregroundColor(.blue)
                    .padding()
                    .gesture(tapToPlus)
            }
        }
    }
}
tapToPlus를 먼저 선언한 뒤 해당 Gesture를 gesture modifier에 전달하는 방식이다.
지금은 같은 코드 내에서 진행했지만 별도의 파일에서 구성해 전달하면 메인 코드는 훨씬 간결하고 깔끔하게 관리할 수 있다.
Gesture의 복수 적용
위의 내용 대로라면 Gesture를 여러 개 적용해 싱글 탭과 더블 탭을 동시에 지원하는 View를 구성하는 것도 당연히 가능하다.
다만 이런 경우 Gesture의 적용 순서에 주의해야 한다.
아래 코드는 간단한 예시다.
struct TapGesture_Tutorials: View {
    @State private var tapCount = 0

    var tapToPlus: some Gesture {
        TapGesture()
            .onEnded {
                tapCount += 1
            }
    }

    var tapToJumpPlus: some Gesture {
        TapGesture(count: 2)
            .onEnded {
                tapCount += 10
            }
    }

    var body: some View {
        VStack {
            Text("\(tapCount)")
                .font(.system(size: 250))

            HStack {
                Image(systemName: "minus.circle")
                    .font(.system(size: 100))
                    .foregroundColor(.red)
                    .padding()
                    .gesture(TapGesture().onEnded({ _ in
                        tapCount -= 1
                    }))

                Image(systemName: "plus.circle")
                    .font(.system(size: 100))
                    .foregroundColor(.blue)
                    .padding()
                    .gesture(tapToPlus)
                    .gesture(tapToJumpPlus)
            }
        }
    }
}
더블 탭을 아무리 해 봐도 미리 작성해 놓은 tapCount가 10으로 한 번에 증가하는 일은 없다.
이는 더블 탭이 인식되기 전에 싱글 탭이 먼저 인식돼 처리가 완료되기 때문인데,
둘의 적용 순서를 바꿔 주면 간단히 해결할 수 있다.
struct TapGesture_Tutorials: View {
    @State private var tapCount = 0

    var tapToPlus: some Gesture {
        TapGesture()
            .onEnded {
                tapCount += 1
            }
    }

    var tapToJumpPlus: some Gesture {
        TapGesture(count: 2)
            .onEnded {
                tapCount += 10
            }
    }

    var body: some View {
        VStack {
            Text("\(tapCount)")
                .font(.system(size: 250))

            HStack {
                Image(systemName: "minus.circle")
                    .font(.system(size: 100))
                    .foregroundColor(.red)
                    .padding()
                    .gesture(TapGesture().onEnded({ _ in
                        tapCount -= 1
                    }))

                Image(systemName: "plus.circle")
                    .font(.system(size: 100))
                    .foregroundColor(.blue)
                    .padding()
                    .gesture(tapToJumpPlus)
                    .gesture(tapToPlus)
            }
        }
    }
}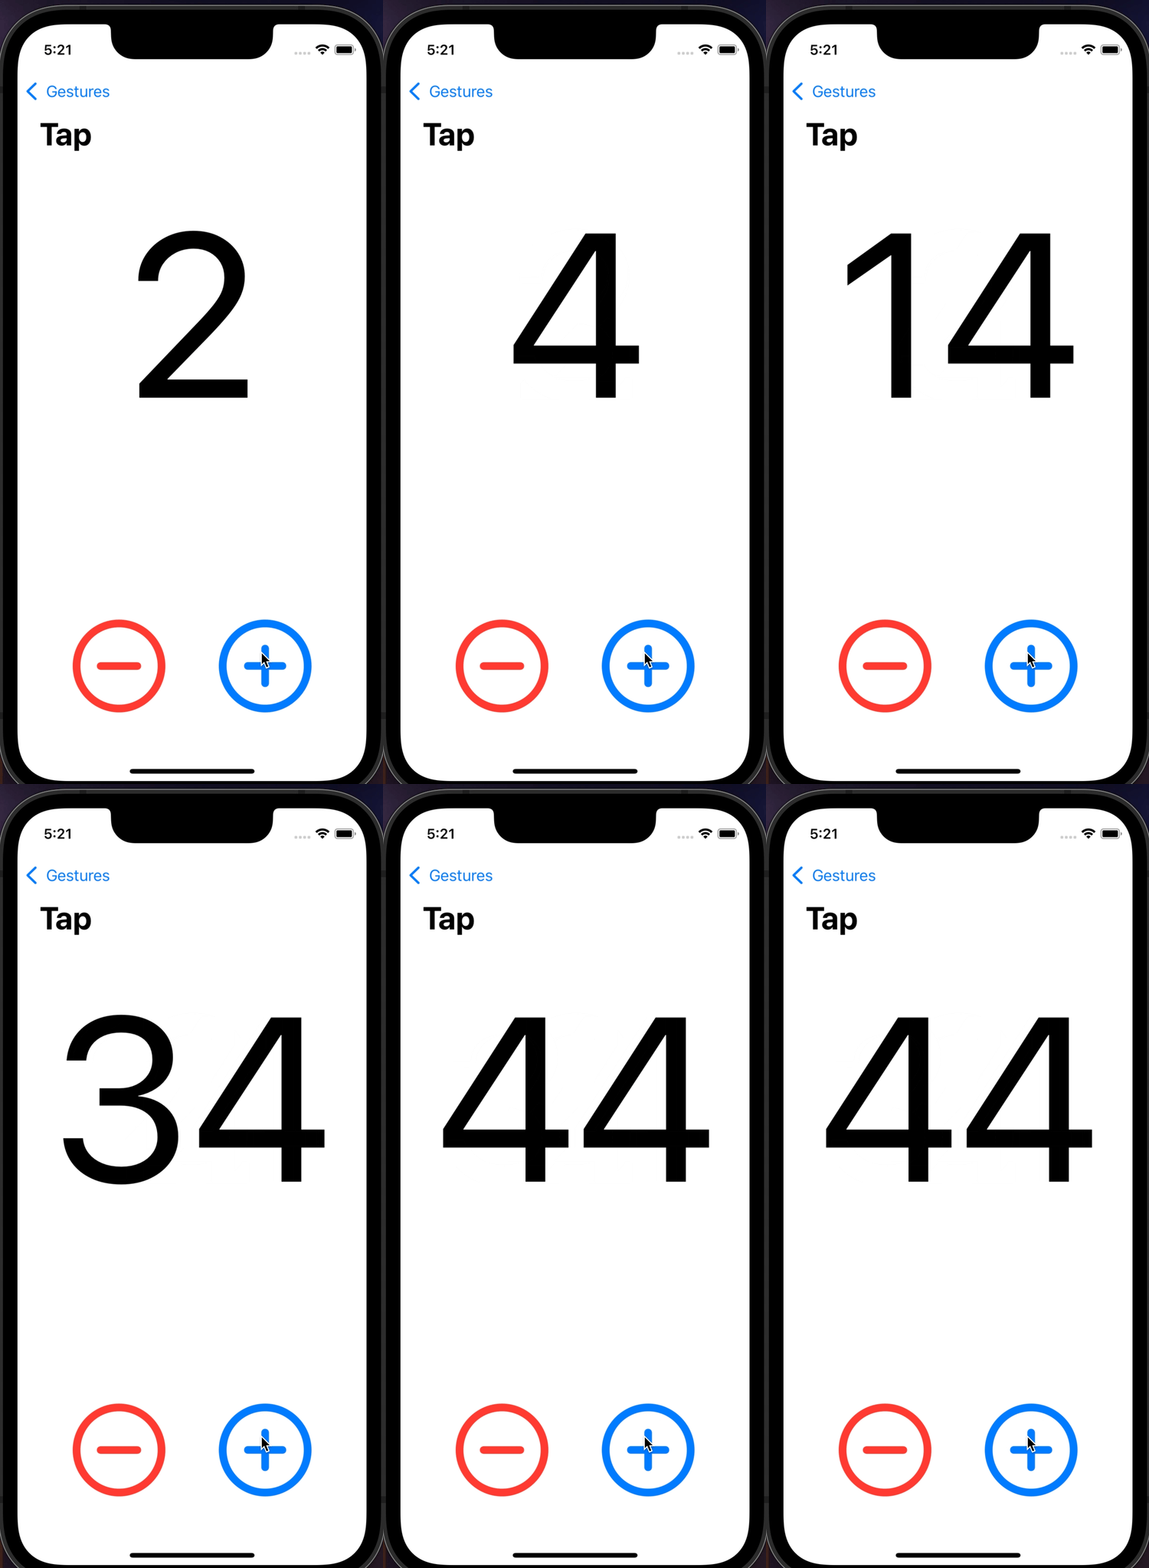
반응이 조금 느리지만 두 Gesture가 모두 인식되는 걸 확인할 수 있다.
이러한 문제 때문에 가능하긴 하더라도 하나만 사용하는 것이 사용성에서나 문제가 발생할 가능성으로 보나 더 좋은 선택이 된다.
LongPressGesture
Apple Developer Documentation
developer.apple.com
struct LongPressGesture_Tutorials: View {
    @State private var showOriginal = true

    var body: some View {
        Image("swiftui-logo")
            .resizable()
            .aspectRatio(contentMode: .fit)
            .frame(width: 200, height: 200)
            .blur(radius: showOriginal ? 0.0 : 40.0)
            .animation(.easeInOut, value: showOriginal)
            .onLongPressGesture(minimumDuration: 0.5, maximumDistance: 10) {
                showOriginal.toggle()
            } onPressingChanged: { press in
                print(press)
            }
    }
}

사용하는 파라미터는 다음과 같다.
- minimumDuration
Gesture를 인식하는데 필요한 시간 - MaximumDistance
Gesture를 판단하기 위한 인식 오차
일정 범위를 벗어나게 되면 LongPress로 인식하지 않는다. - action
동작 - onPressingChange
상태 값
인식되는 순간 true를 전달하고 바로 false로 변경된다.
LongPress도 다음과 같이 별도로 Gesture 코드를 분리할 수 있다.
var longPress: some Gesture {
    LongPressGesture()
        .onEnded { _ in
            showOriginal.toggle()
        }
}
DragGesture
구현 자체가 복잡하기 때문에 기본으로 제공하는 modifier가 존재하지 않는다.
Apple Developer Documentation
developer.apple.com
사용하는 파라미터는 다음과 같다.
- minimumDistance
Gesture 인식에 필요한 최소 이동 거리 - coordinateSpace
좌표체계 방식으로 Gesture가 적용된 View의 좌표를 사용하는 local과 화면 전체를 사용하는 global이 있다.
var dragGesture: some Gesture {
    DragGesture()
        .onChanged { value in
            currentState = value.translation
        }
        .onEnded { _ in

        }
}
DragGesture는 View가 이동한다는 특징이 있다.
Gesture가 진행되는 동안 onChanged로 좌표가 전달되고,
Gesture가 끝나면 onEnded로 좌표가 전달된다.
이러한 변화를 Translation이라고 한다.
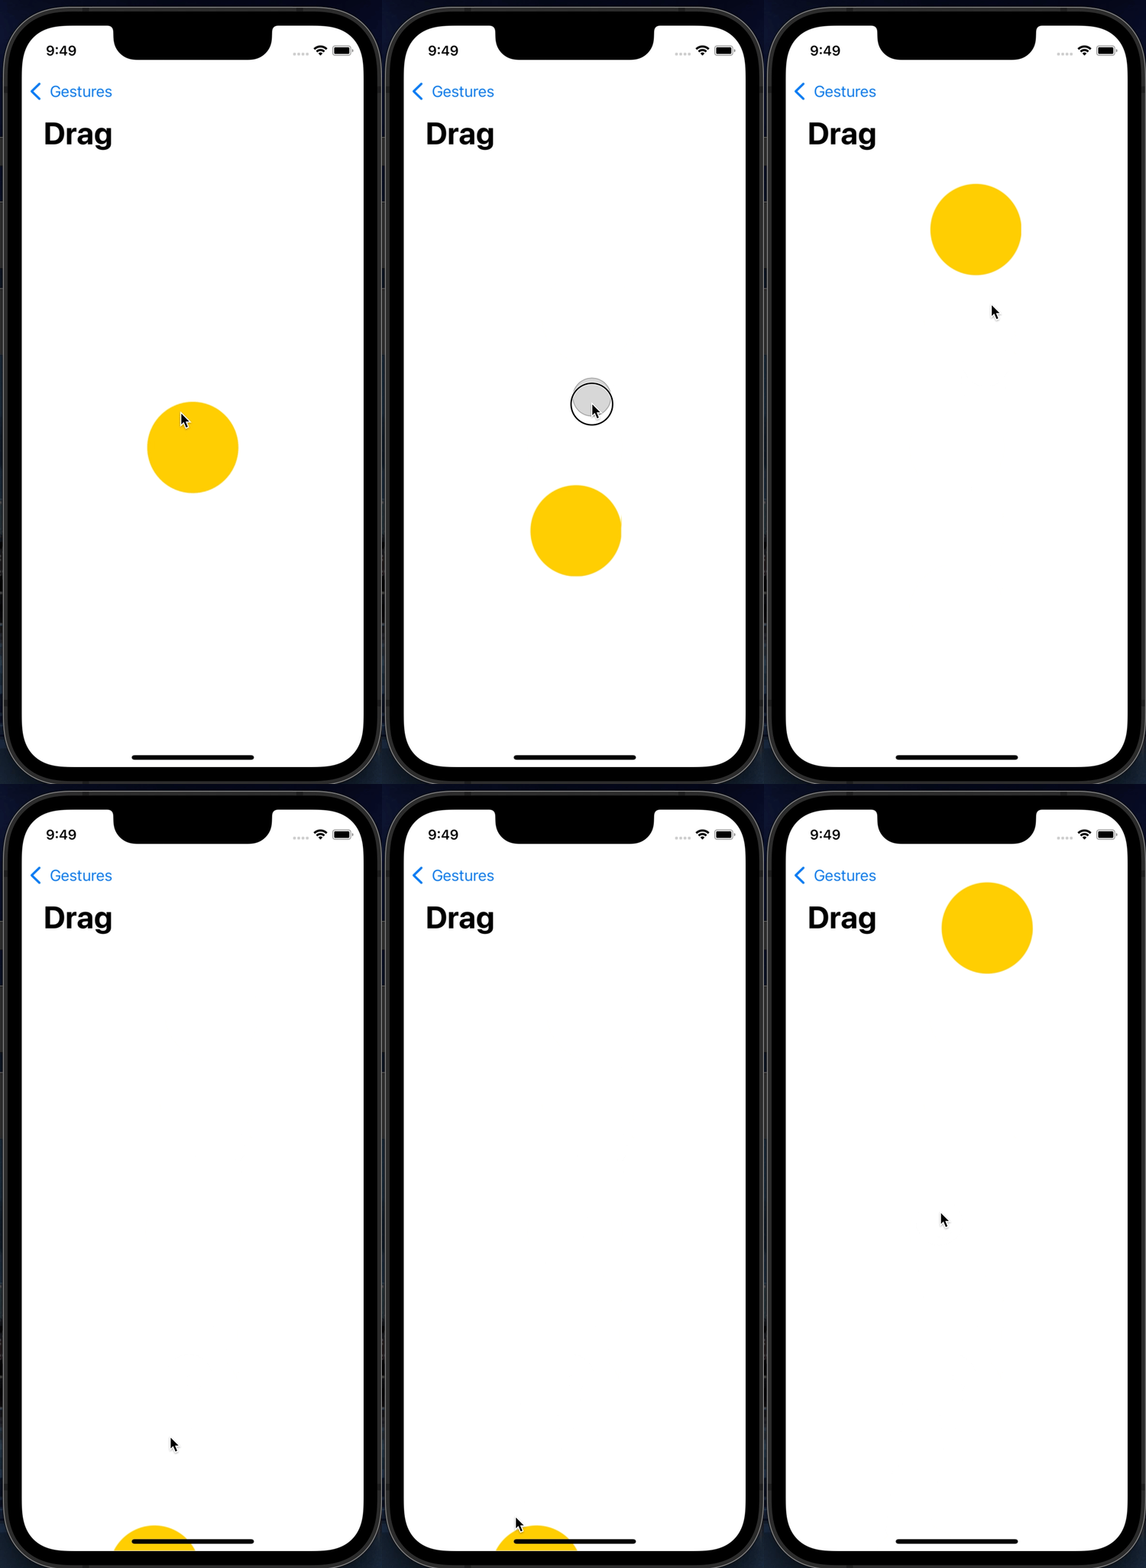
onChange에서 offset에 좌표를 계속 더하기 때문에 첫 번째 Gesture를 제외하고는 정상적인 동작을 하지 않는다.
var dragGesture: some Gesture {
    DragGesture()
        .onChanged { value in
            currentState = value.translation
        }
        .onEnded { value in
            currentState = .zero
        }
}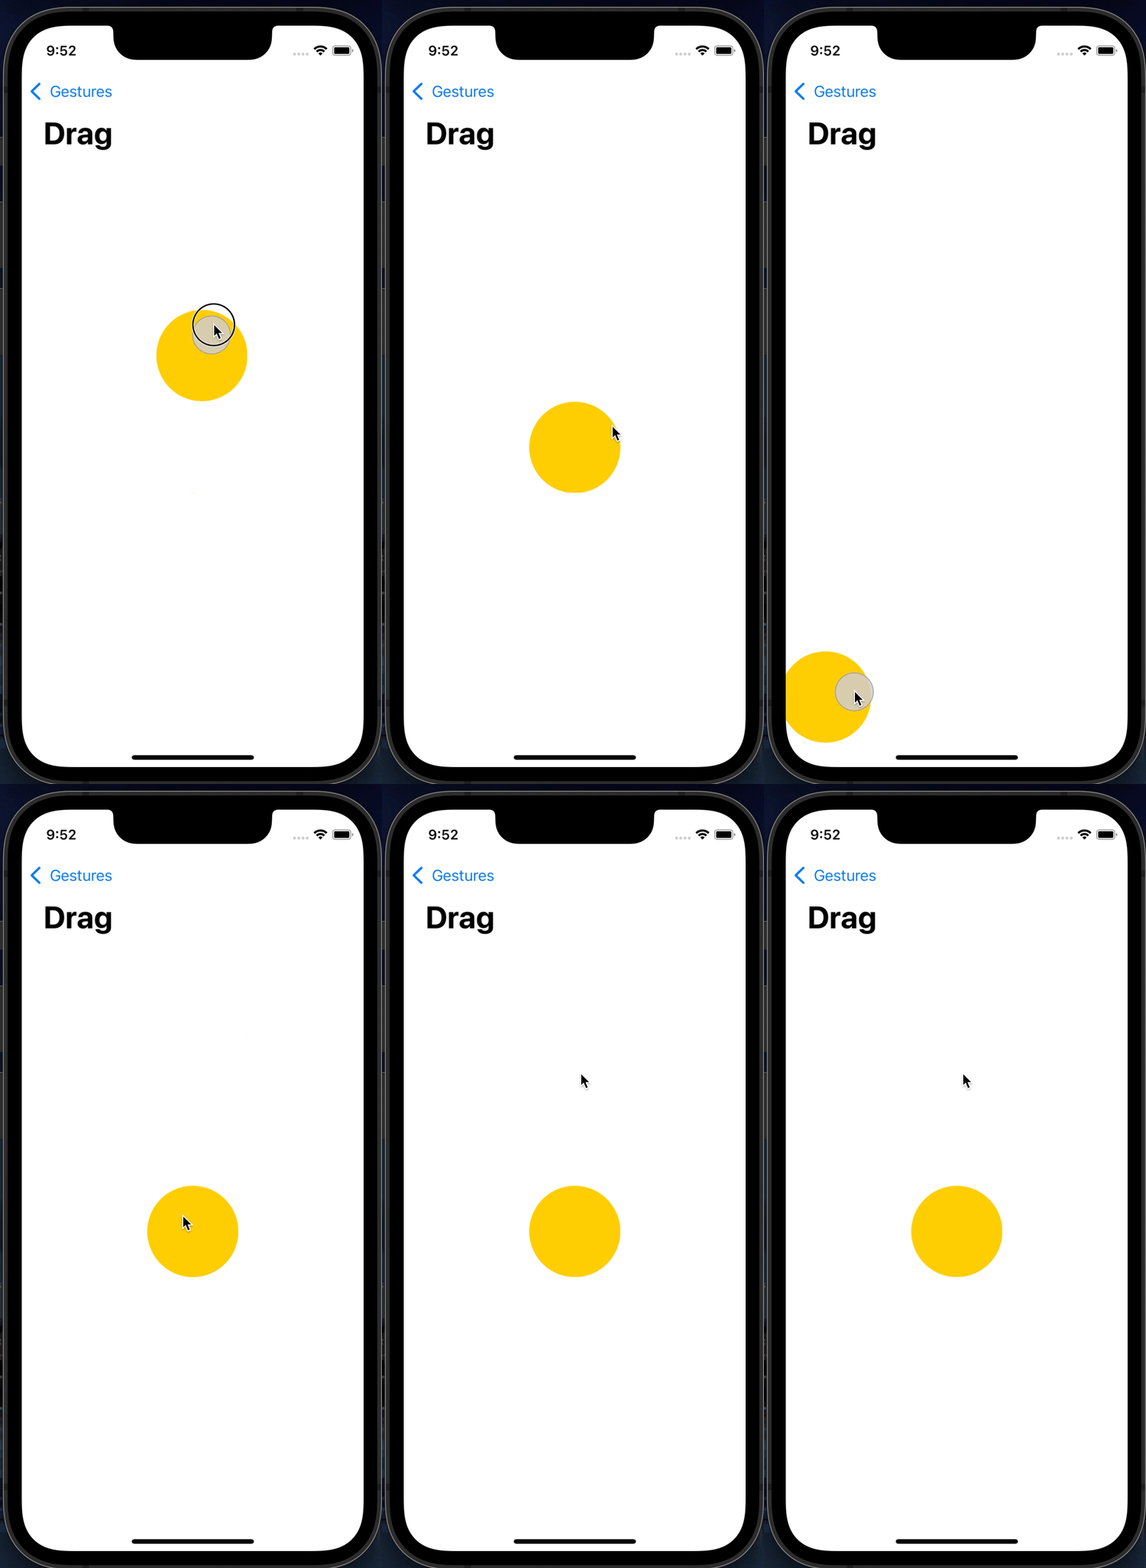
따라서 Gesture가 끝났을 때 좌표를 초기화해 주는 과정이 필요하다.
이렇게 되면 Drag 종료 시 원래의 위치로 돌아오고, 다음 Gesture도 정상적으로 작동한다.
다만 원상 복귀하는 것이 아니라 이동한 위치를 기억하도록 구현한다면 변수 두 개를 사용해
최종 위치를 누적하고, 이동 거리는 초기화하도록 구현하는 방식을 사용한다.
struct DragGesture_Tutorials: View {
    @State private var currentState = CGSize.zero
    @State private var finalState = CGSize.zero

    var dragGesture: some Gesture {
        DragGesture()
            .onChanged { value in
                currentState = value.translation
            }
            .onEnded { value in
                currentState = .zero

                var coordinate = finalState
                coordinate.width += value.translation.width
                coordinate.height += value.translation.height
                finalState = coordinate
            }
    }

    var body: some View {
        VStack {
            Circle()
                .foregroundColor(.yellow)
                .frame(width: 100, height: 100)
                .offset(finalState)
                .offset(currentState)
                .gesture(dragGesture)
        }
    }
}
Gesture가 끝날 때마다 사용한 transition은 초기화시켜 주고,
View의 offset을 현재 좌표에 transition을 합친 곳으로 옮겨 준다.
구현 시 offset과 gesture의 적용 순서에 주의해 gesture가 가능한 마지막에 위치할 수 있도록 한다.
매번 이렇게 번거로운 방식으로 구현하지 않도록 특수한 변수를 사용하는 방법도 존재한다.
struct DragGesture_Tutorials: View {
    @GestureState private var currentState = CGSize.zero
    @State private var finalState = CGSize.zero

    var dragGesture: some Gesture {
        DragGesture()
            .updating($currentState, body: { value, state, transaction in
                state = value.translation
            })
            .onEnded { value in
                var coordinate = finalState
                coordinate.width += value.translation.width
                coordinate.height += value.translation.height
                finalState = coordinate
            }
    }

    var body: some View {
        VStack {
            Circle()
                .foregroundColor(.yellow)
                .frame(width: 100, height: 100)
                .offset(finalState)
                .offset(currentState)
                .gesture(dragGesture)
        }
    }
}
updating에 binding으로 전달된 변수는 Gesutre가 끝나는 시점에 기본 값으로 초기화된다.
즉, onEnded의 초기화 코드가 필요 없어진다는 장점이 있다.
단, 이 경우 읽기 전용 속성이 되기 때문에 직접 업데이트할 수 있는 방법이 사라짐을 기억해야 한다.
closure에 전달되는 변수는 다음과 같다.
- value
상태 - state
바인딩 변수 - transaction
부가정보
Magnification Gesture
Apple Developer Documentation
developer.apple.com
struct MagnificationGesture_Tutorials: View {
    @State private var currentScale: CGFloat = 1.0
    @State private var finalScale: CGFloat = 1.0

    var magGesture: some Gesture {
        MagnificationGesture()
            .onChanged { value in
                let tValue = value / currentScale
                currentScale = value

                finalScale *= tValue
            }
            .onEnded { _ in
                currentScale = 1.0
            }
    }

    var body: some View {
        Image("swiftui-logo")
            .resizable()
            .aspectRatio(contentMode: .fit)
            .frame(width: 200, height: 200)
            .scaleEffect(finalScale)
            .gesture(magGesture)
    }
}
구현 패턴은 Drag Gesture와 동일하다.
두 개의 변수로 Gesture가 변화시키는 값의 초기화와 최종 크기의 적용이 중요하다.
크기 적용에는 CGFloat 형식의 scaleEffect가 사용된다.
Rotation Gesture
Apple Developer Documentation
developer.apple.com
struct RotationGesture_Tutorials: View {
    @State private var currentAngle: Angle = .degrees(0)
    @State private var finalAngle: Angle = .degrees(0)

    var rotGesture: some Gesture {
        RotationGesture()
            .onChanged { value in
                let vAngle = value - currentAngle
                currentAngle = value

                finalAngle += vAngle
            }
            .onEnded { _ in
                currentAngle = .degrees(0)
            }
    }

    var body: some View {
        Image("swiftui-logo")
            .resizable()
            .aspectRatio(contentMode: .fit)
            .frame(width: 200, height: 200)
            .rotationEffect(finalAngle)
            .gesture(rotGesture)
    }
}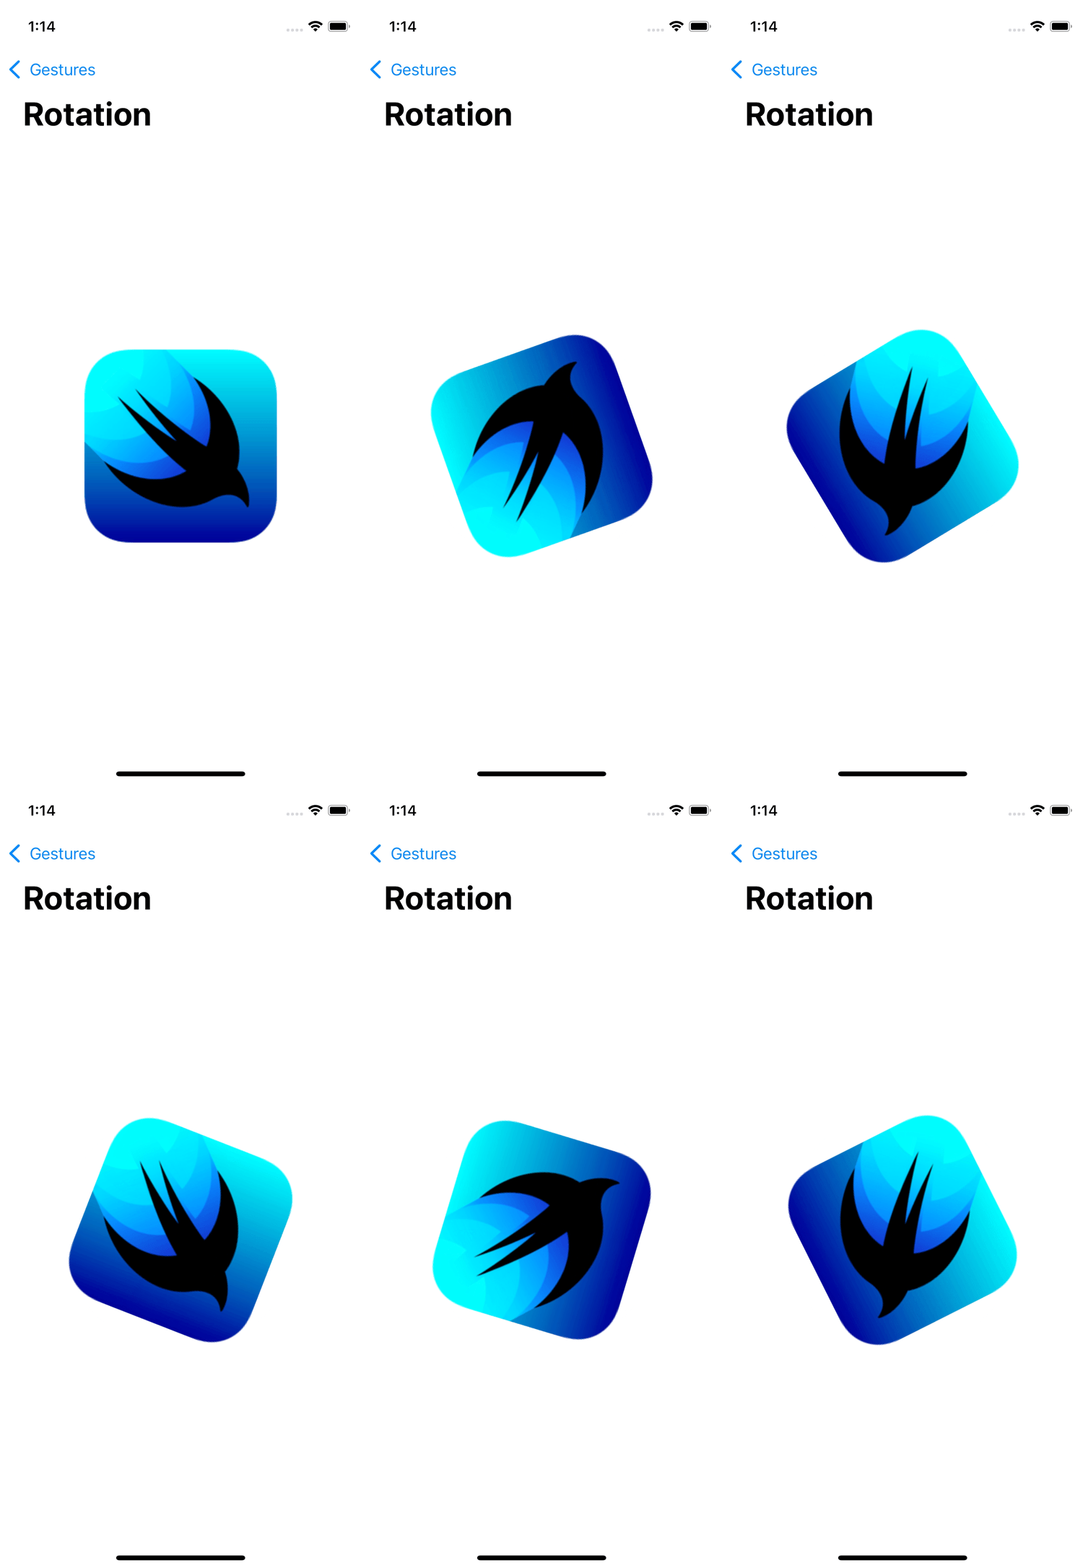
Drag Gesture와 Magnification Gesture와 같은 패턴으로 구현한다.
효과 적용에는 Angle 형식의 rotationEffect가 사용된다.
Sequence Gesture
Apple Developer Documentation
developer.apple.com
struct SequenceGesture_Tutorials: View {
    @ObservedObject var longPress = LongPress()
    @ObservedObject var drag = Drag()

    var sequenceGesture: some Gesture {
        SequenceGesture(longPress.gesture, drag.gesture)
            .onEnded { _ in
                longPress.activated = false
            }
    }

    var body: some View {
        VStack {
            HStack(spacing: 50) {
                Label("Long Press", systemImage: "circle.fill")
                    .foregroundColor(longPress.activated ? Color.green : Color.gray)

                Label("Drag", systemImage: "circle.fill")
                    .foregroundColor(drag.activated ? Color.green : Color.gray)
            }
            .padding()

            VStack {
                Circle()
                    .foregroundColor(.yellow)
                    .frame(width: 100, height: 100)
                    .offset(drag.currentTranslation)
                    .offset(drag.totalTranslation)
                    .gesture(sequenceGesture)

            }
            .frame(maxWidth: .infinity, maxHeight: .infinity)
        }
    }
}
Sequence Gesture는 복수의 Gesture를 연속으로 사용할 수 있도록 한다.
예시는 LongPress Gesture와 Drag Gesture를 연속해서 사용하도록 구성한 Sequence Gesture다.
첫 번째 파라미터로 트리거가 될 Gesture를 전달하고, 두 번째 파라미터로 대상이 될 Gesture를 전달한다.
class Drag: ObservableObject {
    @Published var currentTranslation = CGSize.zero
    @Published var totalTranslation = CGSize.zero
    @Published var activated = false

    var gesture: some Gesture {
        DragGesture()
            .onChanged { value in
                self.currentTranslation = value.translation
                self.activated = true
            }
            .onEnded { value in
                self.activated = false
                self.currentTranslation = .zero
                self.totalTranslation.width += value.translation.width
                self.totalTranslation.height += value.translation.height
            }
    }
}
class LongPress: ObservableObject {
@Published var activated = false
var gesture: some Gesture {
LongPressGesture()
.onChanged { _ in self.activated = false }
.onEnded { _ in self.activated = true }
}
}호출된 LongPress Gesture와 Drag Gesture의 안에는 각각의 activated 변수가 존재하고,
Sequence Gesture는 이를 사용해 상황에 따라 해당 속성을 toggle 해 가며 전환하는 방식으로 동작한다.

LongPress가 인식되지 않으면 Drag가 동작하지 않는 것을 확인할 수 있다.
Simultaneous Gesture
Apple Developer Documentation
developer.apple.com
struct SimultaneousGesture_Tutorials: View {
    @ObservedObject var rotation = Rotation()
    @ObservedObject var magnification = Magnification()

    var simul: some Gesture {
        SimultaneousGesture(rotation.gesture, magnification.gesture)
    }

    var body: some View {
        VStack {
            Image("swiftui-logo")
                .resizable()
                .aspectRatio(contentMode: .fit)
                .frame(width: 200, height: 200)
                .rotationEffect(rotation.finalAngle)
                .scaleEffect(magnification.finalScale)
                .gesture(simul)
        }
    }
}
Simultaneous Gesture는 복수의 Gesture를 동시에 사용할 수 있도록 구성한다.
위의 코드는 Magnification Gesture와 Rotation Gesture를 동시에 사용하도록 구성한 것으로,
파라미터로 동시에 사용할 Gesture를 전달하면 된다.

Exclusive Gesture
Apple Developer Documentation
developer.apple.com
Apple Developer Documentation
developer.apple.com
struct ExclusiveGesture_Tutorials: View {
    @ObservedObject var rotation = Rotation()
    @ObservedObject var magnification = Magnification()
    @State private var currentGestureType = GestureType.rotation

    var gestures: some Gesture {
        ExclusiveGesture(rotation.gesture, magnification.gesture)
    }

    var logo: some View {
        Image("swiftui-logo")
            .resizable()
            .aspectRatio(contentMode: .fit)
            .frame(width: 200, height: 200)
    }

    var body: some View {
        VStack {
            VStack {
                if currentGestureType == .rotation {
                    logo
                        .rotationEffect(rotation.finalAngle)
                        .scaleEffect(magnification.finalScale)
                        .gesture(gestures)
                } else {
                    logo
                        .rotationEffect(rotation.finalAngle)
                        .scaleEffect(magnification.finalScale)
                        .gesture(magnification.gesture.exclusively(before: rotation.gesture))
                }
            }
            .frame(maxWidth: .infinity, maxHeight: .infinity)

            ExclusiveGestureMenu(currentGestureType: $currentGestureType)
        }
    }
}
파라미터 before에 전달된 Gesture를 무시하고 Magnification만 동작한다.
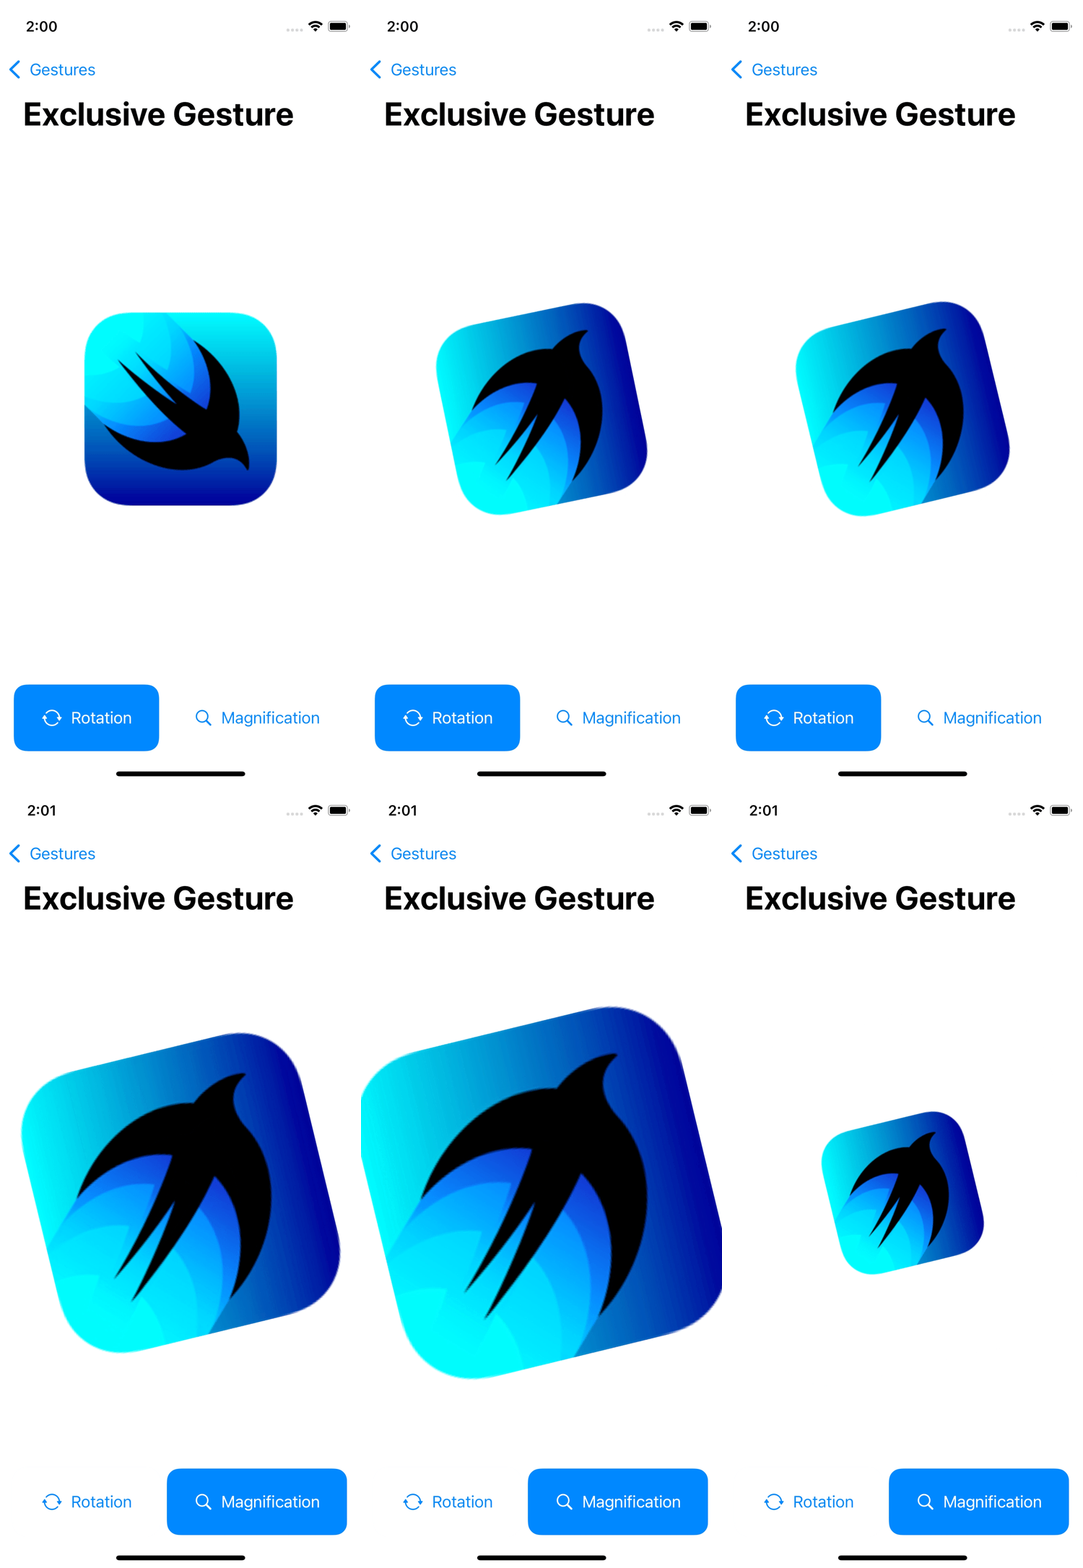
조건에 따라 적용할 Gesture를 결정할 수 있는 Gesture다.
다른 Gesture들과는 다르게 modifier로 구현하는 것이 조금 더 간단하다.
사용 빈도는 낮다.
'학습 노트 > Swift UI (2022)' 카테고리의 다른 글
| 32. CoreData #2 (0) | 2022.11.17 |
|---|---|
| 31. CoreData #1 (0) | 2022.11.16 |
| 29. List의 부가 기능 구현하기 (0) | 2022.11.10 |
| 28. ForEach & Grid (0) | 2022.11.09 |
| 27. List #2 (0) | 2022.11.09 |


