Alert
SwiftUI로 Alert를 표시하는 데에는 준비물이 하나 필요하다.
struct View_Alert: View {
   @State private var result = ""
   @State private var alertStat = false


   var body: some View {
      VStack {
         Text(result)
            .font(.largeTitle)

         Button(action: {
         }, label: {
            Text("Show Alert")
         })
         .padding()
      }
   }
}
바로 State Variable로 위의 코드에서는 alertStat이라는 이름을 가진다.
alert은 해당 변수를 조작하여 자신의 상태를 변경하는데 사용하기 때문에 반드시 필요하다.
struct View_Alert: View {
   @State private var result = ""
   @State private var alertStat = false


   var body: some View {
      VStack {
         Text(result)
            .font(.largeTitle)

         Button(action: {
             alertStat = true
         }, label: {
            Text("Show Alert")
         })
         .padding()
      }
   }
}
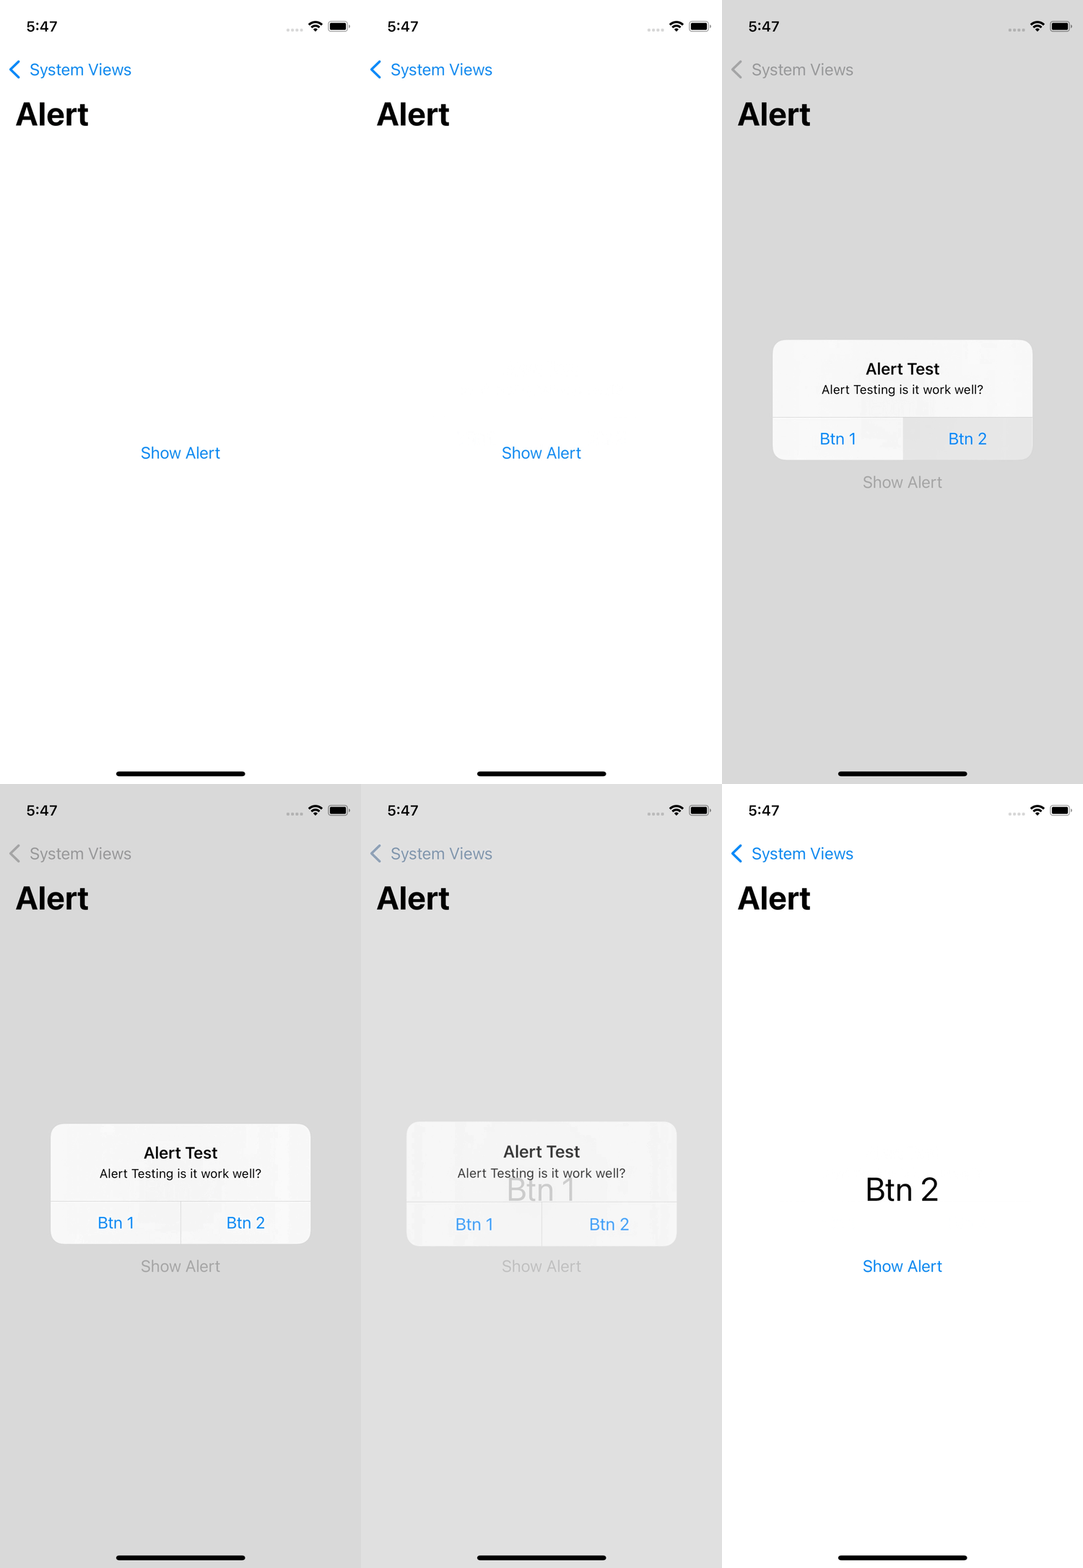
버튼을 누르면 alertStat 변수를 true로 변경해 alert를 표시할 수 있도록 한다.
struct View_Alert: View {
   @State private var result = ""
   @State private var alertStat = false


   var body: some View {
      VStack {
         Text(result)
            .font(.largeTitle)

         Button(action: {
             alertStat = true
         }, label: {
            Text("Show Alert")
         })
         .padding()
         .alert("Alert Test", isPresented: $alertStat) {
             Button {
                 result = "Btn 1"
             } label: {
                 Text("Btn 1")
             }

             Button {
                 result = "Btn 2"
             } label: {
                 Text("Btn 2")
             }

         } message: {
             Text("Alert Testing is it work well?")
         }
      }
   }
}
이후 '.alert' modifier를 추가하고 alert를 구성하면 된다.
생성자의 파라미터는 다음과 같다.
.alert
Apple Developer Documentation
developer.apple.com
- title
alert의 제목 - ispresented
alert의 상태 변수 (@State)
State variable를 전달할 때는 '$'를 접두에 붙여 전달한다. - actions
Button 구성 - message
alert에 표시하는 메세지 - data
전달할 데이터
필요한 경우 선택적으로 사용한다.

VStak에 가장 처음 Embed 된 Text는 비어있는 문자열의 result를 출력하고 있다가,
alert의 Button의 event에 의해 Text가 업데이트되면 이를 출력한다.
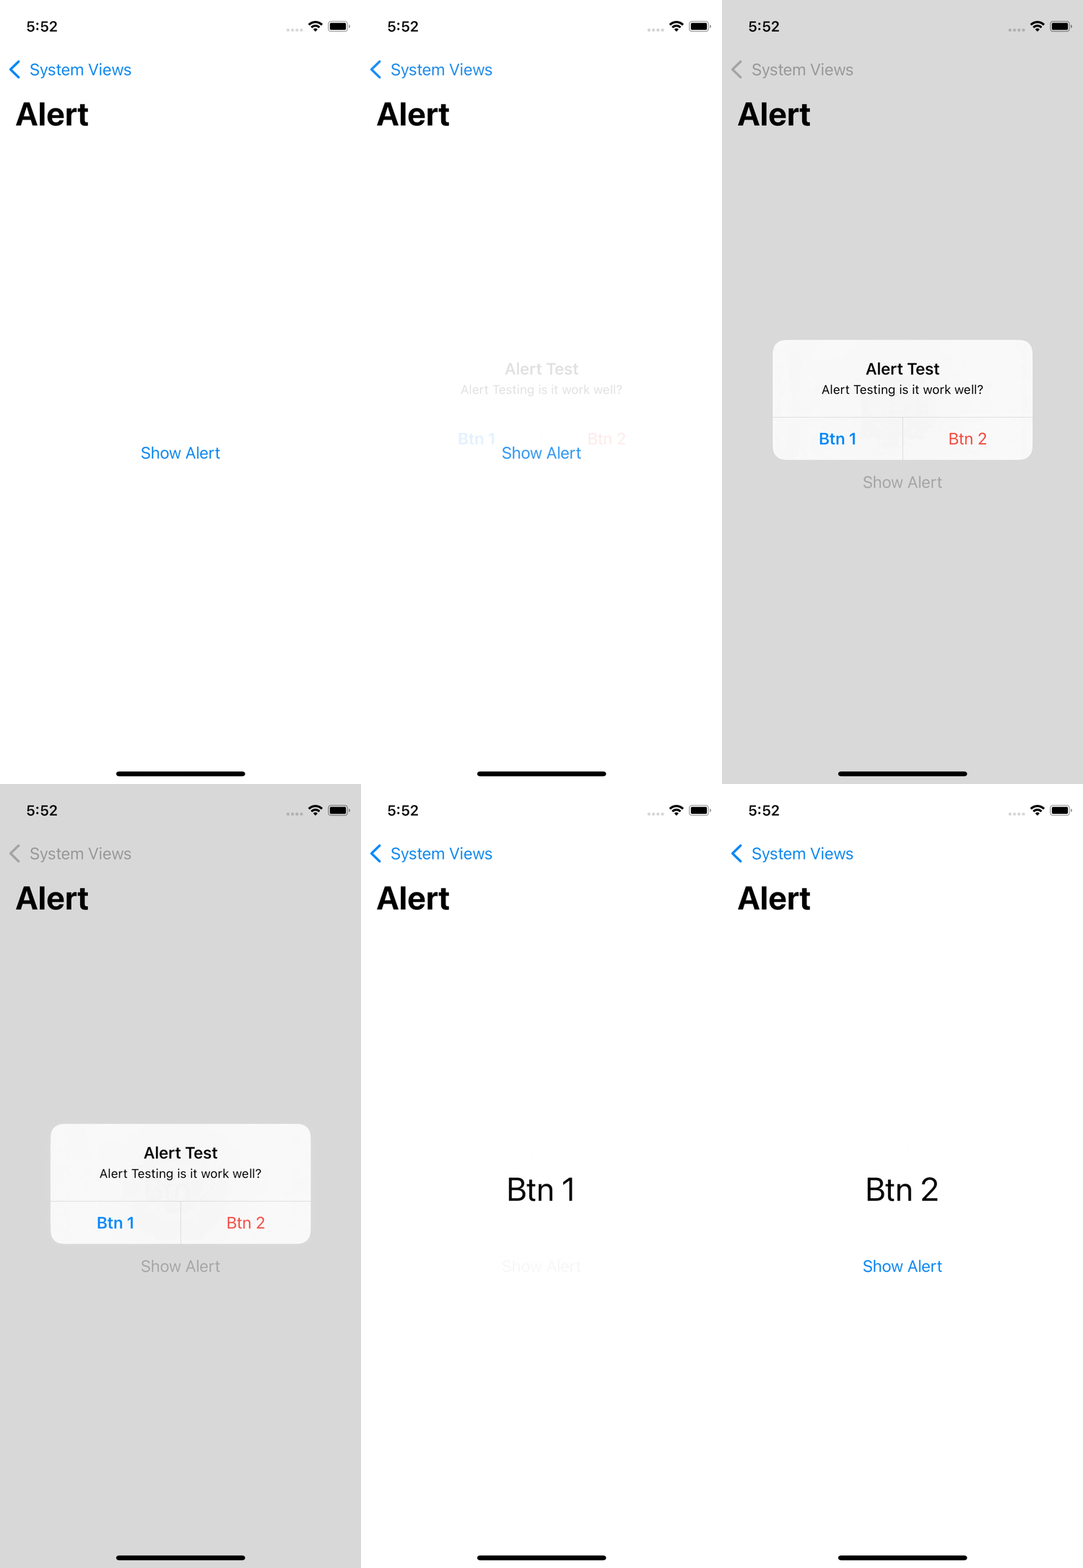
alert의 button을 구성할 때 파라미터의 role을 변경하게 되면 해당하는 스타일로 자동 적용된다.
struct View_Alert: View {
   @State private var result = ""
   @State private var alertStat = false


   var body: some View {
      VStack {
         Text(result)
            .font(.largeTitle)

         Button(action: {
             alertStat = true
         }, label: {
            Text("Show Alert")
         })
         .padding()
         .alert("Alert Test", isPresented: $alertStat) {
             Button(role: .cancel) {
                 result = "Btn 1"
             } label: {
                 Text("Btn 1")
             }

             Button(role: .destructive) {
                 result = "Btn 2"
             } label: {
                 Text("Btn 2")
             }

         } message: {
             Text("Alert Testing is it work well?")
         }
      }
   }
}
alert는 modifier 중에서도 특이하게 위치의 제약이 없다.
- trigger
- 최상위 Container
- alert가 발생하는 view
- 관련 데이터를 표시하는 view
어느 곳에 사용해도 동일한 결과를 보여준다.
alert를 다수 사용하는 경우 State Variable이 중복되지 않도록 주의해야 한다.
Confirmation Dialog
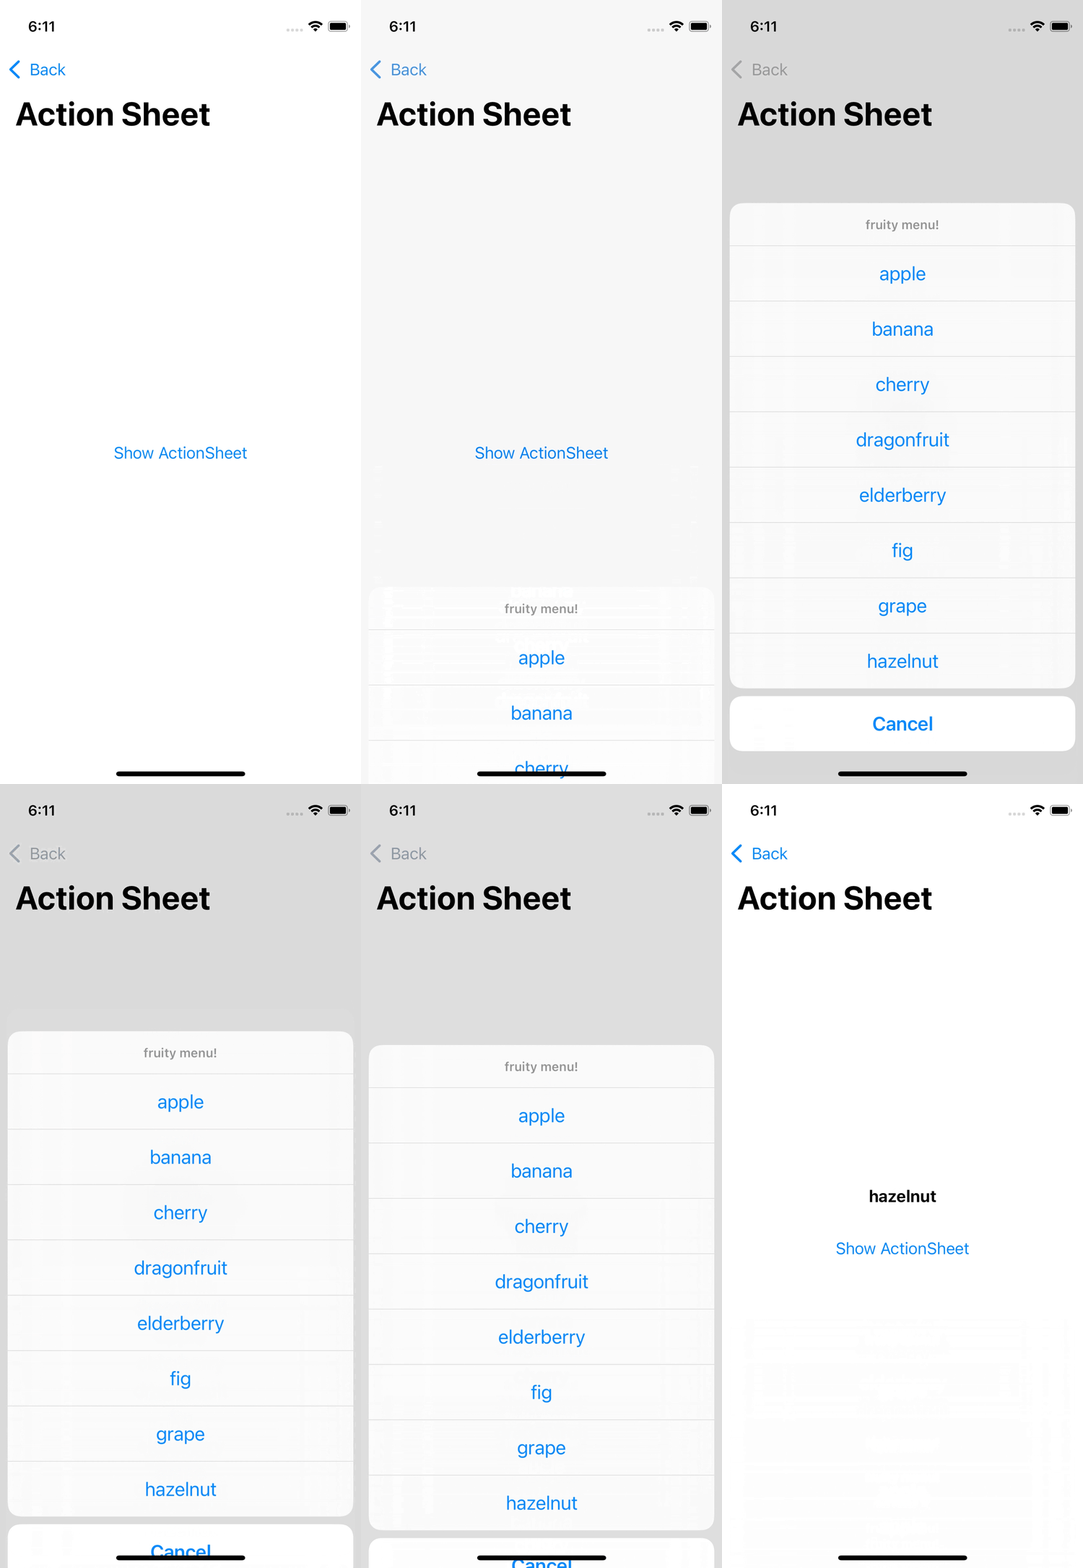
Confirmation Dialog는 Action Sheet라고도 불린다.
구현 방식은 alert와 유사하다.
생성자 파라미터는 다음과 같다.
- title
제목 - isPresented
Confirmation Dialog의 상태 변수 - titleVisibility
제목 표시 방식 - action
Button 구성 - message
출력 Text
struct View_ActionSheet: View {
    @State private var result = ""
    @State private var dialogState = false

   var body: some View {
      VStack {
         Text(result)
              .fontWeight(.bold)

         Button(action: {
            dialogState = true
         }, label: {
            Text("Show ActionSheet")
         })
         .padding()
         .confirmationDialog("Dialog", isPresented: $dialogState) {
             Button {
                 result = "apple"
             } label: {
                 Text("apple")
             }
             Button {
                 result = "banana"
             } label: {
                 Text("banana")
             }
             Button {
                 result = "cherry"
             } label: {
                 Text("cherry")
             }
             Button {
                 result = "dragonfruit"
             } label: {
                 Text("dragonfruit")
             }
             Button {
                 result = "elderberry"
             } label: {
                 Text("elderberry")
             }
             Button {
                 result = "fig"
             } label: {
                 Text("fig")
             }
             Button {
                 result = "grape"
             } label: {
                 Text("grape")
             }
             Button {
                 result = "hazelnut"
             } label: {
                 Text("hazelnut")
             }

         } message: {
             Text("fruity menu!")
         }
      }
   }
}
alert와 동일하게 State Variable을 하나 선언하고 이를 전달해 주면 된다.

Foreach로 Confirmation Dialog 개선하기
Confirmation Dialog는 그 태생상 코드가 복잡해질 수밖에 없다.
가능하다면 ForEach를 사용해 코드를 간단하게 구성하는 것도 가능하다.
struct View_ActionSheet: View {
    @State private var result = ""
    @State private var dialogState = false
    private let menu: [String] = ["apple", "banana", "cherry", "dragonfruit", "elderberry", "fig", "grape", "hazelnut"]


   var body: some View {
      VStack {
         Text(result)
              .fontWeight(.bold)

         Button(action: {
            dialogState = true
         }, label: {
            Text("Show ActionSheet")
         })
         .padding()
         .confirmationDialog("Dialog", isPresented: $dialogState) {
             ForEach(menu, id: \.self) { data in
                 Button {
                     result = data
                 } label: {
                     Text(data)
                 }
             }
         } message: {
             Text("fruity menu!")
         }
      }
   }
}
코드는 매우 간단해졌지만 결과는 동일하다.
'학습 노트 > Swift UI (2022)' 카테고리의 다른 글
| 12. Text (0) | 2022.09.28 |
|---|---|
| 10 ~ 11. Sheet / FullScreenCover & Popover (0) | 2022.09.26 |
| 07. Overlay (0) | 2022.09.22 |
| 05 ~ 06. Scroll View & Form (0) | 2022.09.22 |
| 03 ~ 04. Spacer & Group (0) | 2022.09.22 |


